The routers of INSYS icom can act as OpenVPN server and/or establish connections to an OpenVPN server as OpenVPN client.
This Configuration Guide shows how to configure an INSYS icom router as OpenVPN server.
The description in this Configuration Guide follows a configuration in the new user interface (web interface) available from icom OS 5.5. Update your router to the latest version of icom OS for the required functionality of the new user interface. The description of this configuration in the classic web interface is available in this Configuration Guide.
Situation
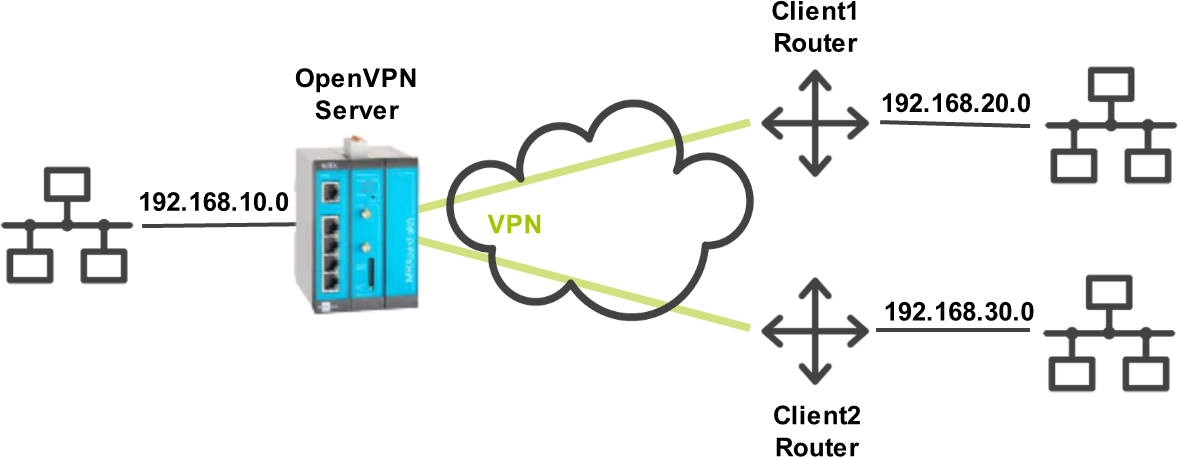
The router shall be configured as a server for an OpenVPN network with two clients. The OpenVPN server has the local network 192.168.10.0/24 in this example. The OpenVPN client with the Common Name Client1 has the local network 192.168.20.0/24 and the OpenVPN client with the Common Name Client2 has the local network 192.168.30.0/24.
Solution
The Startup wizard of the router permits to prepare an optional OpenVPN connection besides the configuration of Internet access. The necessary certificate structure must be generated in advance. The Configuration Guide for Creating a Certificate Structure Using XCA provides instructions for this.
The following certificates and keys are necessary:
| File | Upload to | secret | Common Name for this example |
|---|---|---|---|
CA certificate |
Server, clients |
No |
|
CA key |
– |
Yes [1] |
|
Server certificate |
Server |
No |
Server |
Server key |
Server |
Yes |
|
Client certificate (separate for each client) |
Client |
No |
Client1, Client2 |
Client key (separate for each client) |
Client |
Yes |
We act on the assumption that the router is in default settings for the following proceeding.
|
|
If you configure an OpenVPN server on your router, you make its network accessible from the outside. Even if an OpenVPN network allows a high degree of security, it may pose a security vulnerability in case of an inadequate configuration. The following proceeding provides assistance for the easy configuration of a server for an OpenVPN network. You are solely responsible for the protection of the OpenVPN network! |
|
|
Update your router to iom OS 7.3 or later first! All encryption algorithms that are no longer considered sufficiently secure have been removed starting with this version, which eliminates the possibility of such algorithms being used inadvertently. |
-
Open the user interface of the router in a browser: insys.icom [2]
-
Click To Startup Wizard on the startup screen under
 *Startup Wizard_. [3].
 -
Click in the
 Wizards → Startup wizard menu on START
  .
. -
If necessary, change the time and synchronisation settings and click on NEXT
 .
. -
Enter the credentials required for authentication (or configure an Authentication through certificates) and click on NEXT
. -
Configure the Internet connection and click on NEXT
. -
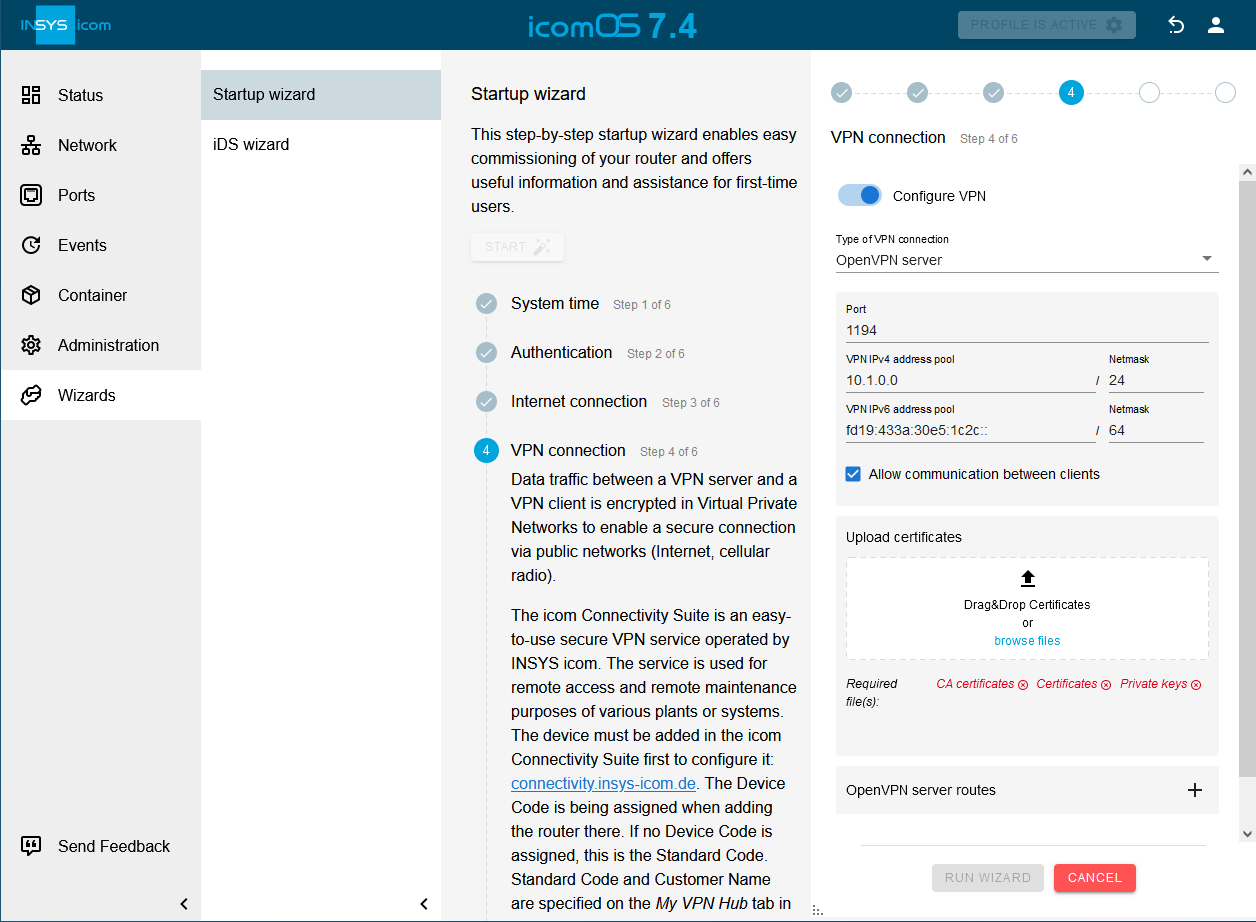
Activate the Configure VPN switch and select OpenVPN server under Type of VPN connection.
-
Optional: check the checkbox Allow communication between clients if this should be possible.
-
Upload the required certificates and keys. [4]

-
Click on
 behind OpenVPN server routes to add a route: [5].
-
Network address: 192.168.20.0 / 24
-
Common name: Client1
-
-
Click on
behind OpenVPN server routes to add a route: [6].-
Network address: 192.168.30.0 / 24
-
Common name: Client2

-
-
Click on NEXT icon: menu-right_white[] .
-
Click on
behind LAN settings to add an IP network: [7].-
IP address: 192.168.10.1 / 24
-
Ports: check Port 1.2
-
Uncheck DHCP server or specify the range of addresses to be assigned if the router is supposed to act as a DHCP server in the local network.

-
-
Click on NEXT icon: menu-right_white[] .
-
Optional: Activate the Configure icom Router Management switch and load a configuration for icom Router Management onto the router.
-
Click on RUN WIZARD .
-
Observe the execution of the wizard and click on EXIT WIZARD .
|
|
There are further options for configuring the OpenVPN server that might be adjusted accordingly. The tunnel addresses are only used for internal VPN routing and must only be adjusted, if they overlap with already used IP ranges. |
|
|
Since several tunnels are possible at the same time, the server must know the networks of the clients and add the according local routes.
With the help of these routes, the server will determine, which data packets are to be sent through which tunnel to the correct client.
To differentiate the tunnels, the routes are determined using the Common Name of the client certificate, which has been sent to the server during authentication.
These routes appear in the routing table of the router The push routes are communicated to the client routers so that they know which networks are behind the tunnel on the OpenVPN server side. The clients will enter these routes in their local routing table. The routes will not be checked for their plausibility. |
Functional test
-
Open the
 Status → Dashboard page in the menu and observe the establishment of the WAN chain with the OpenVPN tunnel in the WAN chain section.
 -
Open the
 Administration → Debugging page in the menu and click on OPEN DEBUG TOOLS
  .
Select the Ping tool and try to ping the IP addresses defined in the local routes.
.
Select the Ping tool and try to ping the IP addresses defined in the local routes.
Troubleshooting
-
The status of the WAN chain and their interfaces is displayed on the
Status → Dashboard page.
If an interface does not achieve the online condition, its condition can also be examined on this page. -
Check in the
Status → Log-View menu the messages in the OpenVPN log. [8]. -
Disable the IP filters for IPv4 in the
 Network → Firewall / NAT menu under Settings IP filter to check whether incorrect filter settings are the reason for connection problems.
Back to the Configuration Guides for icom OS Smart Devices
Back to overview