The routers of INSYS icom can act as OpenVPN server and/or establish connections to an OpenVPN server as OpenVPN client.
Situation
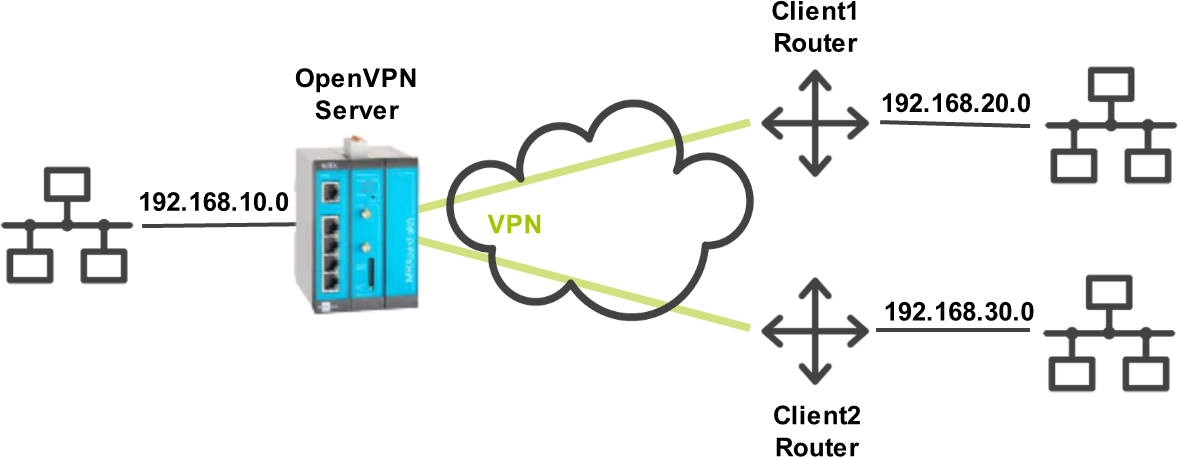
The router shall be configured as a server for an OpenVPN network with two clients. The OpenVPN server has the local network 192.168.10.0/24 in this example. The OpenVPN client with the Common Name Client1 has the local network 192.168.20.0/24 and the OpenVPN client with the Common Name Client2 has the local network 192.168.30.0/24.
Solution
The Startup wizard of the router permits to prepare an optional OpenVPN connection besides the configuration of Internet access. This OpenVPN connection must then be configured.
The necessary certificate structure must be generated in advance. The Configuration Guide for Creating a Certificate Structure Using XCA provides instructions for this.
The following certificates and keys are necessary:
| File | Upload to | Secret | Common Name for this example |
|---|---|---|---|
CA certificate |
Server, clients |
No |
|
CA key |
– |
Yes [1] |
|
Server certificate |
Server |
No |
Server |
Server key |
Server |
Yes |
|
Client certificate (separate for each client) |
Client |
No |
Client1, Client2 |
Client key (separate for each client) |
Client |
Yes |
We act on the assumption that the router is in default settings for the following proceeding.
| If you configure an OpenVPN server on your router, you make its network accessible from the outside. Even if an OpenVPN network allows a high degree of security, it may pose a security vulnerability in case of an inadequate configuration. The following proceeding provides assistance for the easy configuration of a server for an OpenVPN network. You are solely responsible for the protection of the OpenVPN network! |
Configuration via web interface
-
Open web interface of the router using a browser: 192.168.1.1 [2]
-
In the title bar of the web interface, click on (Display help text) to show the inline help that provides helpful information regarding the individual configuration parameters.
-
In the Help → Wizards menu, click on Startup.
-
Under VPN connection, select Prepare for OpenVPN. [3]
-
Configure Internet access (WAN) and plant network (LAN) accordingly and click on Execute wizard.
This step is described in detail in the Quick Installation Guide of the respective router and will not be detailed here.
-
-
Import the certificates and keys for the server generated in advance in the Administration → Certificates menu in the Import certificates or keys section. [4]
-
Activate in the Interfaces → OpenVPN menu the OpenVPN tunnel added by the Startup wizard (check checkbox active) and edit it ():
-
Description: enter an appropriate name for the tunnel
-
Mode: Server
-
Tunnelling over port (local / remote): enter the used ports
-
Protocol: select the used protocol
-
CA certificate: select the CA certificate uploaded in the previous step
-
Certificate: select the server certificate uploaded in the previous step
-
Private key: select the server key uploaded in the previous step
-
Cipher and hash algorithm: select the used settings
-
Diffie Hellman parameters: select the Diffie-Hellman parameter set already existing in the Certificate Manager
-
Allow communication between clients: check, if communication between the clients shall be possible
There are further options for configuring the OpenVPN server that might be adjusted accordingly. The tunnel addresses are only used for internal VPN routing and must only be adjusted, if they overlap with already used IP ranges.
-
-
Click on Save settings.
-
Edit in the Netfilter → IP filter menu the OpenVPN (tunnel establishment) filter rule (): [5]
-
Packet direction: INPUT
-
Input interface: select the interface that is used by the clients to connect to the server
-
-
Click on Save settings.
-
Check all filter rules added by the Startup wizard and adjust them if necessary. his may be necessary if the protocol or port for the OpenVPN tunnel above have been adjusted.
-
Add a new route in the Routing → OpenVPN routes menu (upper routing table) () and edit it (): [6]
-
Description: Route to network 192.168.20.0
-
Interface: select above added OpenVPN server
-
IP address: 192.168.20.0/24
-
Common name: Client1
-
-
Click on Save settings.
-
Add a new local route in the Routing → OpenVPN routes menu (upper routing table) () and edit it (): [7]
-
Description: Route to network 192.168.30.0
-
Interface: select above added OpenVPN server
-
IP address: 192.168.30.0/24
-
Common name: Client2
-
-
Click on Save settings.
-
Add a new push route in the Routing → OpenVPN routes menu (lower routing table) () and edit it (): [8]
-
Description: Route to network 192.168.10.0
-
Interface: select above added OpenVPN server
-
IP address: 192.168.10.0/24
-
Common name: do not enter a Common Name [9]
-
-
Click on Save settings.
-
Add a new push route in the Routing → OpenVPN routes menu (lower routing table) () and edit it (): [10]
-
Description: Route to network 192.168.20.0
-
Interface: select above added OpenVPN server
-
IP address: 192.168.20.0/24
-
Common name: Client2
-
-
Click on Save settings.
-
Add a new push route in the Routing → OpenVPN routes menu (lower routing table) () and edit it (): [11]
-
Description: Route to network 192.168.30.0
-
Interface: select above added OpenVPN server
-
IP address: 192.168.30.0/24
-
Common name: Client1
-
-
Click on Save settings.
Since several tunnels are possible at the same time, the server must know the networks of the clients and add the according local routes. With the help of these routes, the server will determine which data packets are sent through which tunnel to the correct client. To differentiate the tunnels, the routes are determined using the Common Name of the client certificate, which has been sent to the server during authentication. These routes will appear in the routing table of the router.
The push routes will be communicated to the client routers so that they know, which networks are behind the tunnel on the OpenVPN server side. The clients will enter these routes in their local routing table.
The routes will not be checked for their plausibility. -
Activate the profile with a click on the blinking gear in the title bar ().
Functional test
-
Check in the Status → System status menu, whether the WAN chain containing the OpenVPN tunnel has been started.
-
Check in the Status → System details → OpenVPN menu, which OpenVPN clients are currently connected to the server.
-
Use in the Help → Debugging menu the Ping tool to try pinging the IP addresses added in the local routes.
Troubleshooting
-
Change to the Status → Log view menu and check the messages in the OpenVPN log.
-
You may disable the netfilters in the Netfilter → IP filter menu temporarily to find out, whether inadequate filter settings prevent connections.
Back to the Configuration Guides for icom OS Smart Devices
Back to overview