The data logger of the icom Data Suite records historical values from an application. The logged values can then be exported into CSV files. These CSV files can either be sent via e-mail, uploaded to an FTP server or downloaded in the icom Data Suite.
1. Situation
A typical application requires that a value from an external device shall be logged and monitored. If the value exceeds a threshold, an e-mail message shall be sent that contains the datalog of the last 30 minutes.
Since this application is very abstract anyway, we simplify this application that any user who just want’s to test the data logger is able to reproduce this Configuration Guide without any further hardware.
To do this, we use the supply voltage of the router as the value to be monitored and logged.
To trigger a message dispatch, we first need an initiating event.
The router is able to detect when an Ethernet cable is unplugged (link loss).
We can use this feature to trigger an event when we unplug the cable from the configuration port 1.1 to send a message.
For your application, the supply voltage data point can be replaced by any number of other internal data points or data points of connected devices, such as Modbus devices or S7 controls. In the same way, the event for triggering the message dispatch can be selected from a variety of events, such as changed data points, expired timers or received messages.
2. Solution
The following elements need to be configured:
-
A data point that contains the supply voltage of the router
-
A data point that contains the link status of Ethernet port 1.1 of the router (configuration port)
-
A datalog that logs the two data points together with a timestamp and the causing event (optional)
-
A recipient for the e-mail
-
A message that contains the datalog of the last 30 minutes
-
An event that triggers a datalog export as soon as the link on Ethernet Port 1.1 of the router is lost
-
An event that sends the e-mail message as soon as an export file of the selected datalog has been written
The following is prerequisite to continue configuration:
-
Your router has been commissioned as outlined in the associated Quick Installation Guide (using the Startup Wizard)
-
The icom Data Suite (version 1.10 or higher) has been installed on the router as outlined in this Configuration Guide
-
You have an icom Data Suite license that includes the necessary functions
-
Your configuration PC is still connected to the router via configuration port 1.1
-
An e-mail account is configured in the icom Data Suite as outlined in this Configuration Guide
2.1. Configuring the Data Points
-
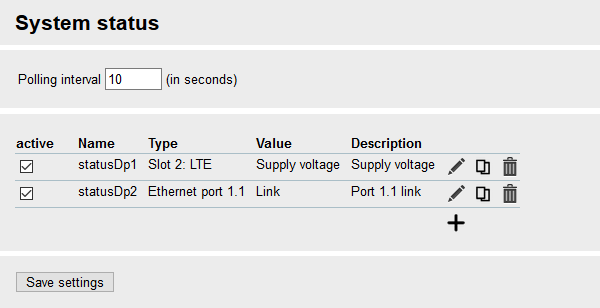
In the Data points → System status menu, add a new system status value () and edit it (): [1]
-
Description: Supply voltage
-
Type: select Slot 2: xxx
-
Value: select Supply voltage
-
-
Click on Save settings.
-
In the Data points → System status menu, add a new system status value () and edit it (): [2]
-
Description: Port 1.1 link
-
Type: select Ethernet port 1.1
-
Value: select Link
-
-
Click on Save settings.
2.2. Configuring the Datalog
-
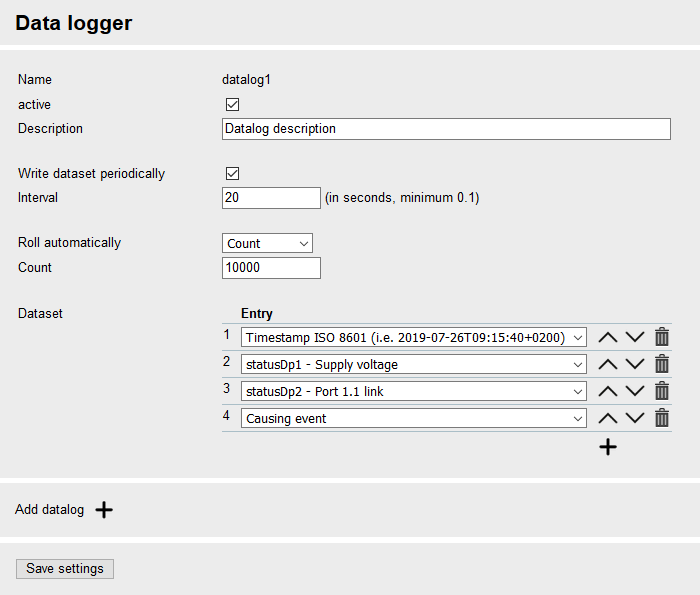
In the Data logger menu, click on Add datalog ().
-
Enter a Description for the datalog that describes its purpose.
-
Check Write dataset periodically and enter an Interval of 20 seconds. [3]
-
For Roll automatically, select Count and enter a Count of 10000. [4]
-
Click on Save settings.
-
In the Dataset section, add an entry () and select Timestamp ISO 8601. [5]
-
In the Dataset section, add an entry () and select statusDp1 - Supply voltage. [6]
-
In the Dataset section, add an entry () and select statusDp2 - Port 1.1 link. [7]
-
In the Dataset section, add an entry () and select Causing event. [8]
-
Click on Save settings.
2.3. Configuring the Message
-
In the Messages → Contacts menu, add a new contact () and edit it ():
-
Real name: enter the name of your e-mail recipient
-
E-mail address: enter the e-mail address of your recipient
-
-
Click on Save settings.
-
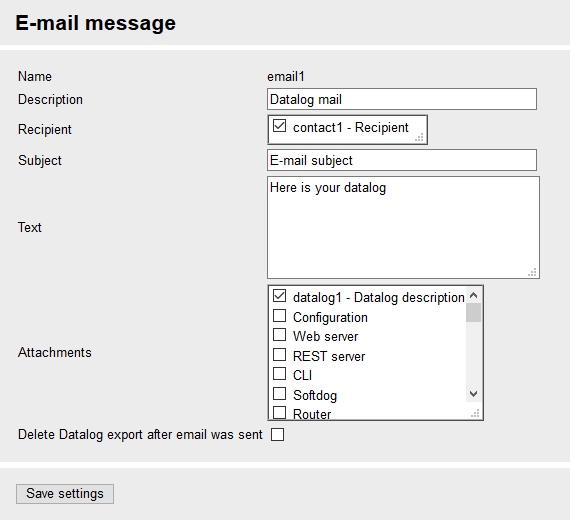
In the Messages → E-mail menu, add a new message () and edit it ():
-
Description: Datalog mail
-
Recipient: select above added contact
-
Subject: enter the desired e-mail subject
-
Text: enter the desired text content
-
Attach datalog export files: select datalog1 [9]
-
-
Click on Save settings.
2.4. Configuring the Events
-
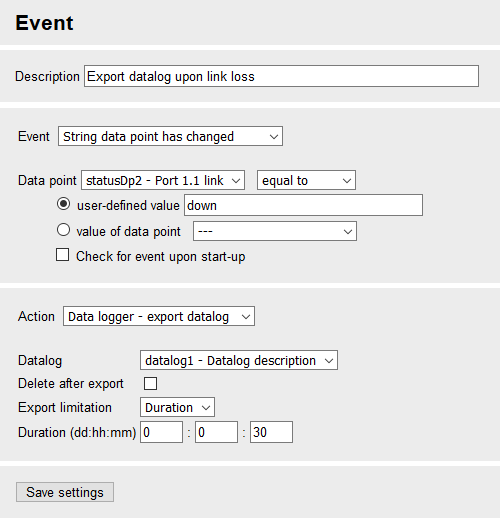
In the Events menu, add a new event () and edit it (): [10]
-
Description: Export datalog upon link loss
-
Event: select String data point has changed
-
Data point: select statusDp2 - Port 1.1 link and equal to and enter a user-defined value of down [11]
-
Action: select Data logger - export datalog
-
Datalog: select datalog1
-
Export limitation: select Duration and enter a Duration of 30 minutes [12]
-
-
Click on Save settings.
-
In the Events menu, add a new event () and edit it (): [13]
-
Description: Send datalog message
-
Event: select Data logger - export created
-
Datalog: select datalog1
-
Action: select Send message
-
Send message: select email1 - Datalog mail
-
-
Click on Save settings.

-
Activate the profile ().
3. Testing the Application
After commissioning the router as outlined in the Quick Installation Guide and configuring the icom Data Suite as above, your computer will be connected to the router via Ethernet port 1.1 (configuration port).
-
Wait a few minutes to allow the router to log some data points.
-
Unplug the Ethernet cable to trigger the above configured event and verify if you receive the e-mail with the datalog attached. Wait a few seconds before reconnecting the Ethernet cable to ensure that the cable is unplugged during a polling cycle.
If you have received the e-mail containing the datalog, you’ve successfully achieved the goal of this Configuration Guide; you may continue with this Configuration Guide to learn how to import this datalog export file into Excel. If you did not receive the e-mail containing the datalog, refer to the Troubleshooting section below.
4. Troubleshooting
-
If you receive an e-mail, but it does not contain the datalog, verify that you have checked the datalog in the Messages → E-mail menu.
-
If you don’t receive an e-mail, check whether the issue is that the link loss event has not triggered a datalog export or a problem when sending the e-mail has occurred. To do this, go to the Status → Log view menu and view the E-mail and Datalogger logs.
-
If the log does not contain [datalogd] export created for datalog1, there is an issue with the detection of the link loss and triggering the export. Unplug the cable again for about 20 seconds. If this does not trigger the event, check the event configuration.
-
If the log contains error messages regarding e-mail dispatch, check the e-mail account settings as outlined in this Configuration Guide.
-
Confirm the spelling of e-mail and SMTP server address (not case-sensitive).
-
Confirm the correct SMTP port.
-
Confirm the correct encryption method.
-
You may send an e-mail message in the Help → Debugging menu to verify the ability for sending e-mails.
-
If the log contains [emaild] E-Mail 'email1' sent, but you did not receive the mail, check the e-mail address entered in the Messages → Contacts menu and the ability of receiving e-mails under this address.
5. Resources
The following ASCII configuration reflects all settings made in this Configuration Guide. You may apply it to your icom Data Suite in the Administration → Profiles menu. However, proper functionality can only be ensured if the opened profile has been created from default settings. The individual parameters still need to be adapted to your application after downloading or copying & pasting it in a text file. If you already have made some settings in your profile, correct numbering must be observed for numbered parameters. Moreover, it must be observed that existing parameters with the same number will be overwritten.
datapoints.systemstatus.status.add
datapoints.systemstatus.status[1].active=1
datapoints.systemstatus.status[1].name=statusDp1
datapoints.systemstatus.status[1].description=Supply voltage
datapoints.systemstatus.status[1].type=lte2
datapoints.systemstatus.status[1].lte_value=supply_voltage

datapoints.systemstatus.status.add
datapoints.systemstatus.status[2].active=1
datapoints.systemstatus.status[2].name=statusDp2
datapoints.systemstatus.status[2].description=Port 1.1 link
datapoints.systemstatus.status[2].type=eth1.1
datapoints.systemstatus.status[2].eth_value=link

datalogger.datalog.add
datalogger.datalog[1].active=1
datalogger.datalog[1].name=datalog1
datalogger.datalog[1].description=Datalog description
datalogger.datalog[1].write_periodically=1
datalogger.datalog[1].write_interval=20
datalogger.datalog[1].rolling=count
datalogger.datalog[1].roll_count=10000
datalogger.datalog[1].datapoint.add
datalogger.datalog[1].datapoint[1].dp_name=datalogDp1
datalogger.datalog[1].datapoint[1].dp_datapoint=TIMESTAMP_ISO8601
datalogger.datalog[1].datapoint.add
datalogger.datalog[1].datapoint[2].dp_name=datalogDp2
datalogger.datalog[1].datapoint[2].dp_datapoint=statusDp1
datalogger.datalog[1].datapoint.add
datalogger.datalog[1].datapoint[3].dp_name=datalogDp3
datalogger.datalog[1].datapoint[3].dp_datapoint=statusDp2
datalogger.datalog[1].datapoint.add
datalogger.datalog[1].datapoint[4].dp_name=datalogDp4
datalogger.datalog[1].datapoint[4].dp_datapoint=causing_event

messages.contacts.contact.add
messages.contacts.contact[1].active=1
messages.contacts.contact[1].name=contact1
messages.contacts.contact[1].real_name=Recipient
messages.contacts.contact[1].email_address=name@domain.com

messages.email.email.add
messages.email.email[1].active=1
messages.email.email[1].name=email1
messages.email.email[1].description=Datalog mail
messages.email.email[1].recipient=contact1
messages.email.email[1].subject=E-mail subject
messages.email.email[1].text=-----BEGIN text-----Here is your datalog-----END text-----
messages.email.email[1].attachments=datalog1
messages.email.email[1].delete_datalog_attachment=0

events.event.add
events.event[1].name=event1
events.event[1].active=1
events.event[1].description=Export datalog upon link loss
events.event[1].event_type=ev_string
events.event[1].event_string_datapoint=statusDp2
events.event[1].event_string_change=equal
events.event[1].event_string_compare_source=value
events.event[1].event_string_compare_value=down
events.event[1].event_string_initial_check=0
events.event[1].action_type=act_datalog_export
events.event[1].action_export_datalog=datalog1
events.event[1].action_export_delete=0
events.event[1].action_export_filter=time_span
events.event[1].action_export_dd=0
events.event[1].action_export_hh=0
events.event[1].action_export_mm=30

events.event.add
events.event[2].name=event2
events.event[2].active=1
events.event[2].description=Send datalog message
events.event[2].event_type=ev_datalog_exported
events.event[2].event_datalog_exported=datalog1
events.event[2].action_type=act_message
events.event[2].action_message=email1
Back to the Configuration Guides for the icom Data Suite
Back to overview