The icom Connectivity Suite - VPN is a service of INSYS icom for the simple and secure network connection of locations, plants, control centers and mobile devices via a VPN network.
Netmapping enables devices in the local network behind an INSYS router to keep their IP address. These devices can then be addressed with the virtual IP address via the icom Connectivity Suite – VPN.
Situation
The application used to address the units via the icom Connectivity Suite - VPN does not permit a connection via the virtual IP address (netmapping address).
Solution
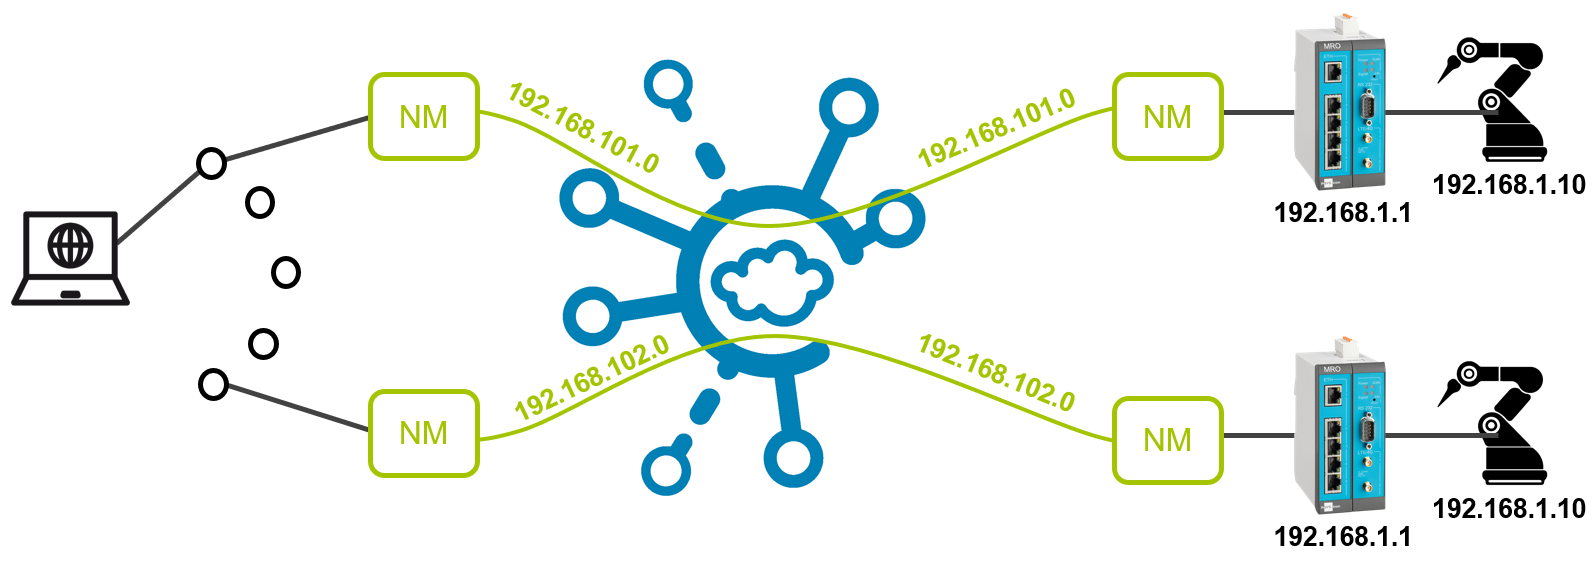
If it is not possible to address the identically configured devices in the different remote networks individually using the netmapping address, the selection of the device to be addressed can be made via individual VPN connections, which in turn use netmapping to redirect the data traffic to the original address of the device to be addressed to the virtual IP address. This can be referred to as double netmapping.
To do this, the OpenVPN configuration files for each VPN connection must be modified as follows.
It is assumed that you
-
have already registered an account for the icom Connectivity Suite - VPN, as described in this Configuration Guide,
-
have added the router to the icom Connectivity Suite - VPN as described in this Configuration Guide, and
-
have configured the router to connect to the icom Connectivity Suite - VPN and for netmapping as described in this Configuration Guide, and
-
have added the PC to the icom Connectivity Suite - VPN as described in this Configuration Guide, and
-
have installed the OpenVPN software on your PC as described in this Configuration Guide in the _Installing the OpenVPN software section.
Downloading the configuration file
The icom Connectivity Suite – VPN generates a configuration file for establishing the OpenVPN connection.
-
Open the portal of the icom Connectivity Suite:
-
Enter your credentials, select your preferred language under Sprache or Language and click on Log in.
-
Select the Devices tab.
-
Go to the row of the PC that is used to establish the connection to the icom Connectivity Suite – VPN and click on Download (
 ) in the Manage column.
 -
Click on OpenVPN Config file and save the configuration file to your computer.
-
Move the OpenVPN configuration file from the Download directory to the configuration directory of the OpenVPN installation. The standard configuration directory for this is C:\Program Files\OpenVPN\config.
Modifying the configuration files
The configuration files for each VPN connection must be modified for the double netmapping of the connection to the icom Connectivity Suite - VPN. This requires a DNAT rule that forwards all requests to the network behind the router to the netmapping address and a static route that routes all requests to the network behind the router through the VPN tunnel.
-
Open the configuration directory in a file manager.
-
Make a copy of the OpenVPN configuration file Control_PC.ovpn and rename it accordingly, e. B. Control_PC_101.ovpn following the different netmapping addresses in this example.
-
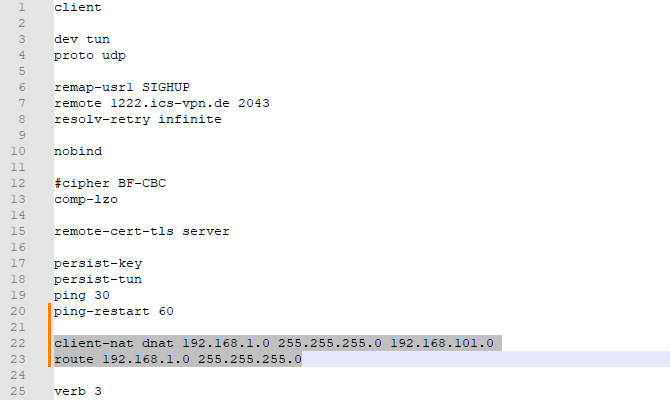
Open the new OpenVPN configuration file in a text editor and insert the following lines:
client-nat dnat 192.168.1.0 255.255.255.0 192.168.101.0
route 192.168.1.0 255.255.255.0
-
Save the modified OpenVPN configuration file.
-
Modify the OpenVPN configuration files for the other VPN connections accordingly. Be sure to adjust the addresses in the commands accordingly and name the files accordingly.
Establishing the OpenVPN connection
When the OpenVPN package is installed, it is possible to establish a connection to each OpenVPN network, for which a configuration file is present, from a PC.
-
Start the OpenVPN GUI via the
 Start menu → OpenVPN → Open-VPN GUI or by clicking on the desktop icon.
 -
Right-click the symbol of the OpenVPN GUI in the task bar and select Control_PC_101 → Connect (the OpenVPN connection will be named by the file name of the configuration file).
The OpenVPN GUI will establish a connection to the icom Connectivity Suite – VPN now and the desired device can be addressed via double netmapping using the original address.
Troubleshooting
-
You can verify a successful connection when the state changes to online on the Devices tab of the icom Connectivity Suite. Please note that this may take up to a few minutes.
-
If the connection to the icom Connectivity Suite – VPN has been established successfully, the symbol of the Open-VPN GUI will be shown green. If the symbol remains yellow, the OpenVPN client tries to reach the server, but the connection cannot be established.
-
A connection log can be displayed using the menu item View Log displayed If the symbol remains yellow and the log stops with the line UDP link remote, a possible reason is that an external firewall blocks the VPN connection. The port for the VPN connection is displayed in this log entry at the end after the colon. This port (with the UDP protocol) must be opened by the administrator.
-
Refer to the icom Connectivity Suite manual for more information.
Back to the Configuration Guides for the icom Connectivity Suite
Back to overview