INSYS routers with icom OS require the configuration of an authentication method for productive use.
This “circumstance” forces the user to deal with the protection of the access to the router during configuration already.
The description in this Configuration Guide follows a configuration in the new user interface (web interface) available from icom OS 5.5. Update your router to the latest version of icom OS for the required functionality of the new user interface. The description of this configuration in the classic web interface is available in this Configuration Guide.
Situation
No authentication is configured in default settings. The access to the user interface (web interface ) is possible without login. Modifications can be made. However, the modifications can only be activated after an authentication method has been configured.
If the router is commissioned with the startup wizard, either a user or an authentication with certificates must be configured for this.
If ACTIVATE PROFILE ![]() in the title bar is clicked upon modifying the configuration to activate the profile and no authentication is yet configures, an error message appears that prompts to configure a user.
in the title bar is clicked upon modifying the configuration to activate the profile and no authentication is yet configures, an error message appears that prompts to configure a user.
The manual configuration of the different authentication methods is described in the following.
Solution
One of the following authentication methods must be configured:
-
User name and password: a user must be configured locally on the router for this
-
Certificate: the client authentication via certificate must be activated, a CA certificate must be stored on the router and a client certificate must be imported in the browser for this
-
RADIUS server: the authentication at an RADIUS server must be activated and a user must be configured on the RADIUS server
|
|
It is recommended to disable authentication methods that are not used to increase security. |
Authentication via user name and password
The security of this authentication method depends on complexity and non-disclosure of the selected password.
-
Open the user interface of the router in a browser: insys.icom [1]
-
If the start screen is displayed, click To manual configuration under
 Manual configuration.
 -
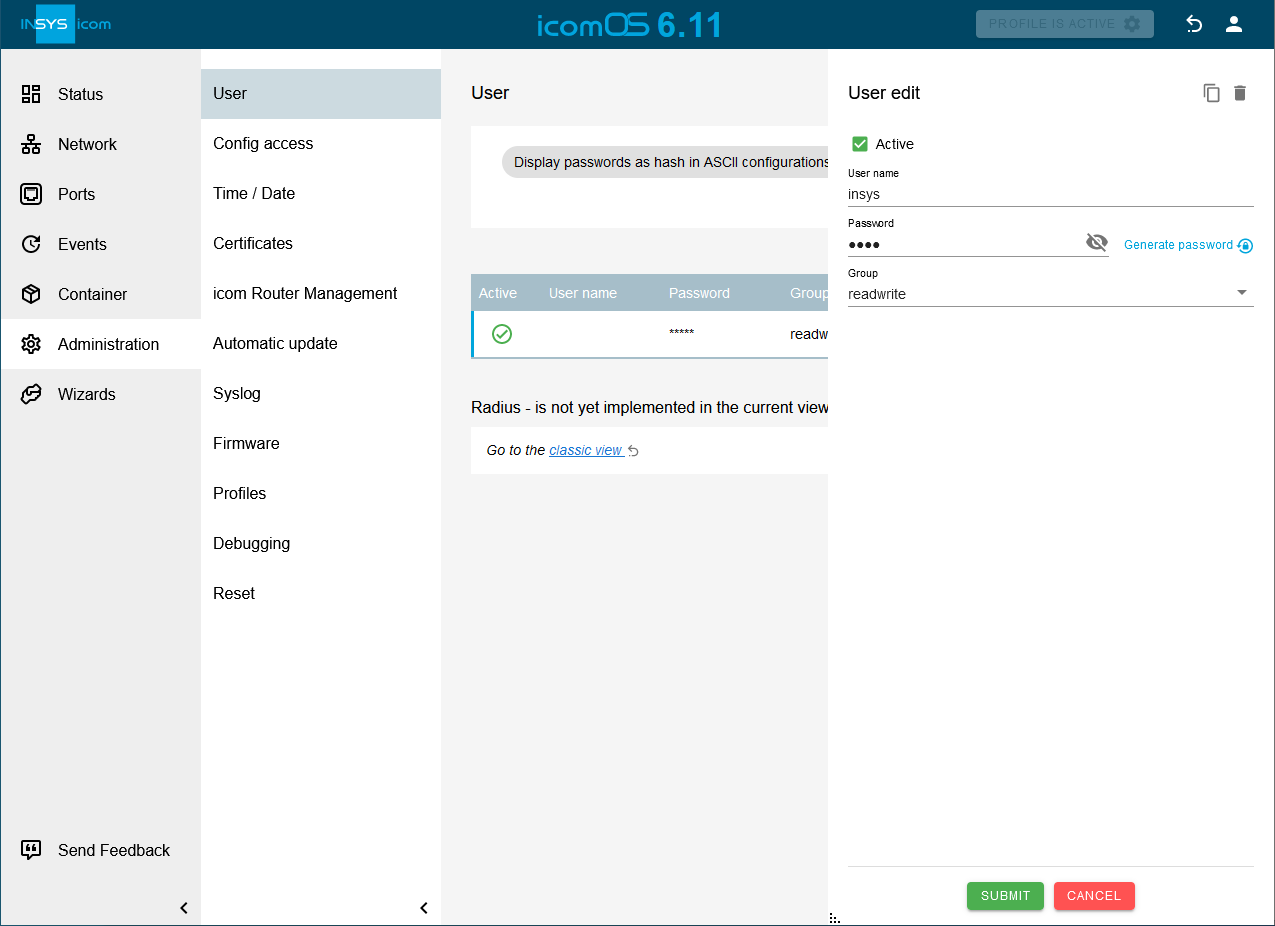
Click in the
 Administration → User menu in the User section on
  in the row of the already added incomplete user to edit it.
 -
Enter a User name and a Password, specify the Group and click on SUBMIT .
-
Activate the profile with a click on ACTIVATE PROFILE
 .
.
|
|
A typo during entry, forgetting the credentials stored here or not granting at least one user write privileges causes that the router cannot be accessed any more. Access is then only possible again by resetting the router to default settings under loss of all settings. |
Permitted characters for the user name: 0-9, a-z, A-Z as well as the special characters - (minus), _ (underscore), . (full stop) Additionally permitted special characters for the password: !@#$%^&=* There are no special requirements to the password. The password should be long enough and hard to guess. The security is in the responsibility of the user. If no password is assigned, the user cannot log in to the router.
The password will be stored encrypted as a salted SHA-512 hash and cannot be made visible again.
Instead of clear text, it can also be entered as hash; for example to be able to enter users with password without having to know this.
Example for a hash:
$6$ed81a2f486$LSbNLuCyoXieyfUvpg30Ew/chO55Cw.LL2Hol4sCo5xf75GT9Om4yxGEDYhifSlK0XKLMXM.GGOp9iCQeCaDS/
The hash must start with the string $6$ (indicates SHA-512) and have exactly 100 characters.
The salt is the part between the second and the third Dollar symbol, here ed81a2f486.
If the Display passwords as hashi in ASCII configurations adn CLI option is enabled in the ![]() Administration → User menu, these are displayed as hash in ASCII configurations and in the CLI, otherwise, they are replaced by five asterisks
Administration → User menu, these are displayed as hash in ASCII configurations and in the CLI, otherwise, they are replaced by five asterisks
Authentication via client certificate
The following elements of a certificate structure must be present for this type of authentication:
-
CA certificate (is stored in the router)
-
Client certificate (is stored in the web browser)
-
Client key (is stored in the web browser)
The creation of a certificate structure is described in this Configuration Guide in detail.
The security of this authentication method depends on the protection of the certificate structure. Everybody who has access to the client certificate and key or is able to create a client certificate and key with this CA certificate and related key can get access to the user interface. Therefore, the transmission of the client certificate and key must also be taken into account for protection. Considering this, this authentication method is very secure and should usually be preferred to an authentication with user name and password.
-
Open the user interface of the router in a browser: https://insys.icom [1]
-
If the start screen is displayed, click To manual configuration under
Manual configuration. -
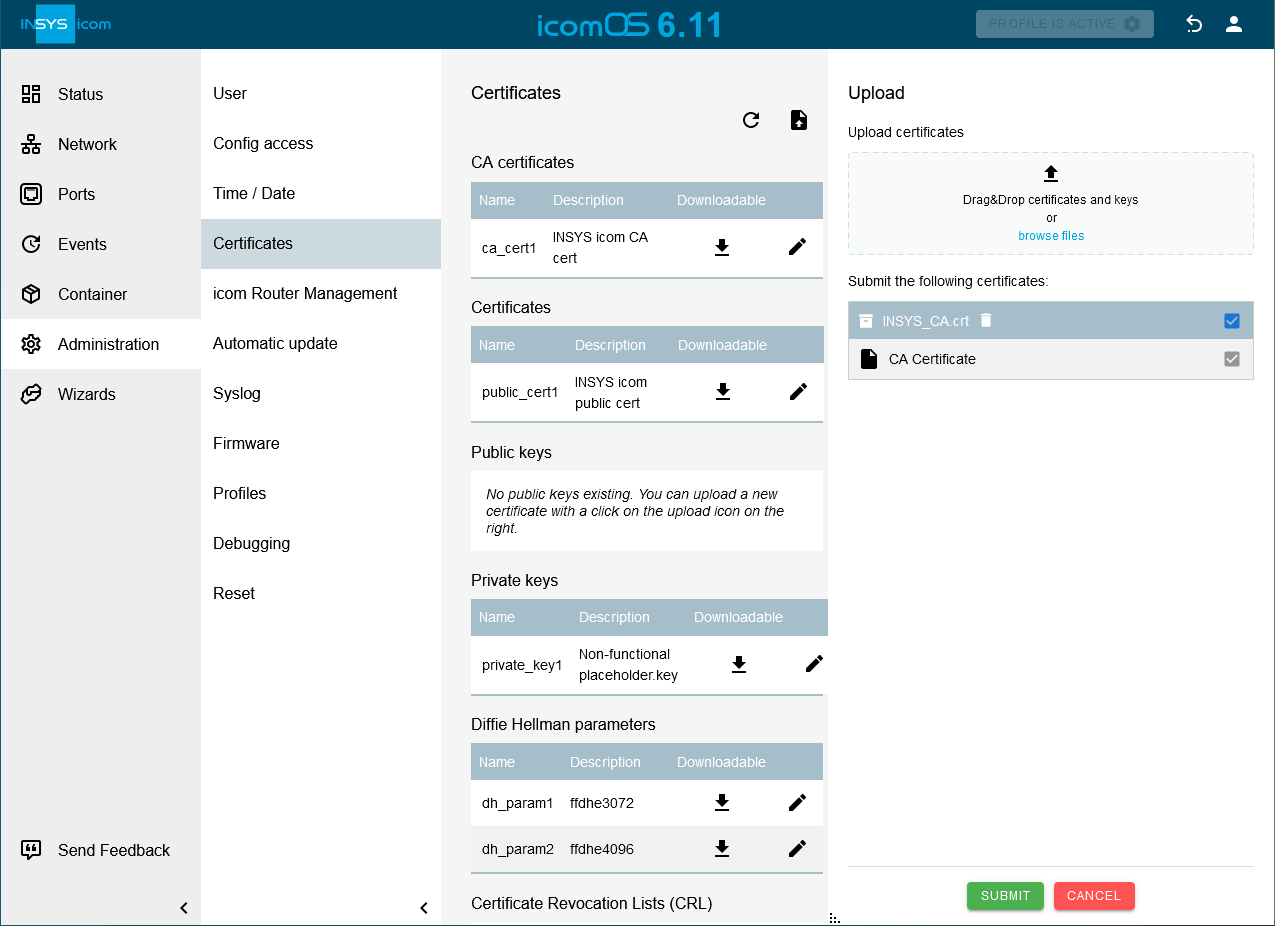
Click in the
Administration → Certificates menu on  , select the CA certificate file and click on SUBMIT .
-
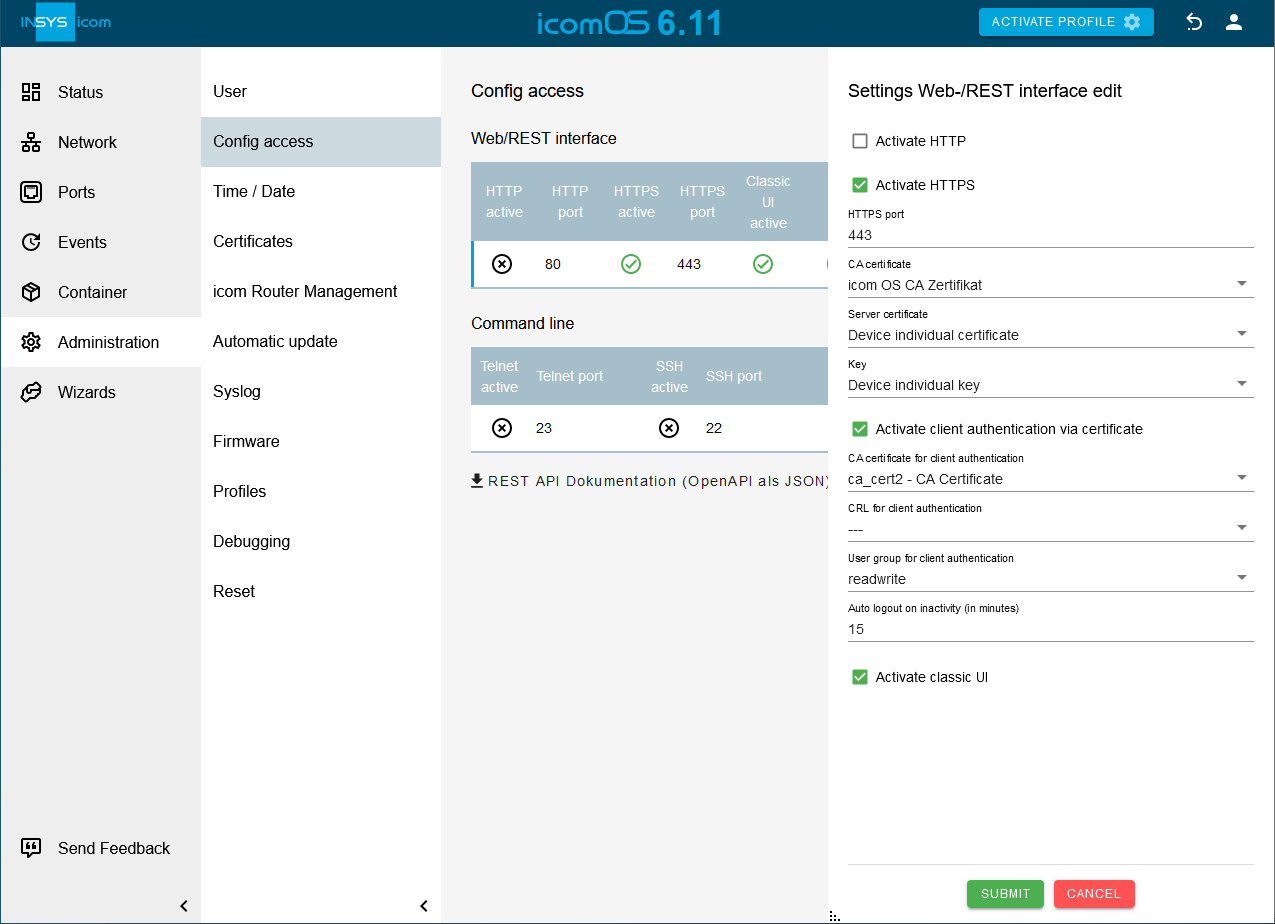
Click in the
Administration → Config access menu in the _Web/REST interface _ section on . -
Check the Activate client authentication via certificate checkbox, select under CA certificate for client authentication above imported CA certificate and click on SUBMIT .
-
Activate the profile with a click on ACTIVATE PROFILE
. -
Import the client certificate in the web browser.
|
|
The import of the certificate in the web browser depends on the browser used. Usually, the functions for importing certificates can be found under Settings → Data protection & security. It is possible that the browser has to be restarted. It may happen that security queries must be acknowledged with the first access to the user interface. |
Authentication via RADIUS
The user management is taken over by a RADIUS server for this type of authentication. The router will forward the entered credentials to a RADIUS server, which will perform the authentication then.
The security of this authentication method depends on the security of the RADIUS server operated by the user and the complexity and non-disclosure of the credentials. The connection to the RADIUS server is protected using a 'Shared Secret'.
-
Open the user interface of the router in a browser: https://insys.icom [1]
-
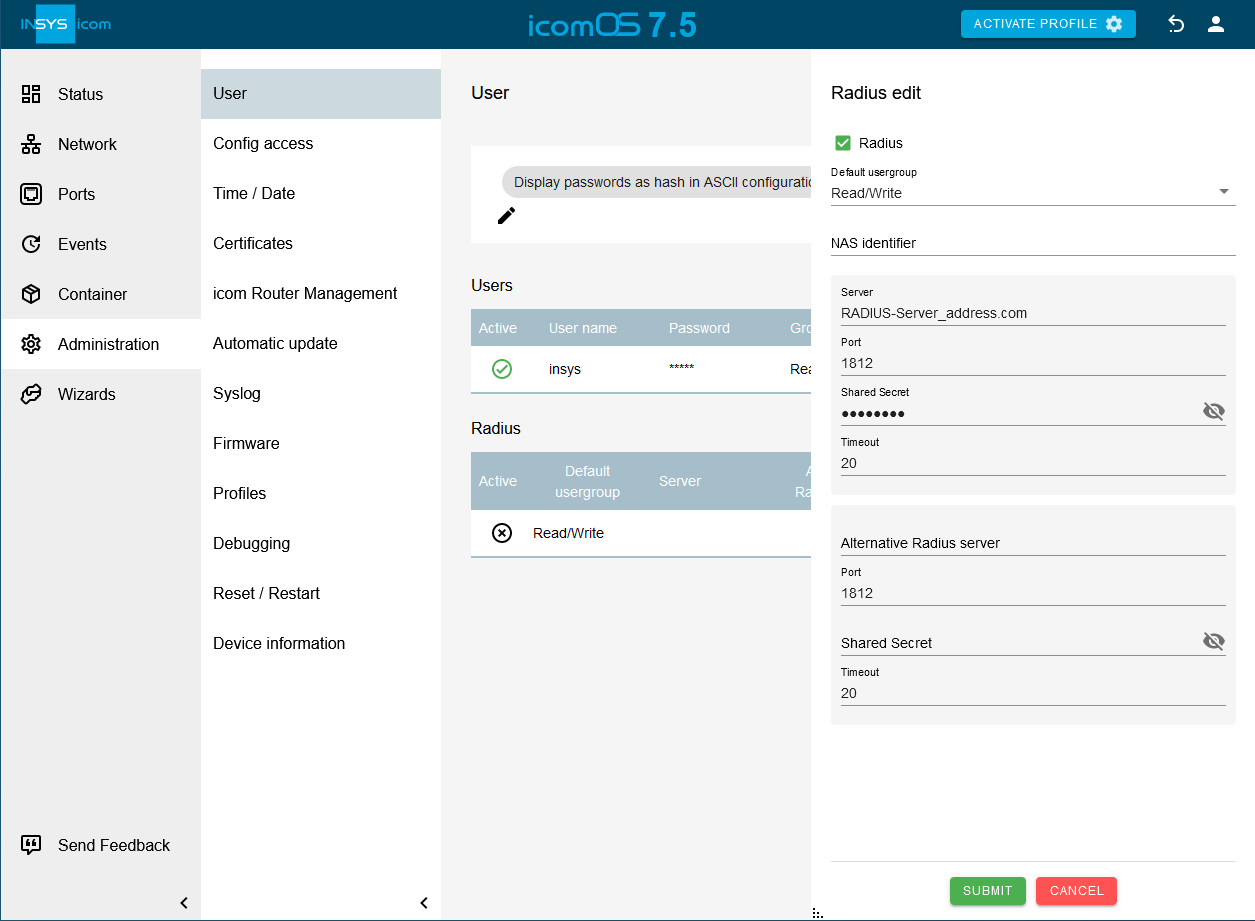
Click in the
Administration → User menu in the Radius section on in the row of the Radius server to edit it. -
Check the Radius option to activate authentication at the RADIUS server.
-
Select the Default user group for the login via the RADIUS server.
-
Optional: Optionally, add an attribute to the authentication request that the RADIUS server could evaluate to identify the device that has sent the request.
-
Enter under Server and Port the URI or IP address and the port of the RADIUS server.
-
Enter under Shared Secret the 'Shared Secret' of the RADIUS server.
-
Optional: Adjust the Timeout for the response of the RADIUS server, after which an attempt is made to reach the alternative RADIUS server (if configured).
-
Optional: Configure an alternative RADIUS server.
-
Click on SUBMIT .
-
Click on ACTIVATE PROFILE
.
Important to know!
The following applies if more than one authentication method is configured:
-
If the authentication via certificate is configured, the authentication will always be made if the client certificate on the browser, which is used to access the router, has been created using the CA certificate, which is stored on the router, and is valid. Then, it is not necessary to enter credentials.
-
If a RADIUS server is configured for the authentication, it will always be tried to authenticate first using the users, which are configured locally in the router. Only in case a local authentication fails (if for example no user is configured, the entered user is disabled or the entered password is missing or wrong), the authentication against the configured RADIUS server will be attempted. If the RADIUS server authorises the request, the user rights configured for a locally entered user with the same user name will be used for this user. If the user is not entered locally at all, the authentication will be made by the RADIUS server and the user rights generally configured for the RADIUS server will be used.
The user management via a RADIUS server permits also access to the REST interface and the CLI (command line interface) besides access to the user interface.
Troubleshooting
-
When entering passwords it must be observed that the Shift-Lock or Num-Lock key has not been pressed accidentally.
-
When authenticating via a certificate, it must be observed that the certificate is not expired and date/time in the router are correct.
-
If an authentication against a RADIUS server is not possible, it is best to verify whether the RADIUS server can be accessed first.
-
If you have locked out yourself from the router due to a wrong configuration, this can be reset to default settings by pressing the reset key three times within 2 seconds. This will delete all settings.
Back to the Configuration Guides for icom OS routers
Back to overview