REST stands for Representational State Transfer and provides an interface for configuration, status query and execution of manual actions of the icom Data Suite via HTTP and HTTPS protocol.
Using the REST interface: The HTTP(S) REST interface permits to configure the icom Data Suite automated or retrieve values using scripts.
You’ll find an example for reading out, adding, modifying and deleting configurations via the REST interface using the Postman app and the web-based tool Swagger in the following. It shall communicate how to determine the syntax for command and transmitted configuration information (payload) using different tools and how to transmit it to the icom Data Suite.
The Configuration Guide is based on an icom Data Suite in default settings. The description may differ for individual configurations with regard to profiles, addresses etc.
The REST interface is supported by the icom Data Suite from version 1.5. The tools mentioned are only examples and serve as guide for dealing with the REST interface using external tools.
|
|
The documentation of the REST API contains all commands that are available in the icom Data Suite on the different configurations and equipment variants of the router. Not all commands contained are supported by the icom Data Suite on your router. icom Data Suite and REST API documentation must have the same firmware revision. |
1. Situation
The following configuration steps are to be made using the REST interface:
-
Retrieving the currently configured users of the icom Data Suite
-
Adding a new user
-
Modifying the configuration of this user
-
Deleting the newly added user
2. Solution
The full documentation of the REST API will be downloaded from the icom Data Suite in form of a JSON file according to the OpenAPI Specification 3.0.
This JSON file will be opened in a tool, such as the Swagger Editor or Postman, to determine the syntax for command transmission.
The adjusted configuration commands will then be transmitted to the icom Data Suite using this tools or a cURL command.
Make sure the that you have access to the web interface of the icom Data Suite.
2.1. Activating the REST interface and downloading the REST API documentation
-
Open the web interface of the icom Data Suite using a browser: link: 192.168.1.10 [1]
-
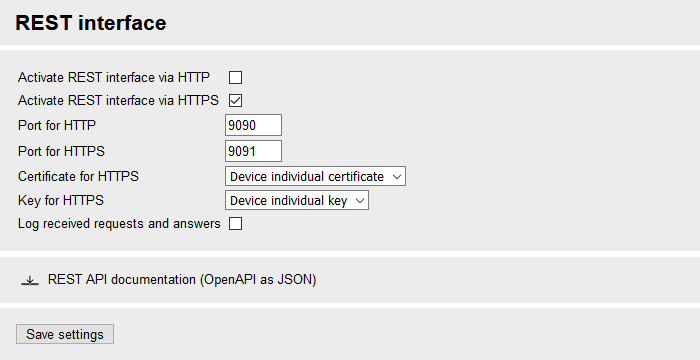
Check the checkbox Activate REST interface via HTTPS in the Administration → REST interface menu and click on Save settings.
-
Click on
 REST API documentation (OpenAPI as JSON) and download the REST API documentation to the computer.
-
Click on the blinking gear in the title bar (
 ) to activate the profile.
2.2. Determining the REST syntax and transmitting the configuration commands to the icom Data Suite
REST API tools such as Postman and the Swagger Editor provide a very convenient way for this. Configuration commands can also be issued in a command line using cURL.
2.2.1. Postman
The Postman app is a useful tool for communicating with the icom Data Suite via the REST interface. The following describes how to import the REST API documentation of the icom Data Suite in the Postman app, enter the credentials for the REST interface and verify the environment variables for the communication with the icom Data Suite. Furthermore, the example of the user configuration describes how to read out, add, change and delete configurations with the help of the commands GET, POST, PUT and DELETE. You will also learn how to execute manual actions.
-
Download the Postman app and install it.
-
Open the Postman app
-
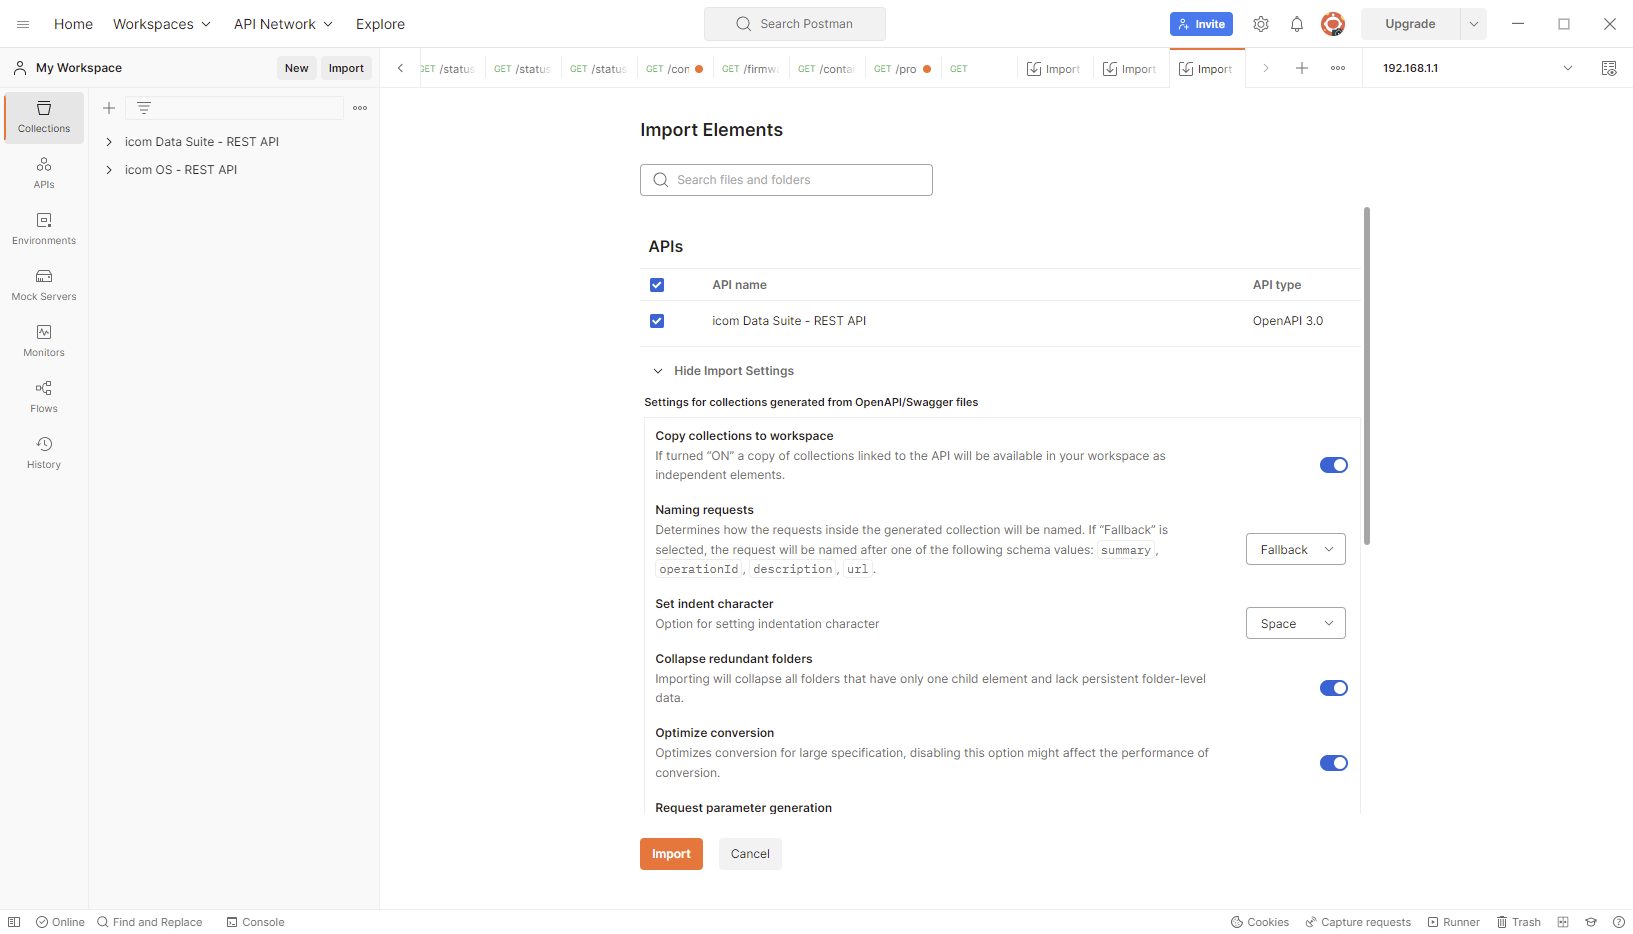
Click on the Import button in the My Workspace section top left (or in the File → Import… menu) and and open the above downloaded REST API documentation.
-
Click on
 Show import settings, check Copy collections to workspace and click on the Import button.
-
Click the Close button to finish the import.
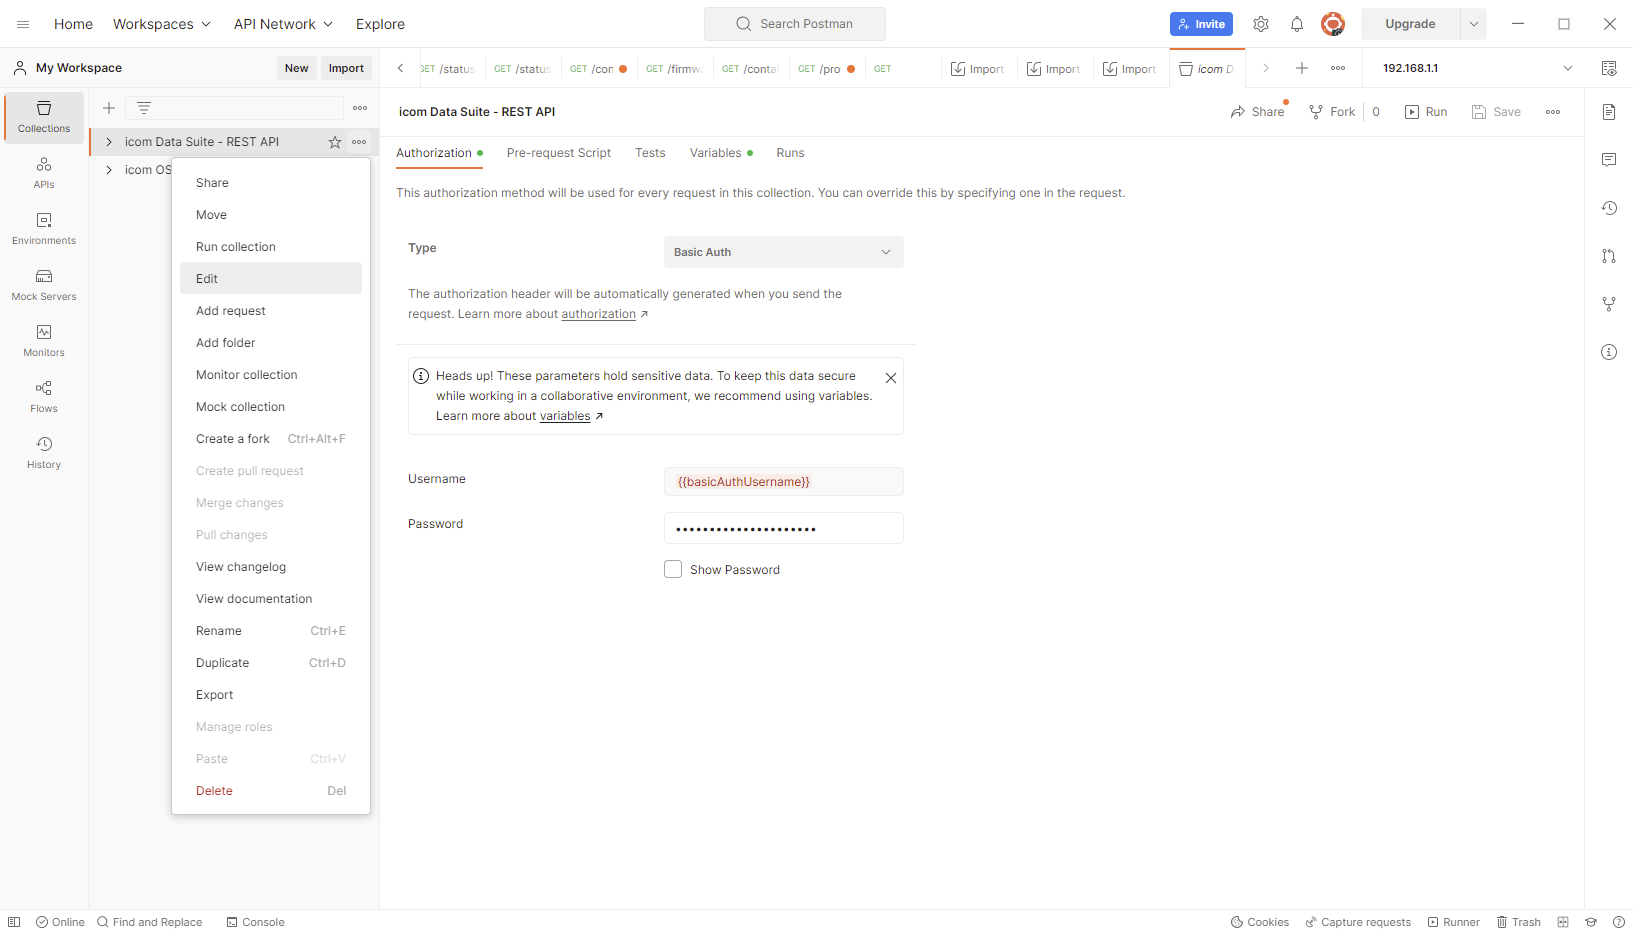
The documentation of the REST API of the icom Data Suite will be displayed as a collection. -
Hover over the new collection, click on
 View more actions and select
  Edit.
Edit.
-
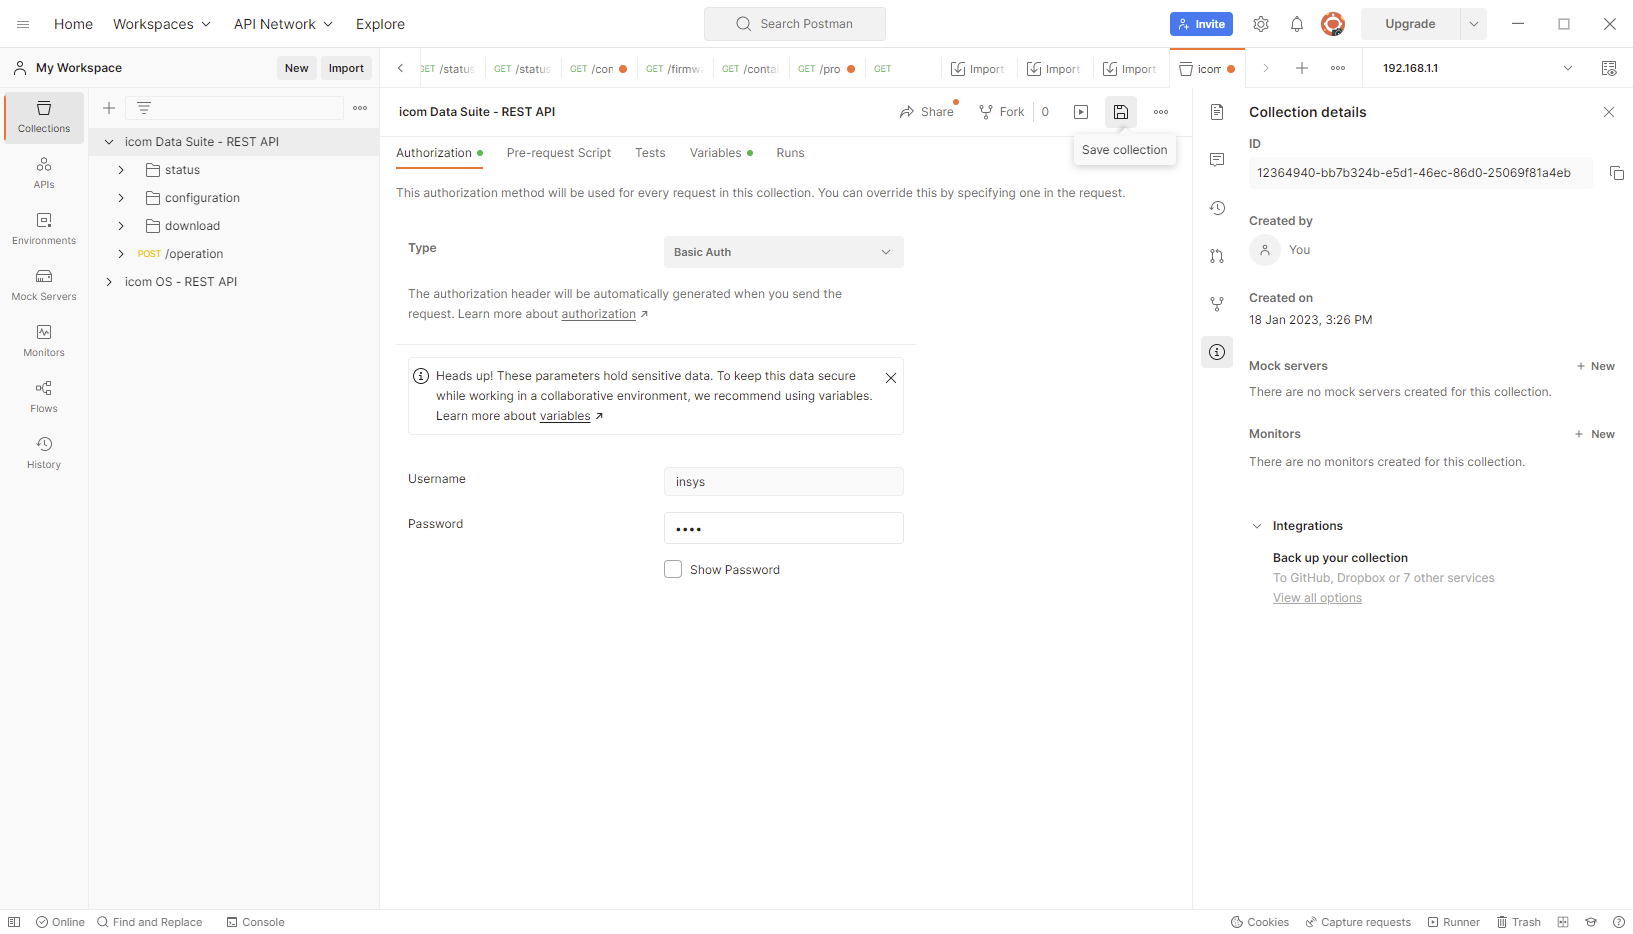
Change in the field of the icom Data Suite - REST API to the Authorization tab, select the Type Basic Auth and enter the Username and the associated Password of the user. The user must be entered in the Administration → User menu of the icom Data Suite with read and write privileges.
-
Click on
 Save Collection to store the credentials in the collection.
 -
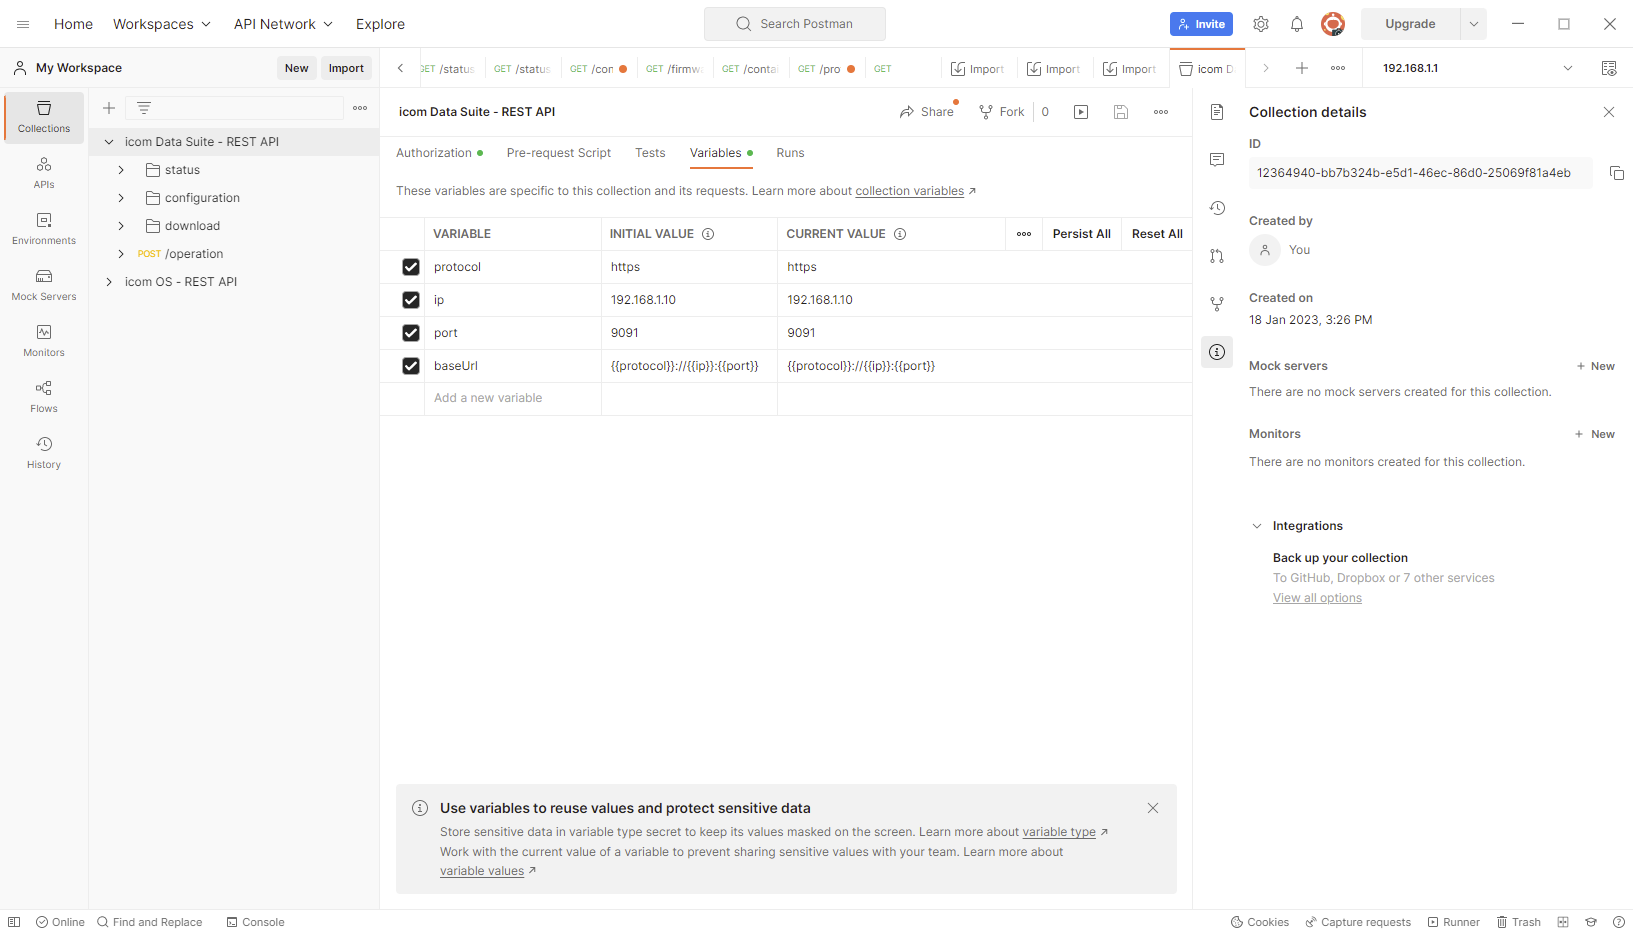
Change to the Variables tab and verify the stored variables for protocol (HTTP or HTTPS), IP address of the icom Data Suite and port for HTTP/HTTPS access. The default values of the icom Data Suite have been entered here with above imported REST API documentation. If these have been modified, they need to be adjusted here. [2]
2.2.1.1. Querying the user configuration
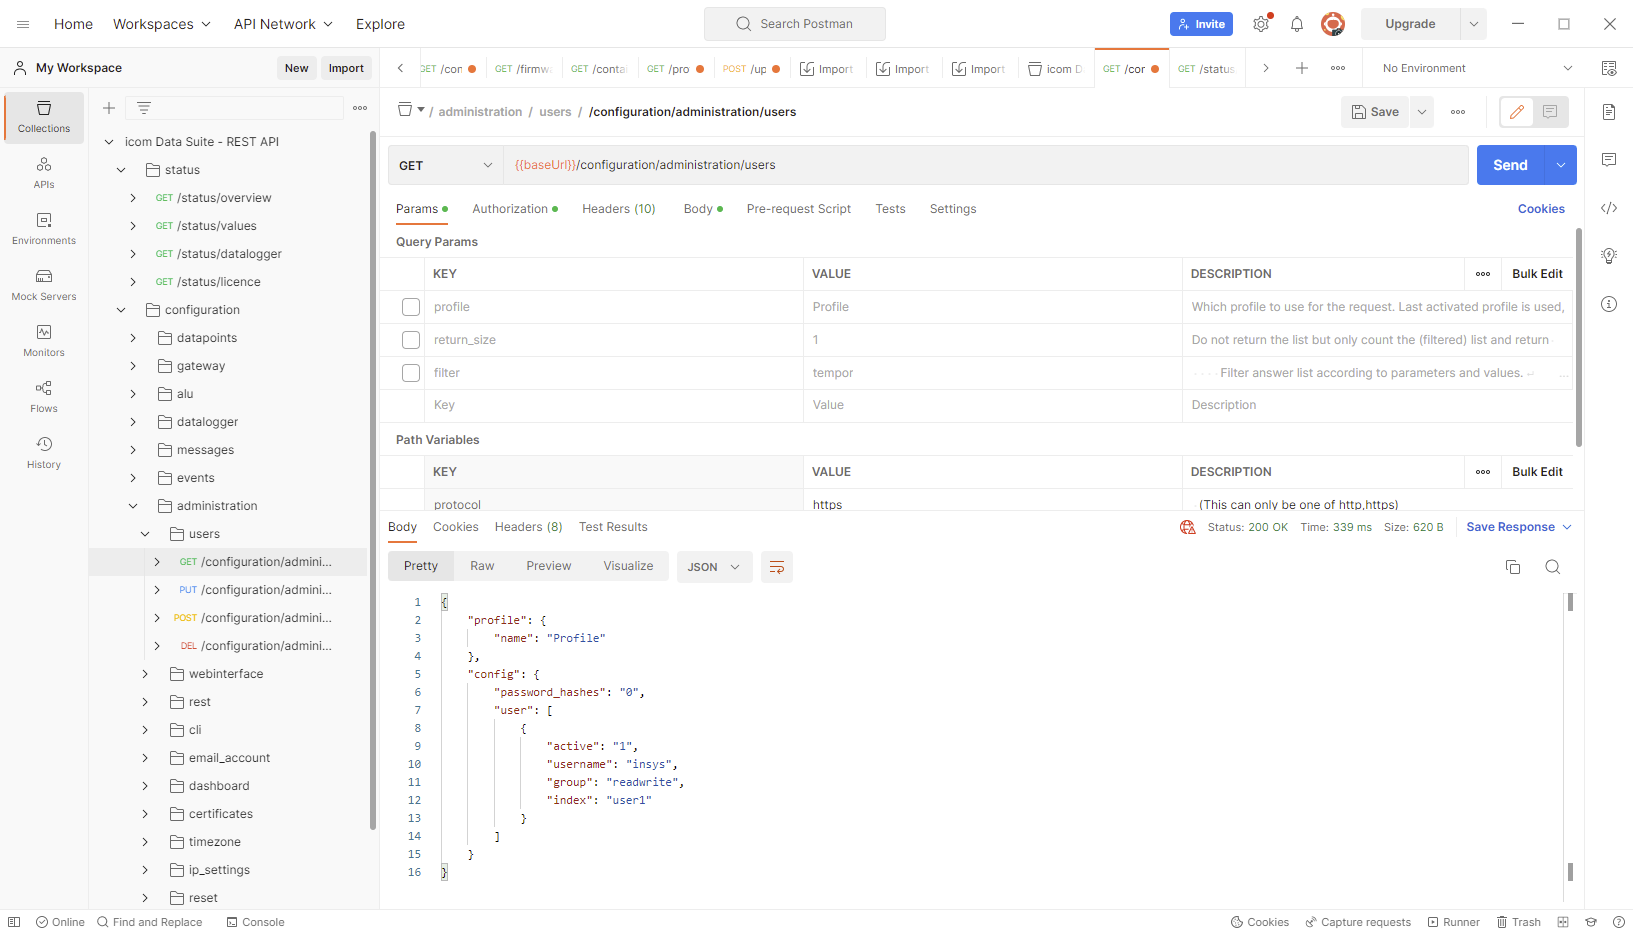
The HTTP command required for reading out resources (parameters or entries) is GET. The syntax of the command is described in the documentation of the REST API.
-
Navigate in the collection icom Data Suite - REST API to configuration → administration → users and click on the GET command.
-
Uncheck in the Query Params section the checkboxes for profile, return_size and filter.
-
Click on the Send button to send the GET command to the icom Data Suite.
The response appears in the lower part of the Postman app window in JSON format with the status code 200 OK.
It contains the user configuration of the icom Data Suite.
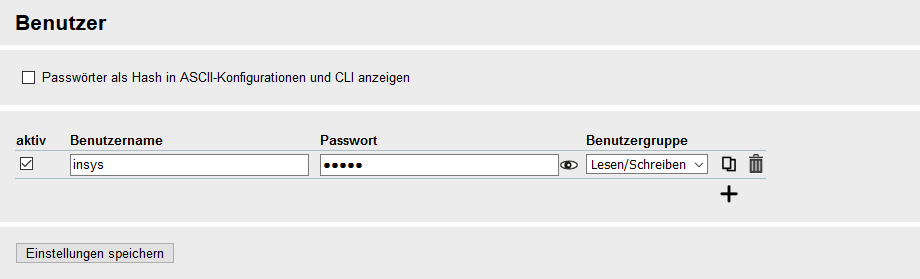
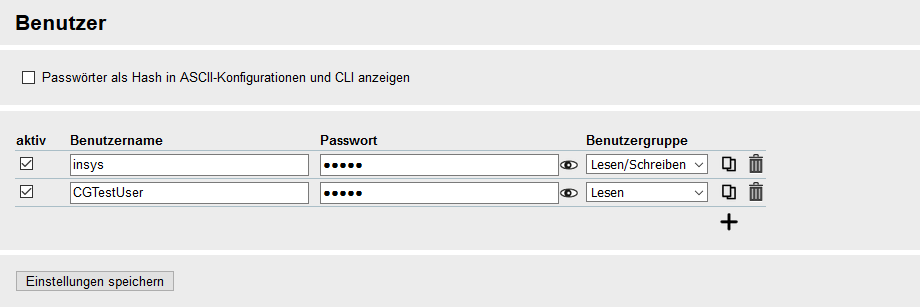
Compare the configuration in the web interface of the icom Data Suite in the Administration menu on the User page with this.
2.2.1.2. Adding a user
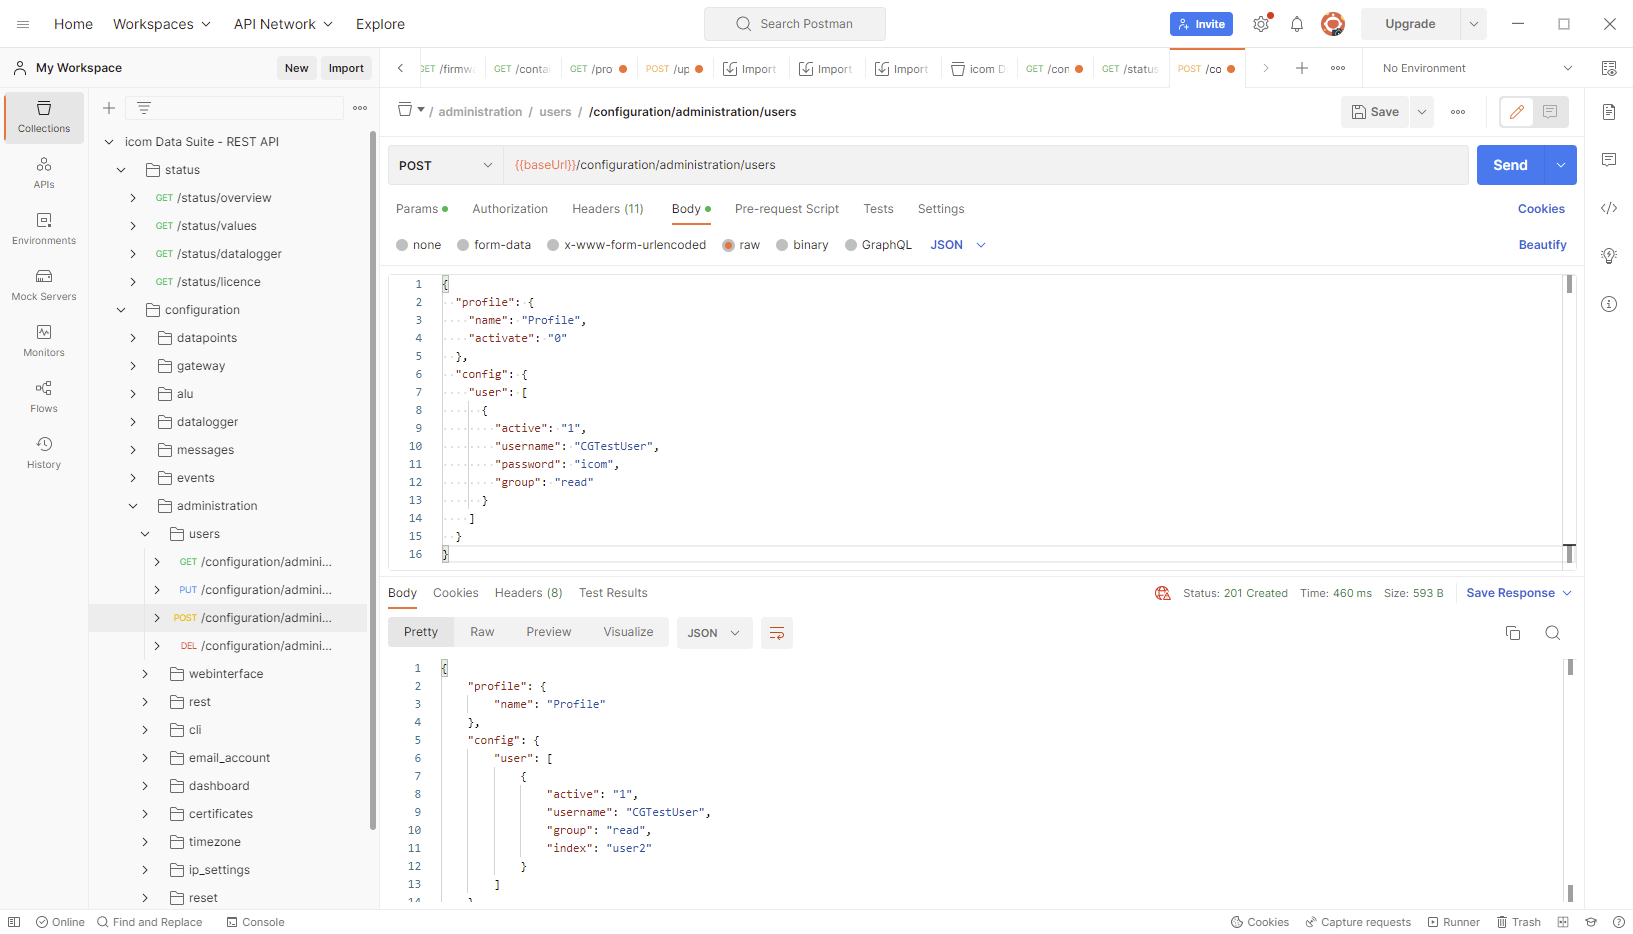
The HTTP command required for adding resources (parameters or entries) is POST. The syntax of the command is described in the documentation of the REST API.
-
Navigate in the collection icom Data Suite - REST API to configuration → administration → users and click on the POST command.
-
Change to the Body tab and modify the payload in JSON format as follows or copy it.
{
  "profile": {
    "name": "Profile",
    "activate": "0"
  },
  "config": {
    "user": [
      {
        "active": "1",
        "username": "CGTestUser",
        "password": "icom",
        "group": "read"
      }
    ]
  }
}
-
Click on the Send button to send the POST command to the icom Data Suite.
With this command, a new active user with the user name CGTestUser, the password icom and the user group Read * will be added to the profile *Profile, which will not be activated subsequently.
The response appears in the lower part of the Postman app window in JSON format with the status code 201 Created.
Above transmitted configuration will be displayed again.
Compare the configuration in the web interface of the icom Data Suite in the Administration menu on the User page with the newly added user. [3]
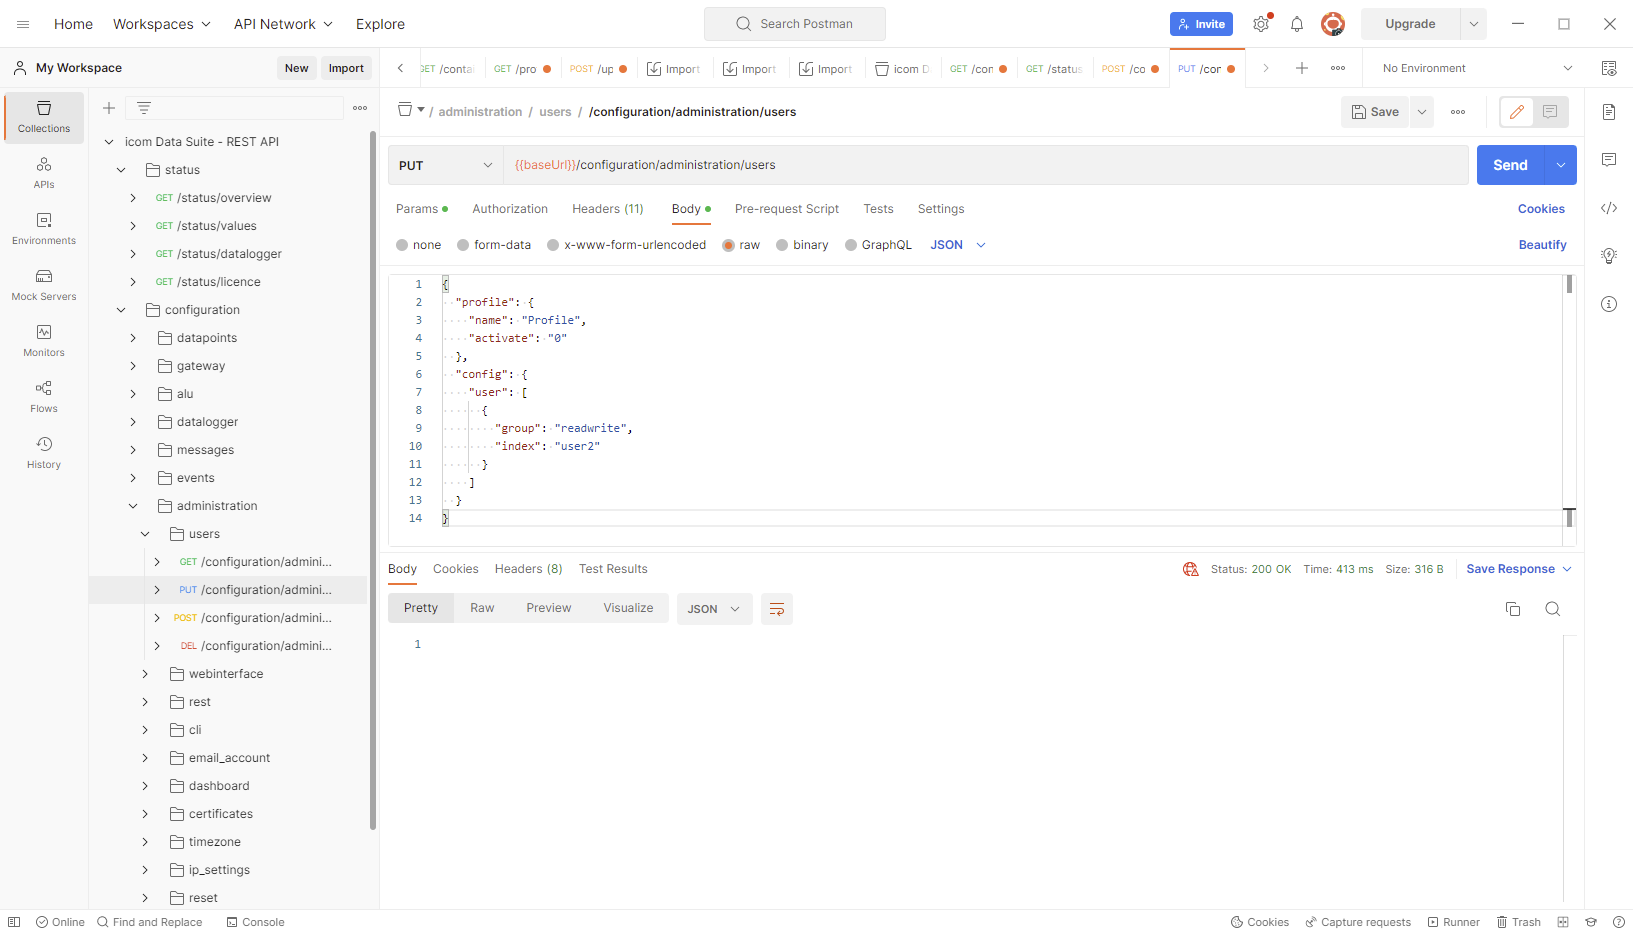
2.2.1.3. Modifying the configuration of a user
The HTTP command required for adding resources (parameters or entries) is PUT. The syntax of the command is described in the documentation of the REST API.
-
Navigate in the collection icom Data Suite - REST API to configuration → administration → users and click on the PUT command.
-
Change to the Body tab and modify the payload in JSON format as follows or copy it.
{
  "profile": {
    "name": "Profile",
    "activate": "0"
  },
  "config": {
    "user": [
      {
        "group": "readwrite",
        "index": "user2"
      }
    ]
  }
}
-
Click on the Send button to send the PUT command to the icom Data Suite.
With this command, the user group of the user with the index user2 * in the profile *Profile will be set to Read/Write. This will change the user group of above added user. The index of the user is displayed, if the GET command for querying the user configuration is executed again after adding.
The response appears in the lower part of the Postman app window in JSON format with the status code 200 OK.
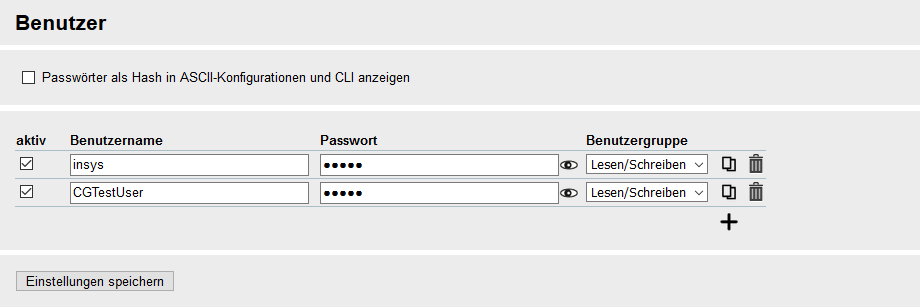
Compare the configuration in the web interface of the icom Data Suite in the Administration menu on the User page with the changed user group. [3]
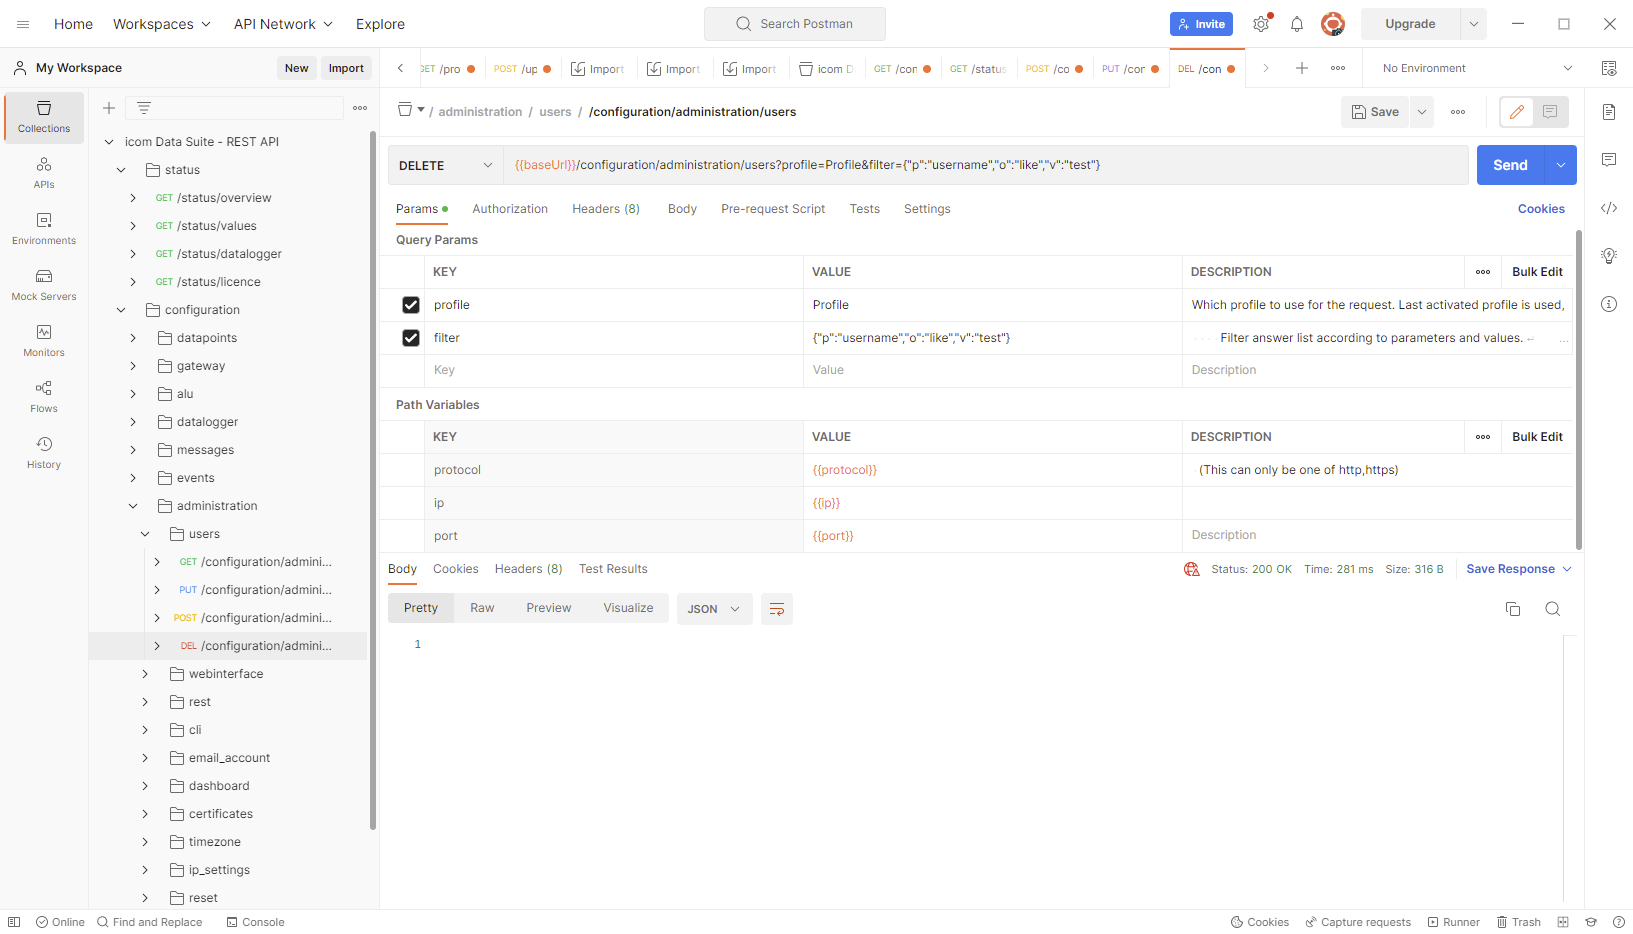
2.2.1.4. Deleting a User
The HTTP command required for adding resources (parameters or entries) is DELETE. The syntax of the command is described in the documentation of the REST API.
-
Navigate in the collection icom Data Suite - REST API to configuration → administration → users and click on the DEL command.
-
Enter on the Params tab under Query Params the value Profile for the query parameter profile. This deletes all users that meet the filter criteria from the profile Profile.
-
Enter the the value {"p":"username","o":"like","v":"test"} for the query parameter filter. This deletes all users from the specified (or last activated, if no profile is specified) profile, whose user name ("p":"username") contains ("o":"like") the string test ("v":"test").
|
|
Each filter consists of three parameters: "p" : "parameter to be filtered" "o" : "operator to be used for the filter, either "eq" (equal) for an exact match or "like" (similar) if the specified string is to be contained only" "v" : "value that is to be searched in the parameter according to the operator" |
-
Click on the Send button to send the DELETE command to the icom Data Suite.
The response appears in the lower part of the Postman app window in JSON format with the status code 200 OK.
Compare the configuration in the web interface of the icom Data Suite in the Administration menu on the User page with the user deleted again now. [3]
2.2.1.5. Manual execution of actions
The icom Data Suite permits a variety of actions to be executed, such as restarting, starting a timer, sending a message or setting a data point. Actions are triggered when an event occurs, but can also be triggered manually.
Unfortunately, it is not easily possible to determine the syntax of the JSON body for manual actions in Postman. However, the required syntax can be determined using the CLI. Rfer to the pages Rest interface → Debugging and triggering manual actions as well as Determining the command syntax for CLI and REST interface in the Online Help of the icom Data Suite or the router (for the CLI command transmitted to the router) for this.
2.2.1.5.1. Example 1: Switching the Info LED
In this example, the Info LED on the router is to be made to flash manually.
The required HTTP command for executing actions manually is POST.
-
Navigate in the collection icom Data Suite - REST API to operation and click on the POST command.
-
Change to the Body tab and modify the payload in JSON format as follows or copy it.
{
    "method" : "manual_action",
    "params" : {
        "type" : "m3_cli",
        "options" : {
            "command" : "help.debug.info_led.info_led=flash\nhelp.debug.info_led.submit"
        }
    }
}
-
Click on the Send button to send the POST command to the icom Data Suite.
This command makes the Info LED at the router to flash. It is deactivated in the same way with the value off for the parameter info_led and actiavted with on. The CLI command consists of the two commands help.debug.info_led.info_led=flash to set the LED to flash and help.debug.info_led.submit to submit the set parameter, joined by \n for a line break between the two commands.
The response appears in the lower part of the Postman app window in JSON format with the status code 201 Created.
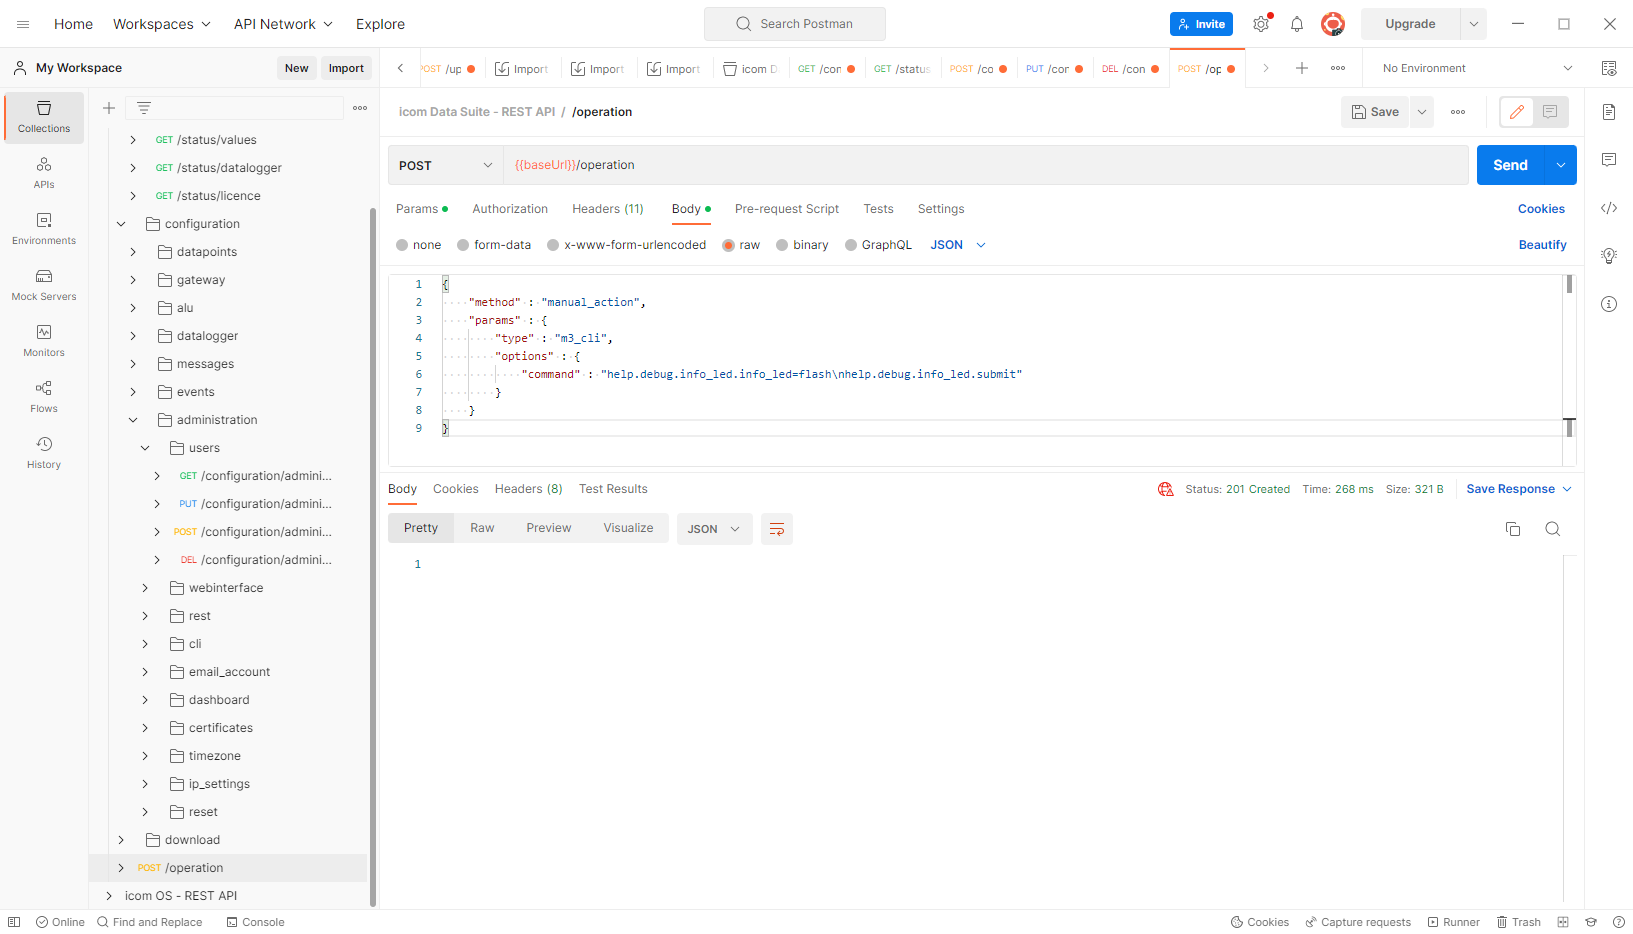
Also watch the LED on the router.
2.2.1.5.2. Example 2: Setting an analogue value
In this example, the flag flag1 is supposed to be set to a certain value. It is assumed that this flag has been created with an analogue data type in the icom Data Suite.
The required HTTP command for executing actions manually is POST.
-
Navigate in the collection icom Data Suite - REST API to operation and click on the POST command.
-
Change to the Body tab and modify the payload in JSON format as follows or copy it.
{
  "method": "manual_action",
  "params": {
    "type": "analog",
    "options": {
      "datapoint": "flag1",
      "change": "set_to",
      "set":"to_value",
      "value":"123555"
    }
  }
}
-
Click on the Send button to send the POST command to the icom Data Suite.
This command sets the analogue data point (flag) flag1 to the value 123555.
The response appears in the lower part of the Postman app window in JSON format with the status code 201 Created.
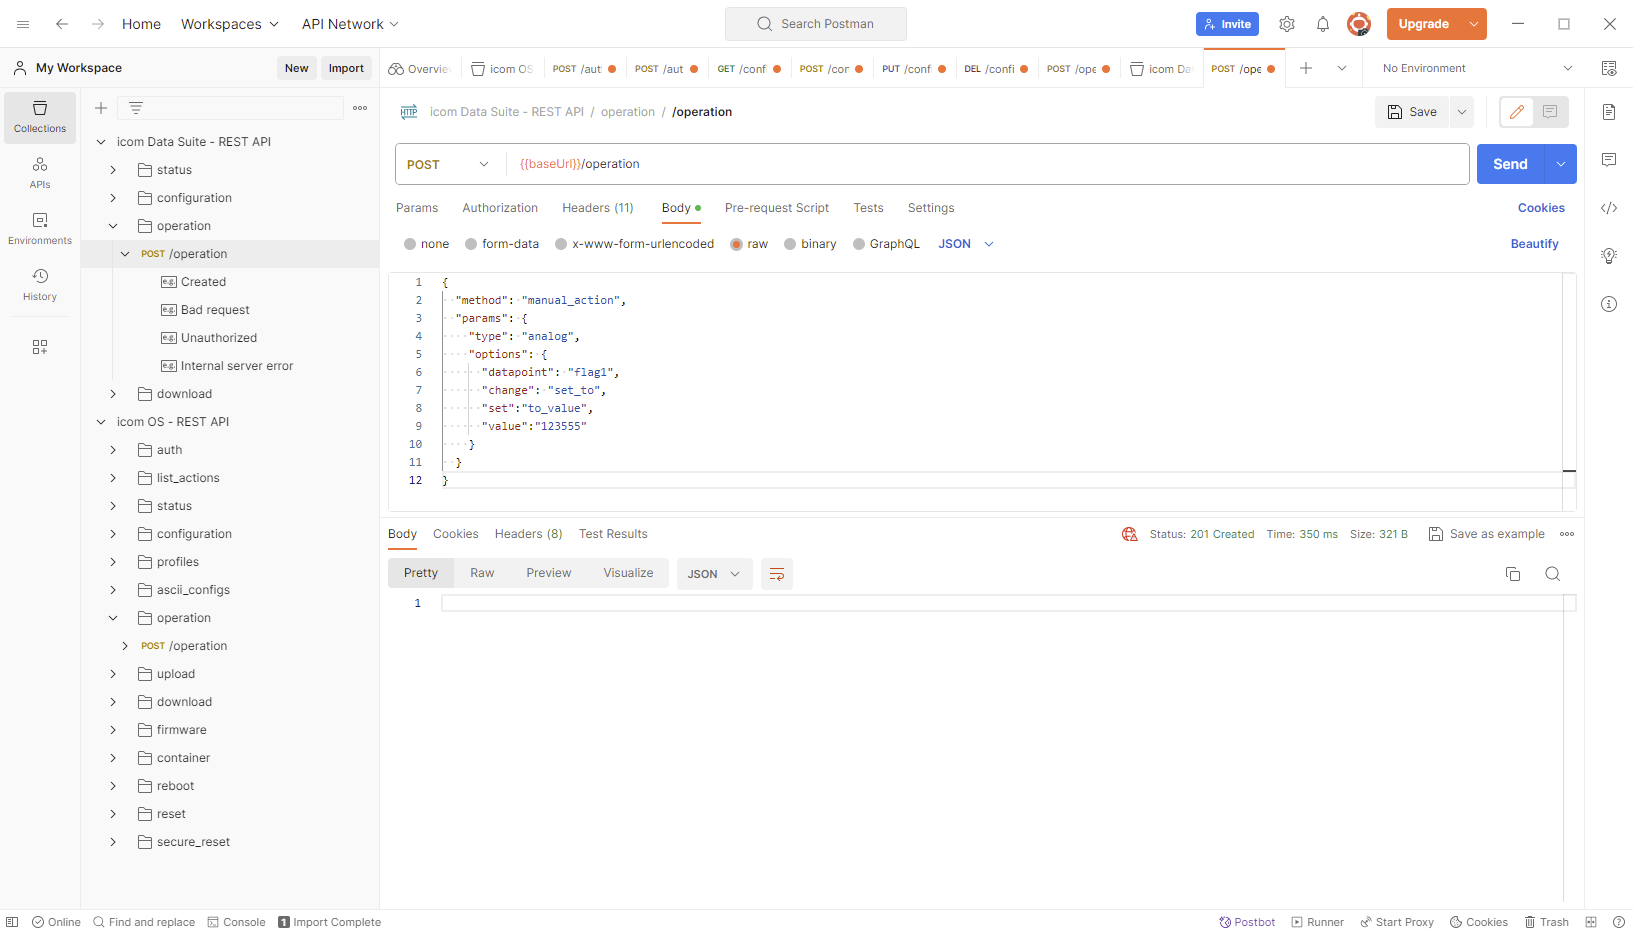
Open in the web interface of the icom Data Suite the Status → Current Values page and check whether the value of the flag flag1 has changed to the respective value.
2.2.2. Swagger Editor
The Swagger Editor is a useful online tool for getting an overview of all existing commands with their associated options and determining the syntax of commands for the transmission via the REST interface. It does not require an installation.
A detailed description of the communication with the REST interface of the icom Data Suite using the Swagger Editor will follow later at this point. Informationen regarding the communication with the REST interface of the routers using the Swagger Editor can be found in this Configuration Guide.
3. Troubleshooting
-
In case of problems with the cURL syntax, it might be helpful to use the option
-k(verbose) to facilitate troubleshooting. -
If an error related to an untrusted certificate chain is indicated when executing a cURL command copied from the Swagger editor, it is possible that the cURL option
-kwas forgotten to be appended to the command, which prevents verification of the certificate. -
Depending on the operating system, it may not be possible to process the cURL command generated in the Swagger editor directly in the terminal. Then it needs to be modified as follows:
-
Copy command to text editor
-
Remove apostrophes around the cURL command (e.g. GET)
-
Replace apostrophes around the parameters with quotes
-
Remove line breaks
-
Remove unnecessary blanks
-
Remove unnecessary backslashes (\)
-
Back to the Configuration Guides for icom OS Smart Devices
Back to overview