REST stands for Representational State Transfer and provides an interface for configuration, status query and execution of manual actions of the router via the HTTP and HTTPS protocol.
|
|
This Configuration Guide applies from icom OS Firmware version 5.2 with the new REST API version 2.0. Use the previous Configuration Guide if your router has an earlier firmware version. The user guidance is described on the basis of the new user interface from icom OS 6.0. |
The HTTP(S) REST interface permits to configure the router automated or retrieve values using scripts.
You’ll find an example for reading out, adding, modifying and deleting configurations via the REST interface using the Postman app and the web-based tool Swagger in the following. It shall communicate how to determine the syntax for command and transmitted configuration information (payload) using different tools and how to transmit it to the router.
The Configuration Guide is based on a router in default settings after commissioning with the startup wizard. The description may differ for individual configurations with regard to profiles, addresses etc.
The tools mentioned are only examples and serve as guide for dealing with the REST interface using external tools.
|
|
The icom Data Suite available for INSYS routers provides a REST interface as well. The operation is analogue to the REST interface of the router described in this Configuration Guide. |
|
|
The documentation of the REST API contains all commands that are available in the different configurations and equipment variants of the router. Not all contained commands are supported by your router. Router and REST API documentation must have the same firmware revision. |
1. Situation
The following configuration steps are to be made using the REST interface:
-
Retrieving the currently configured users of the router
-
Adding a new user
-
Modifying the configuration of this user
-
Deleting the newly added user
-
Manual execution of actions
2. Solution
The full documentation of the REST API will be downloaded from the router in form of a JSON file according to the OpenAPI Specification 3.0.
This JSON file will be opened in a tool, such as the Swagger Editor or Postman, to determine the syntax for command transmission.
The adjusted configuration commands will then be transmitted to the router using this tools or a cURL command.
Ensure that you have access to the web interface of the router.
2.1. Activating the REST interface and downloading the REST API documentation
Access to the REST interface via HTTPS is already enabled in the default settings of the router.
-
Open the user interface of the router in a browser: insys.icom [1]
-
Activate in the
 Administration → Configuration access menu in the Web/REST interface section the checkbox Activate HTTPS and click on SUBMIT .

-
Click in the
 Administration → Configuration access menu on
  REST API documentation (OpenAPI as JSON) and download the REST API documentation to the computer.

-
Click on ACTIVATE PROFILE
 .
.
The firewall exception rule Local access to webinterface via HTTPS already exists and is configured in the default settings of the router.
This permits access to the REST interface with active firewall.
It only needs to be modified if the respective port has been changed.
The firewall rules are configured in the ![]() Network → Firewall / NAT menu.
Network → Firewall / NAT menu.
2.2. Determining the REST syntax and transmitting the configuration commands to the router
REST API tools such as Postman and the Swagger Editor provide a very convenient way for this. Configuration commands can also be issued in a command line using cURL.
2.2.1. Authentication
Authentication takes place via access and refresh tokens.
A Post request, which is authenticated using a combination of user name and password, managed in the ![]() Administration → User menu must be issued to receive the tokens.
The access token received in the authorisation header is used to authenticate further communication via the REST interface.
When the validity of the access token expires (5 minutes), another POST request must be made with the refresh token in the authorisation header to obtain new access and refresh tokens for further communication.
The refresh token can only be used once to request new tokens and its validity is identical to the Auto logout on inactivity time, set in the
Administration → User menu must be issued to receive the tokens.
The access token received in the authorisation header is used to authenticate further communication via the REST interface.
When the validity of the access token expires (5 minutes), another POST request must be made with the refresh token in the authorisation header to obtain new access and refresh tokens for further communication.
The refresh token can only be used once to request new tokens and its validity is identical to the Auto logout on inactivity time, set in the ![]() Administration → Configuration access menu in the Web/REST interface section.
A logout from the REST interface is made with a POST request, where both tokens can be used in the authorisation header.
The tokens lose their validity with the logout, their expiry or a restart of the router.
Administration → Configuration access menu in the Web/REST interface section.
A logout from the REST interface is made with a POST request, where both tokens can be used in the authorisation header.
The tokens lose their validity with the logout, their expiry or a restart of the router.
Example of the request to receive the tokens:
POST /api/v2_0/auth/login
The user name (here insys) and password (here icom) are transmitted in the body of the request.
{
  "username" : "insys",
  "password" : "icom"
}
The following responses are possible:
400 Bad Request → Body is not correct
401 Unauthorized → Credentials are not correct
200 OK → with return of the following body (which contains the requested tokens):
{
  "access" : "<AccessToken>",
  "refresh" : "<RefreshToken>"
}
Example of the request to renew the tokens:
POST /api/v2_0/auth/refresh (the refresh token must be contained in the authorization header)
The following responses are possible:
401 Unauthorized → Refresh token is not correct
200 OK → with return of the following body (which contains the new tokens):
{
  "access" : "<NewAccessToken>",
  "refresh" : "<NewRefreshToken>"
}
Example of the request to logout from the session:
POST /api/v2_0/auth/logout (one of the two tokens must be contained in the authorization header)
The following responses are possible:
401 Unauthorized → Token is not correct
200 OK
2.2.2. Postman
The Postman app is a useful tool for communicating with the router via the REST interface. The following describes how to import the REST API documentation of the router in the Postman app, request the access tokens for the REST interface as well as verify the environment variables for the communication with the router. Furthermore, the example of the user configuration describes how to read out, add, change and delete configurations with the help of the commands GET, POST, PUT and DELETE. You will also learn how to execute manual actions.
-
Download the Postman app and install it.
-
Open the Postman app
-
Click on the Import button in the My Workspace section top left (or in the File → Import… menu) and and open the above downloaded REST API documentation.
-
Check the checkbox Postman Collection and click on the Import button.
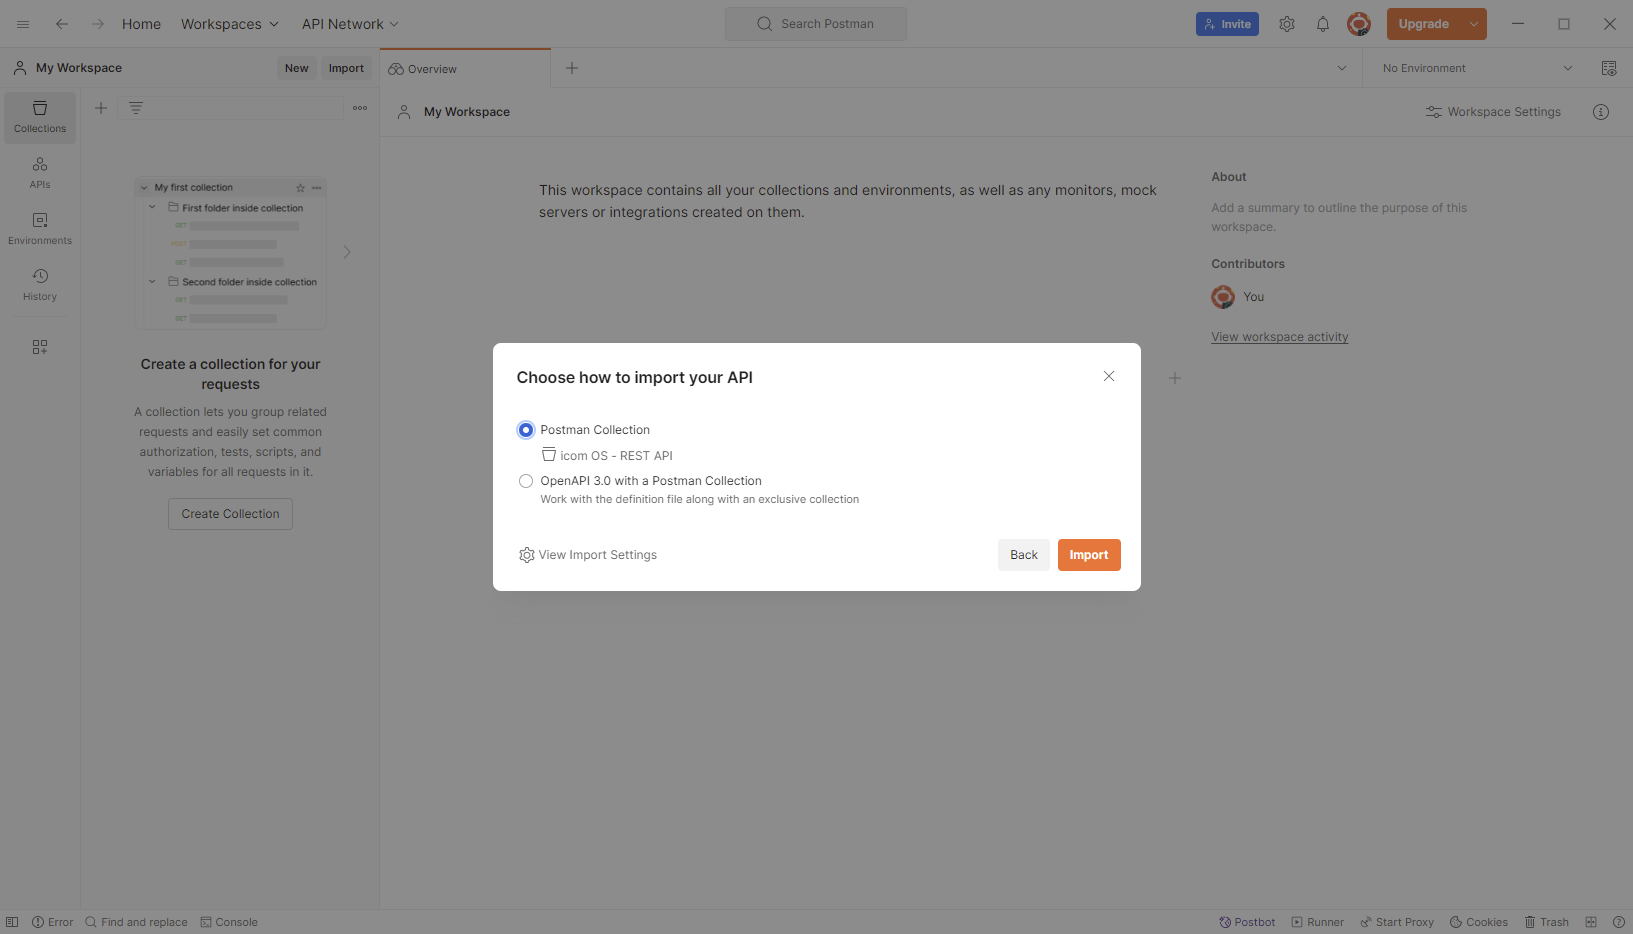
The documentation of the REST API of the router will be displayed as a collection. -
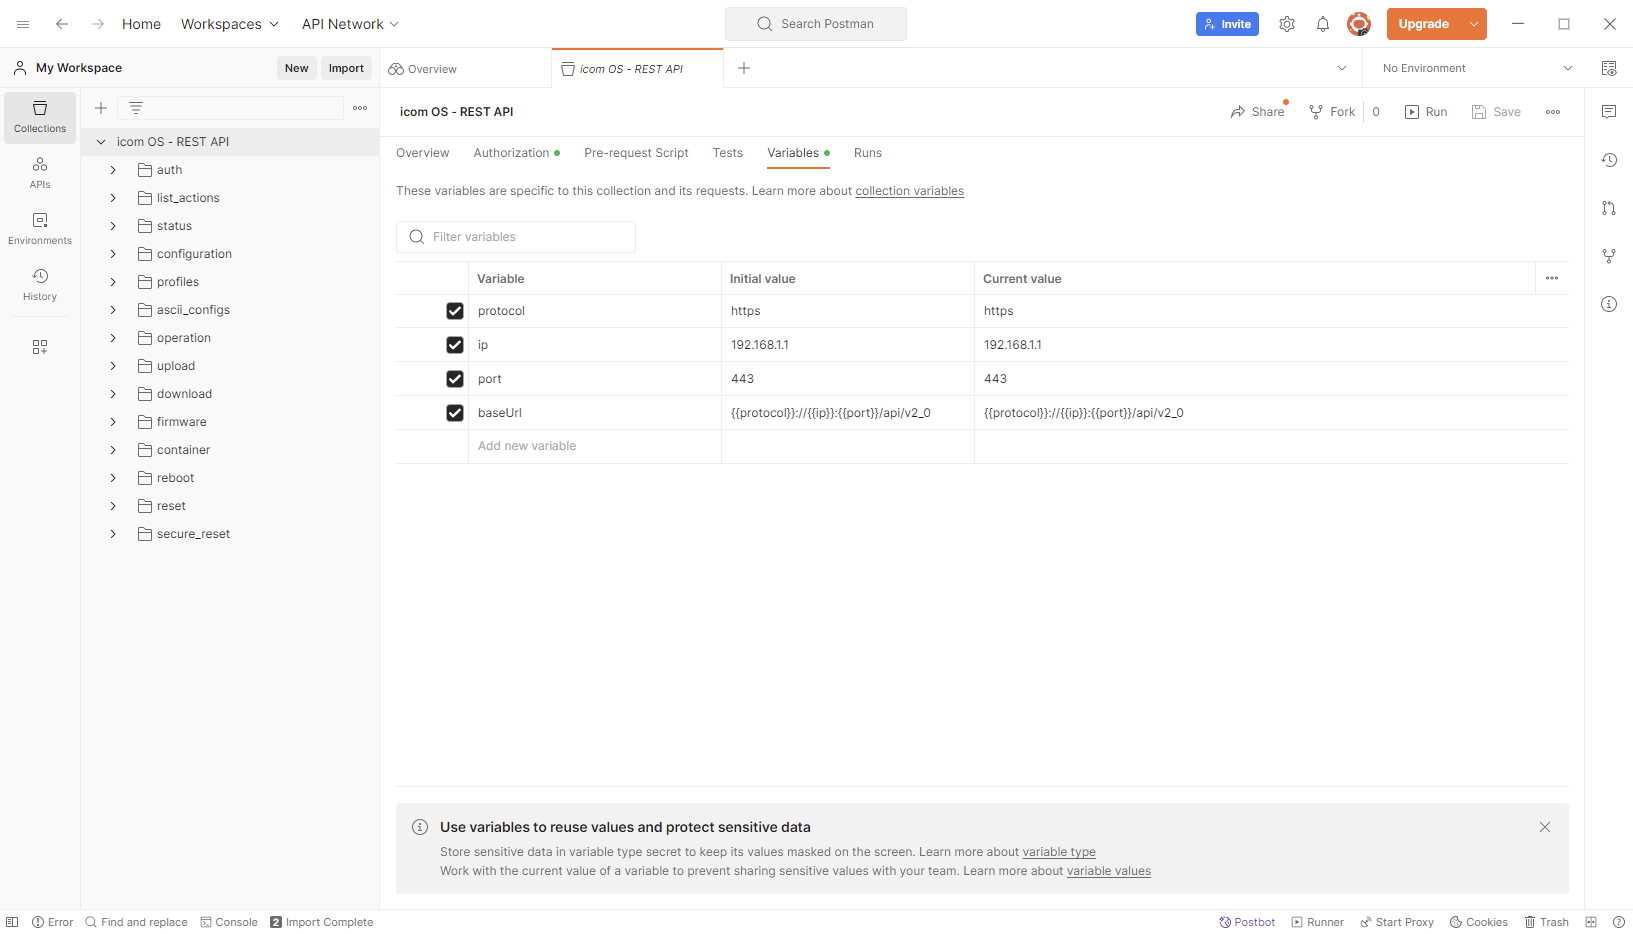
Highlight the new collection, change in the field on the right to the Variables tab and check the stored variables for protocol (HTTP or HTTPS), IP address: of the router, port for HTTP/HTTPS access and the URL incl. path. The default values of the router have been entered here with above imported REST API documentation. If these have been changed, they must be modified and saved here.
-
Navigate in the collection icom OS - REST API to auth → login and click on the * POST* command.
-
Change to the Body tab, adjust the variables username and password (here insys and icom)[2] and click the Send button to send the POST command to the router.
The response appears in the lower part of the Postman app window in JSON format with the status code 200 OK. It contains the two tokens for authentication.
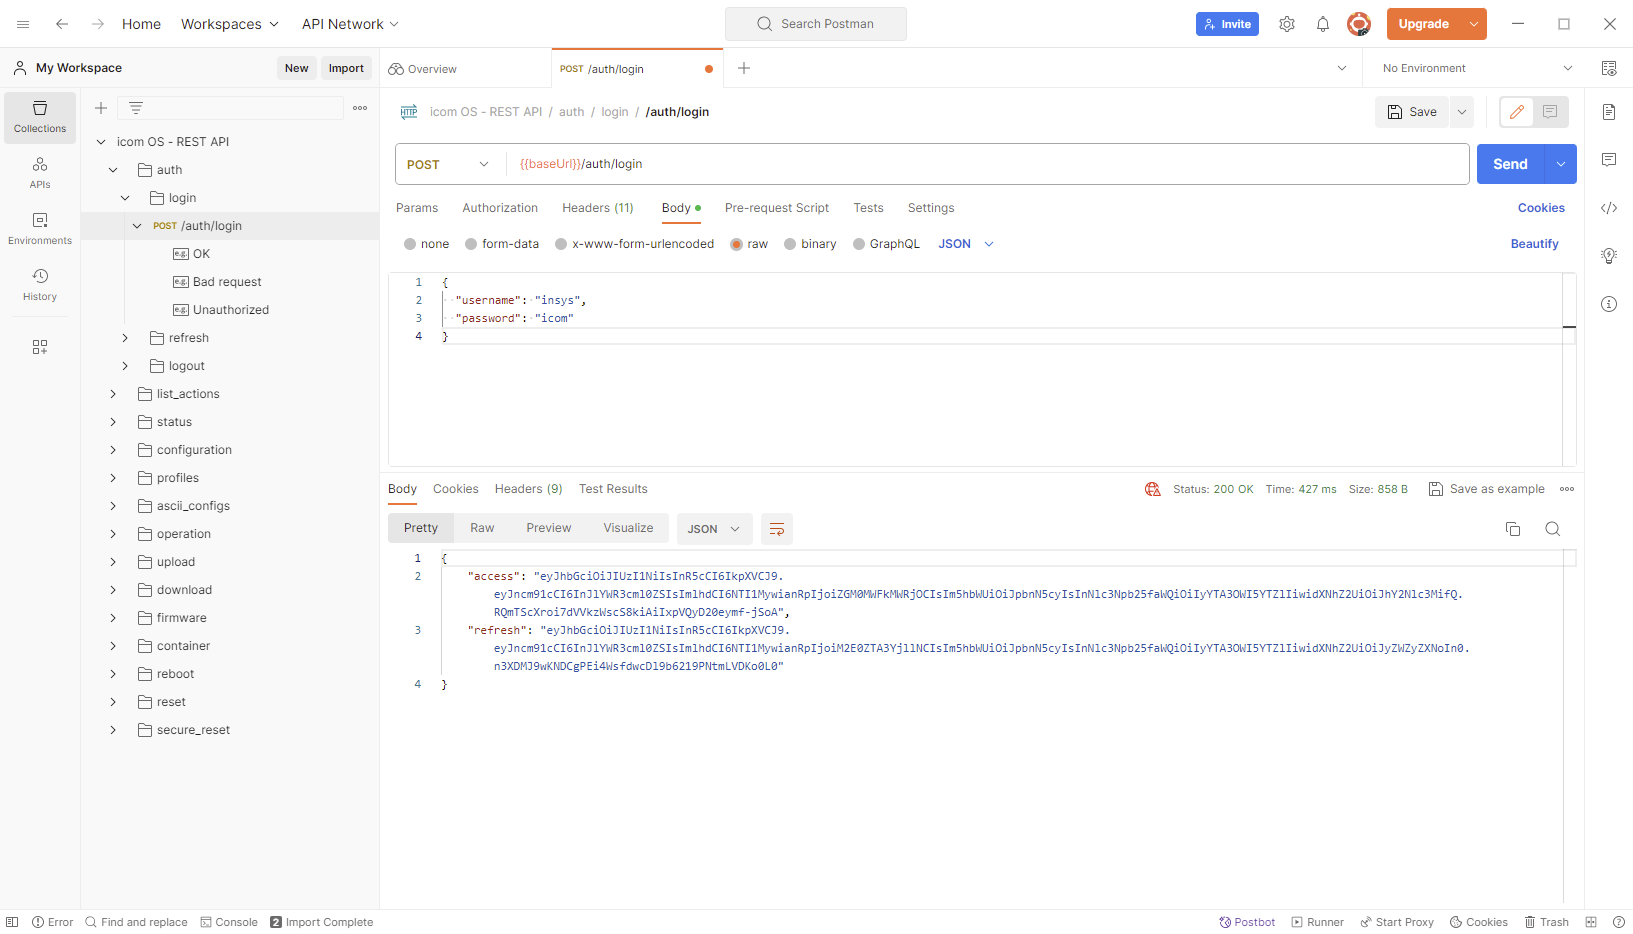
-
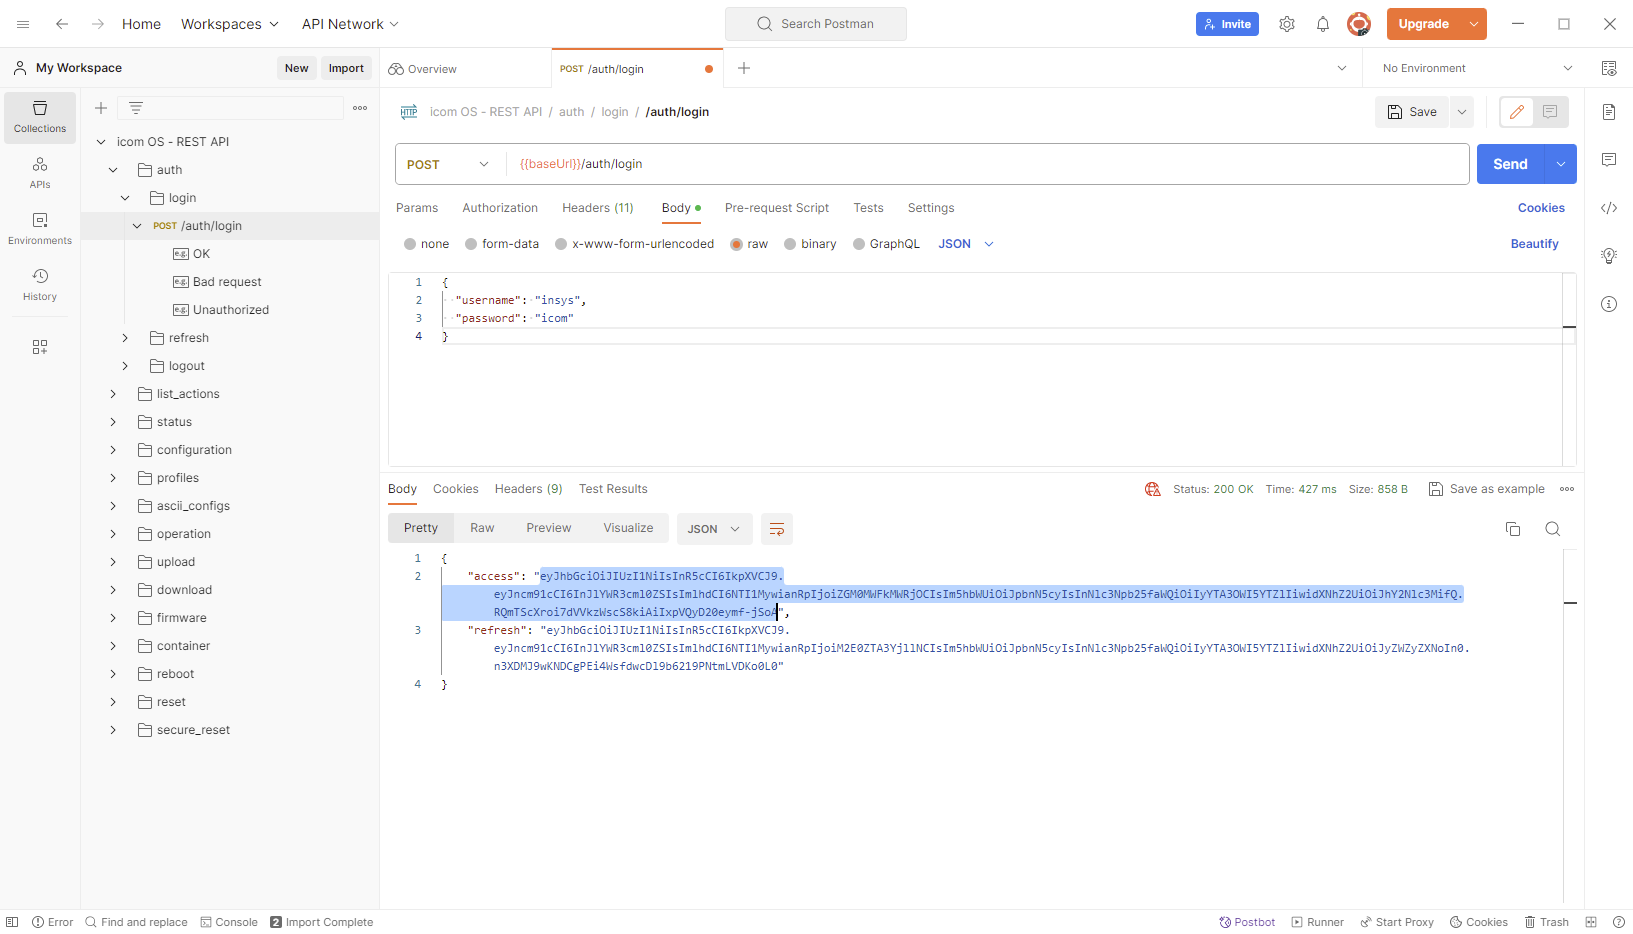
Copy the access token to the clipboard.
-
Hover over the new collection, click on
 View more actions and select
  Edit.
Edit. -
Change in the field on the right to the Authorization tab, select the Type Bearer Token and copy the access token from the clipboard into the Token field.
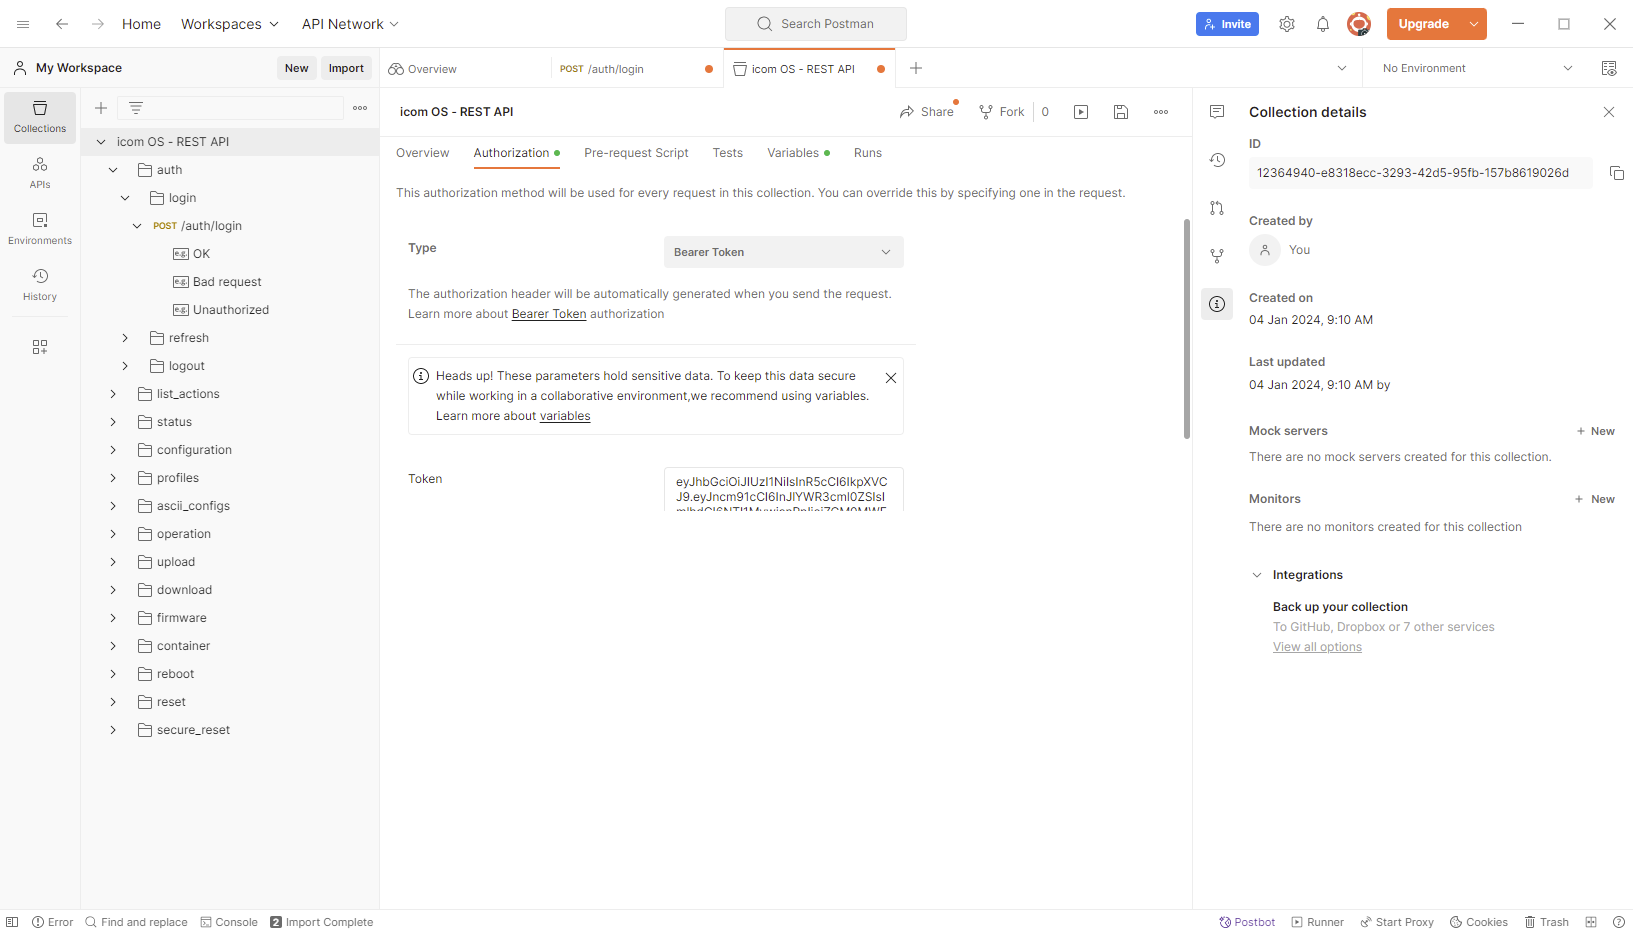
-
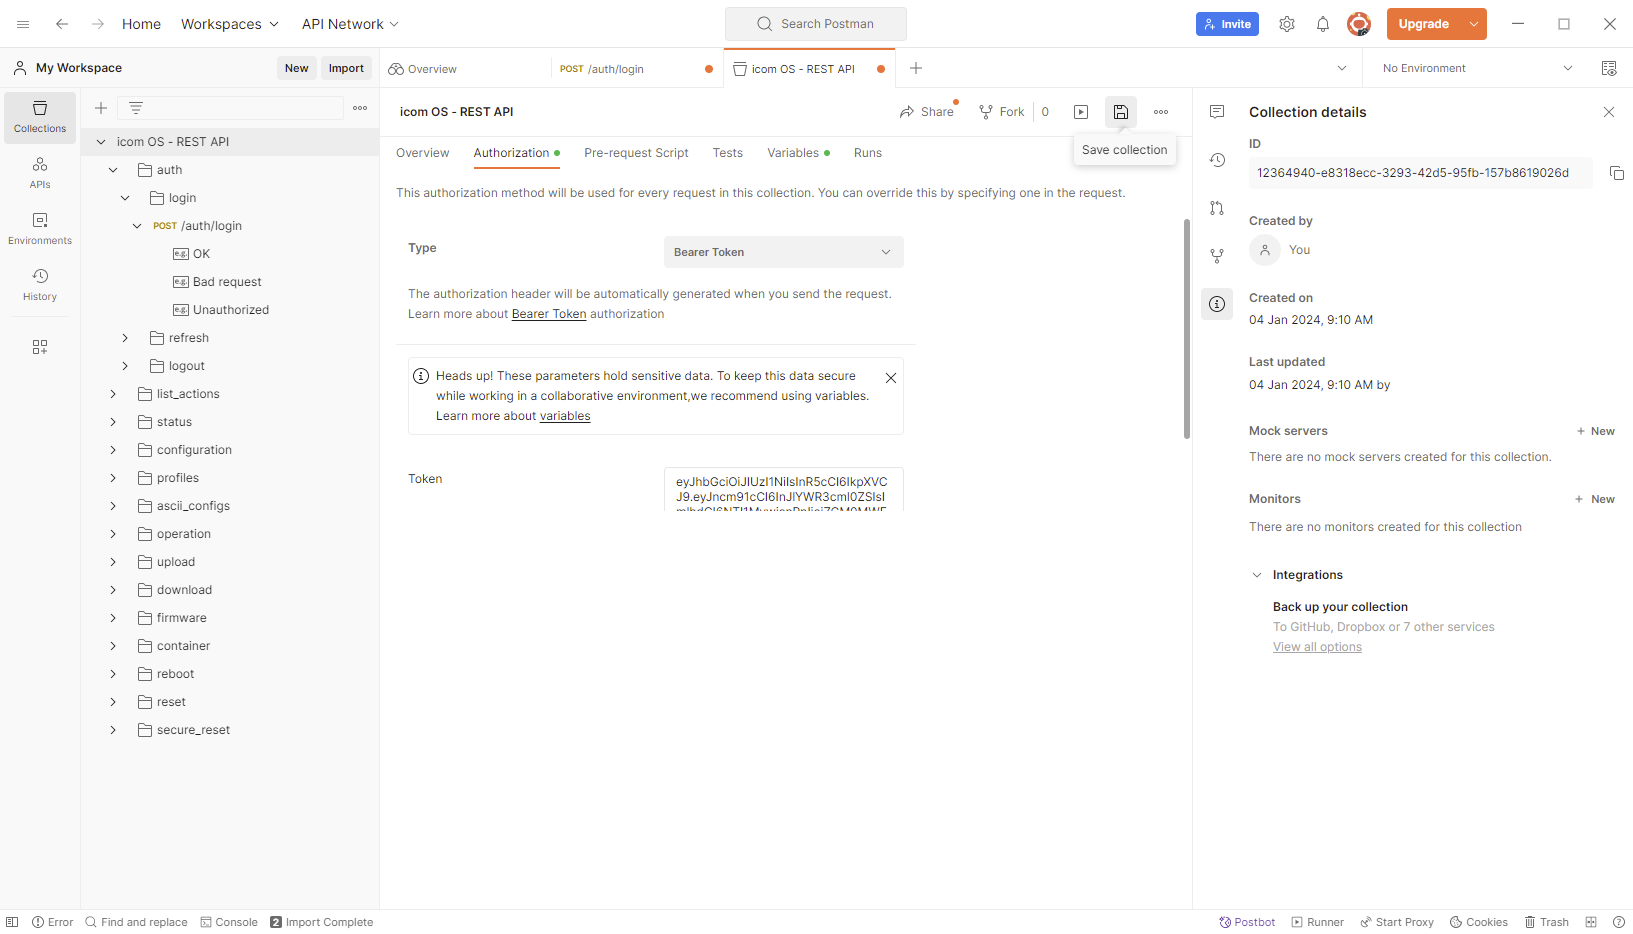
Click on
 Save Collection, to store the token in the collection.
The access token is stored in the collection now and willö be inserted into the authorisation header of the request for each subsequent request.
|
|
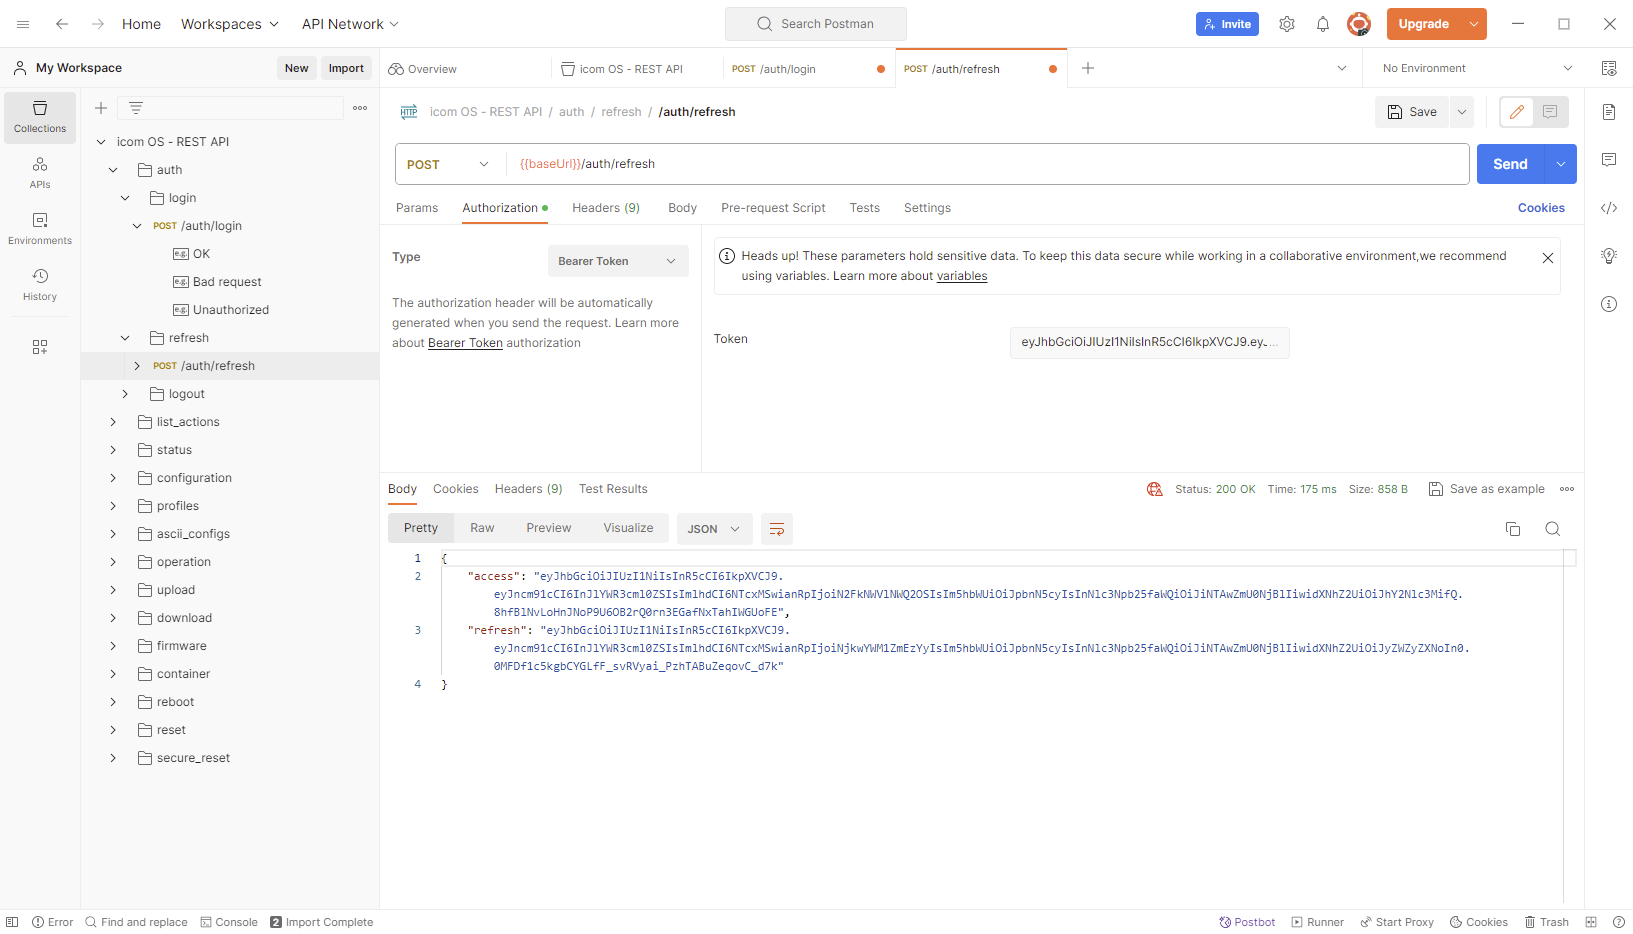
Please note that the access token is only valid for 5 minutes and after this time a new access token must be requested using the refresh token.
To do this, the refresh token must be stored as a token in the HTTP command POST /api/v2_0/auth/refresh on the Authorization tab as described above and a new token pair must be requested.
The newly transmitted access token must then be stored as a token in the collection again as described above.
Alternatively, it is also possible to simply request a new access token as described above with POST /api/v2_0/auth/login and log in again.
|
2.2.2.1. Querying the user configuration
The HTTP command required for reading out resources (parameters or entries) is GET. The syntax of the command is described in the documentation of the REST API.
-
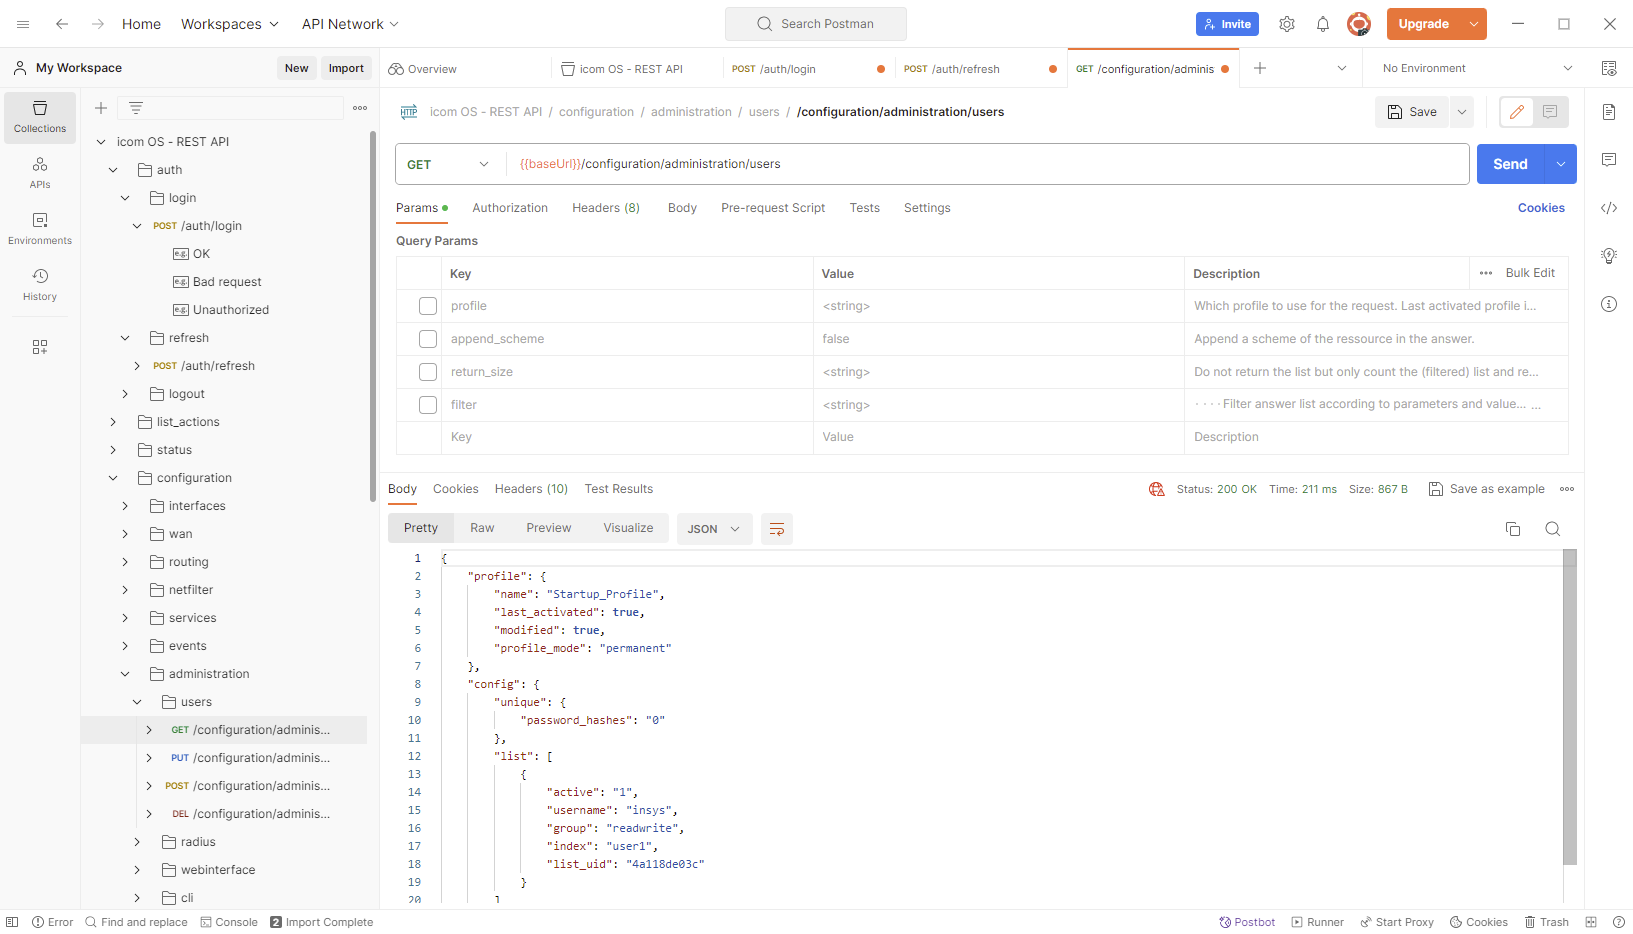
Navigate in the collection icom OS - REST API to configuration → administration → users and click on the GET command.
-
Uncheck on the Params tab the checkboxes fpr profile, append_scheme, return_size and filter.
-
Click on the Send button to send the GET command to the router.
The response appears in the lower part of the Postman app window in JSON format with the status code 200 OK.
It contains the user configuration of the router.
Compare the configuration in the web interface of the router in the Administration menu on the User page with this.

2.2.2.2. Adding a user
The HTTP command required for adding resources (parameters or entries) is POST. The syntax of the command is described in the documentation of the REST API.
-
Navigate in the collection icom OS - REST API to configuration → administration → users and click on the POST command.
-
Change to the Body tab and modify the payload in JSON format as follows or copy it.
{
  "profile": {
    "name": "Startup_Profile",
    "activate": "1"
  },
  "config": {
    "list": [
      {
        "active": "1",
        "username": "CGTestUser",
        "password": "icom",
        "group": "read"
      }
    ]
  }
}
-
Click on the Send button to send the POST command to the router.
With this command, a new active user with the user name CGTestUser, the password icom and the user group Read * will be added to the profile *Startup_Profile, which will be activated subsequently.
The response appears in the lower part of the Postman app window in JSON format with the status code 201 Created.
Above transmitted configuration will be displayed again.
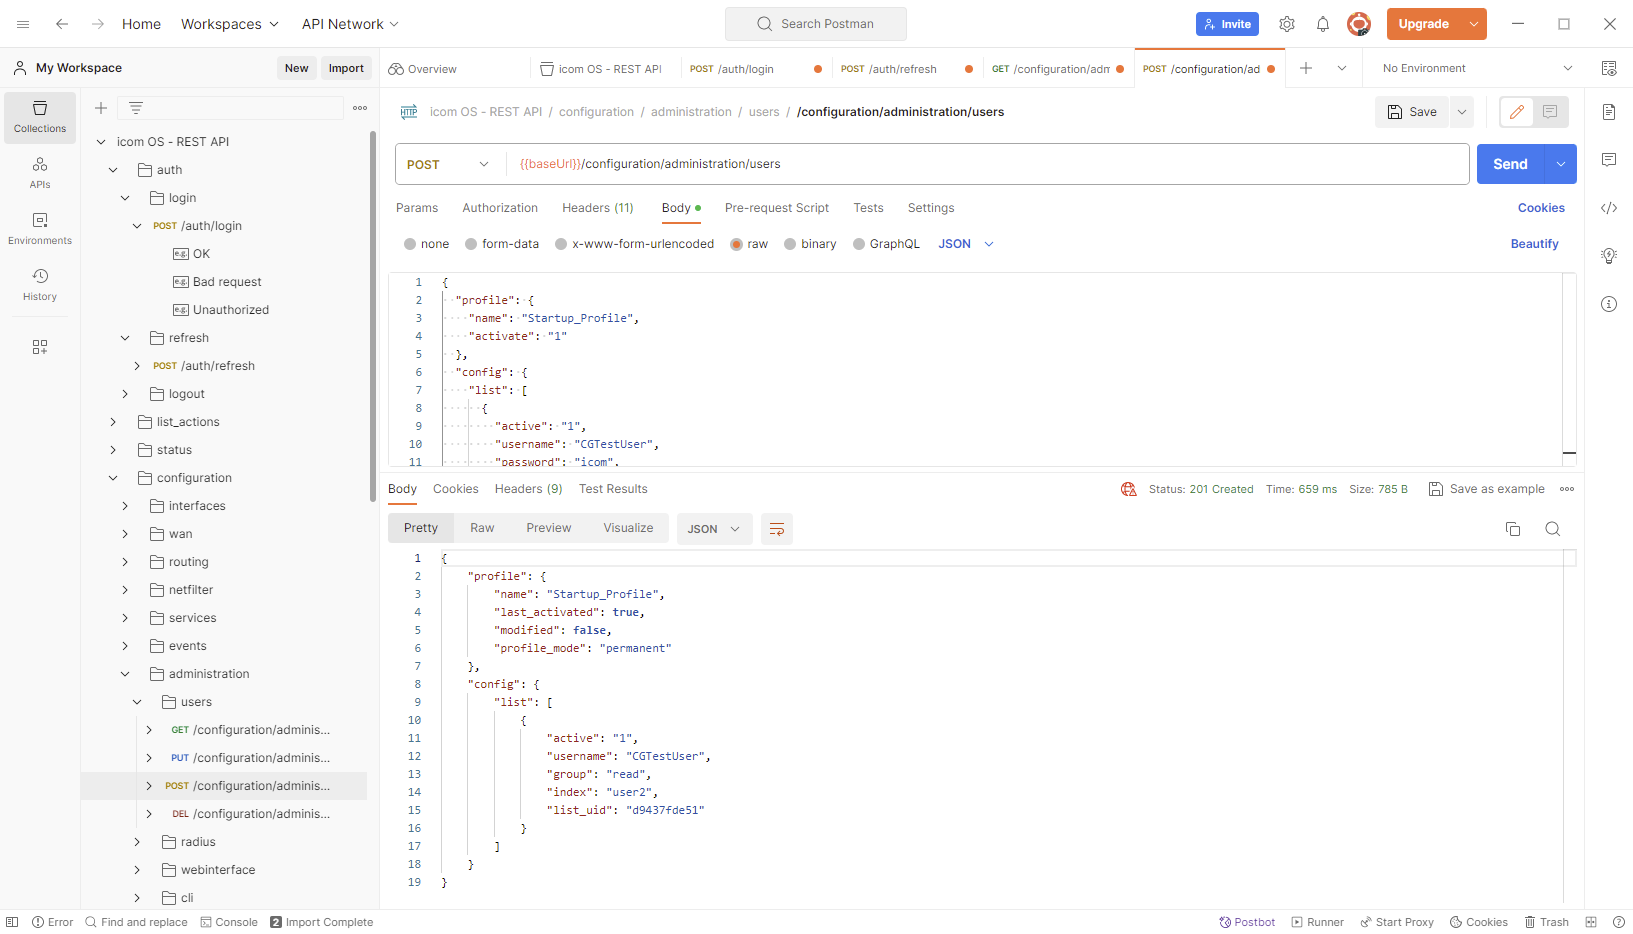
Compare the configuration in the web interface of the router in the Administration menu on the User page with the newly added user. [3]

2.2.2.3. Modifying the configuration of a user
The HTTP command required for adding resources (parameters or entries) is PUT. The syntax of the command is described in the documentation of the REST API. The user to be modified is identified using the list ID list_uid. The list ID is indicated when the user is queried or added.
-
Navigate in the collection icom OS - REST API to configuration → administration → users and click on the PUT command.
-
Change to the Body tab and modify the payload in JSON format as follows or copy it.
-
Replace the list ID list_uid with the ID, which has been returned when adding the user above.
{
  "profile": {
    "name": "Startup_Profile",
    "activate": "0"
  },
  "config": {
    "list": [
      {
        "group": "readwrite",
        "index": "user2",
        "list_uid": "<enter the list_uid of this user returned in the previous step here>"
      }
    ]
  }
}
-
Click on the Send button to send the PUT command to the router.
With this command, the user group of the user with the respective list ID list_uid in the profile Startup_Profile will be set to Read/Write. This will change the user group of above added user.
The response appears in the lower part of the Postman app window in JSON format with the status code 200 OK.
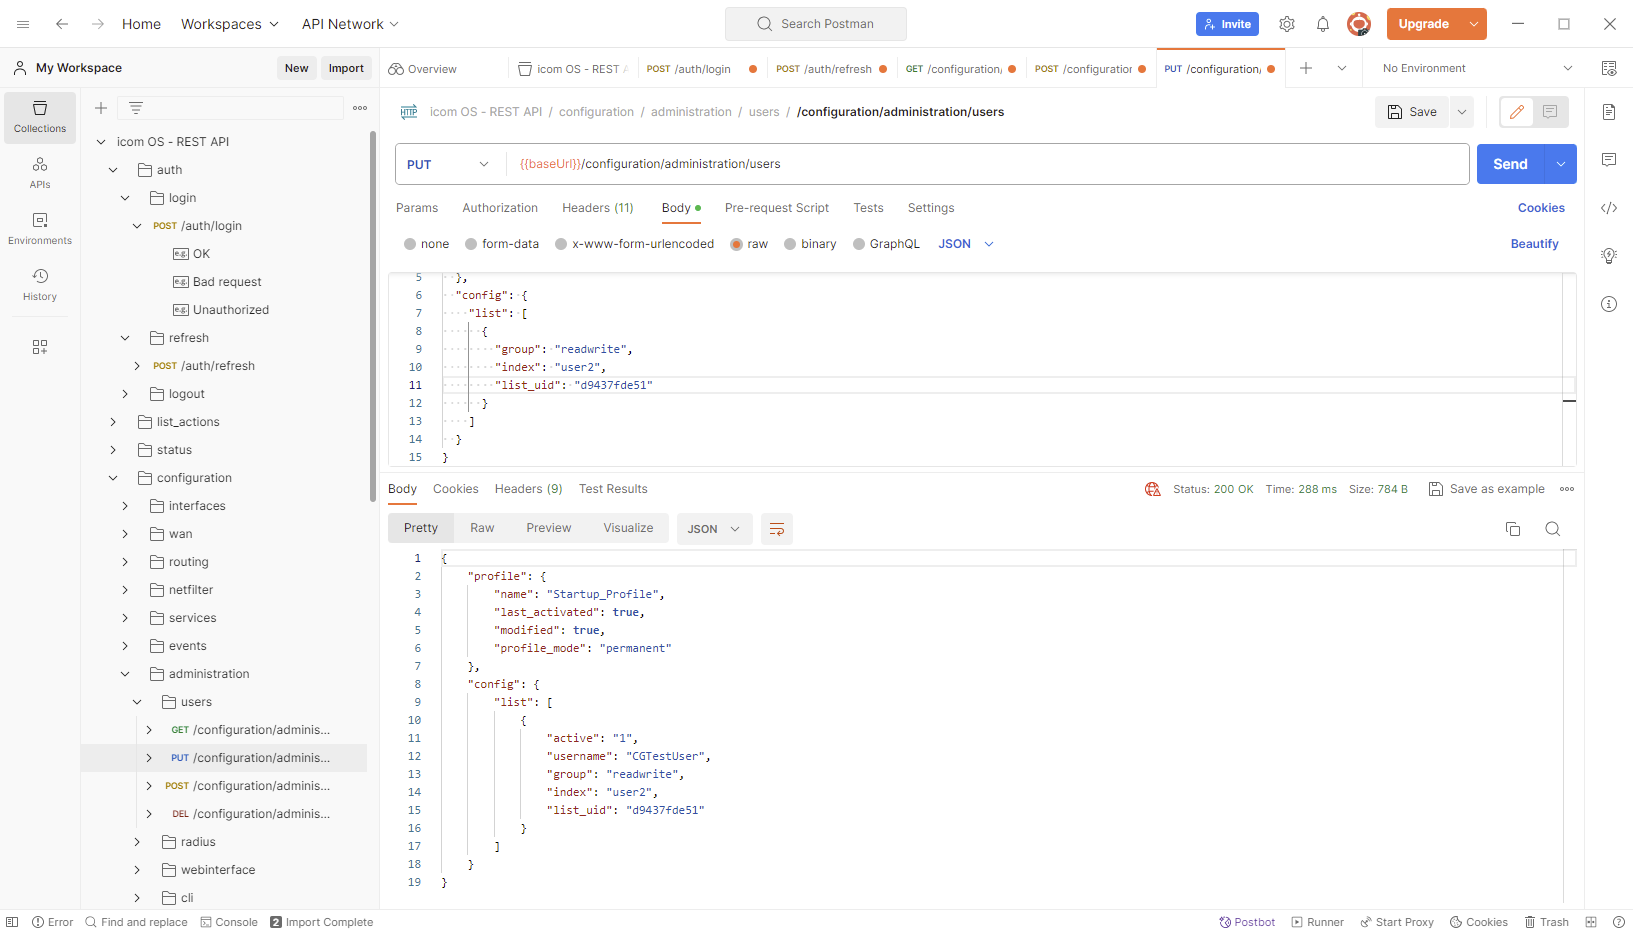
Compare the configuration in the web interface of the router in the Administration menu on the User page with the changed user group. [3]

2.2.2.4. Deleting a User
The HTTP command required for adding resources (parameters or entries) is DELETE. The syntax of the command is described in the documentation of the REST API.
-
Navigate in the collection icom OS - REST API to configuration → administration → users and click on the DEL command.
-
Uncheck the delete query parameter on the Params tab under Query Params.
-
Enter the value Startup_Profile for the query parameter profile. This deletes all users that meet the filter criteria from the profile Startup_Profile.
-
Enter the the value {"p":"username","o":"like","v":"test"} for the query parameter filter. This deletes all users from the specified (or last activated, if no profile is specified) profile, whose user name ("p":"username") contains ("o":"like") the string test ("v":"test").
|
|
Each filter consists of three parameters: "p" : "parameter to be filtered" "o" : "operator to be used for the filter, either "eq" (equal) for an exact match or "like" (similar) if the specified string is to be contained only" "v" : "value that is to be searched in the parameter according to the operator" |
-
Click on the Send button to send the DELETE command to the router.
The response appears in the lower part of the Postman app window in JSON format with the status code 200 OK.
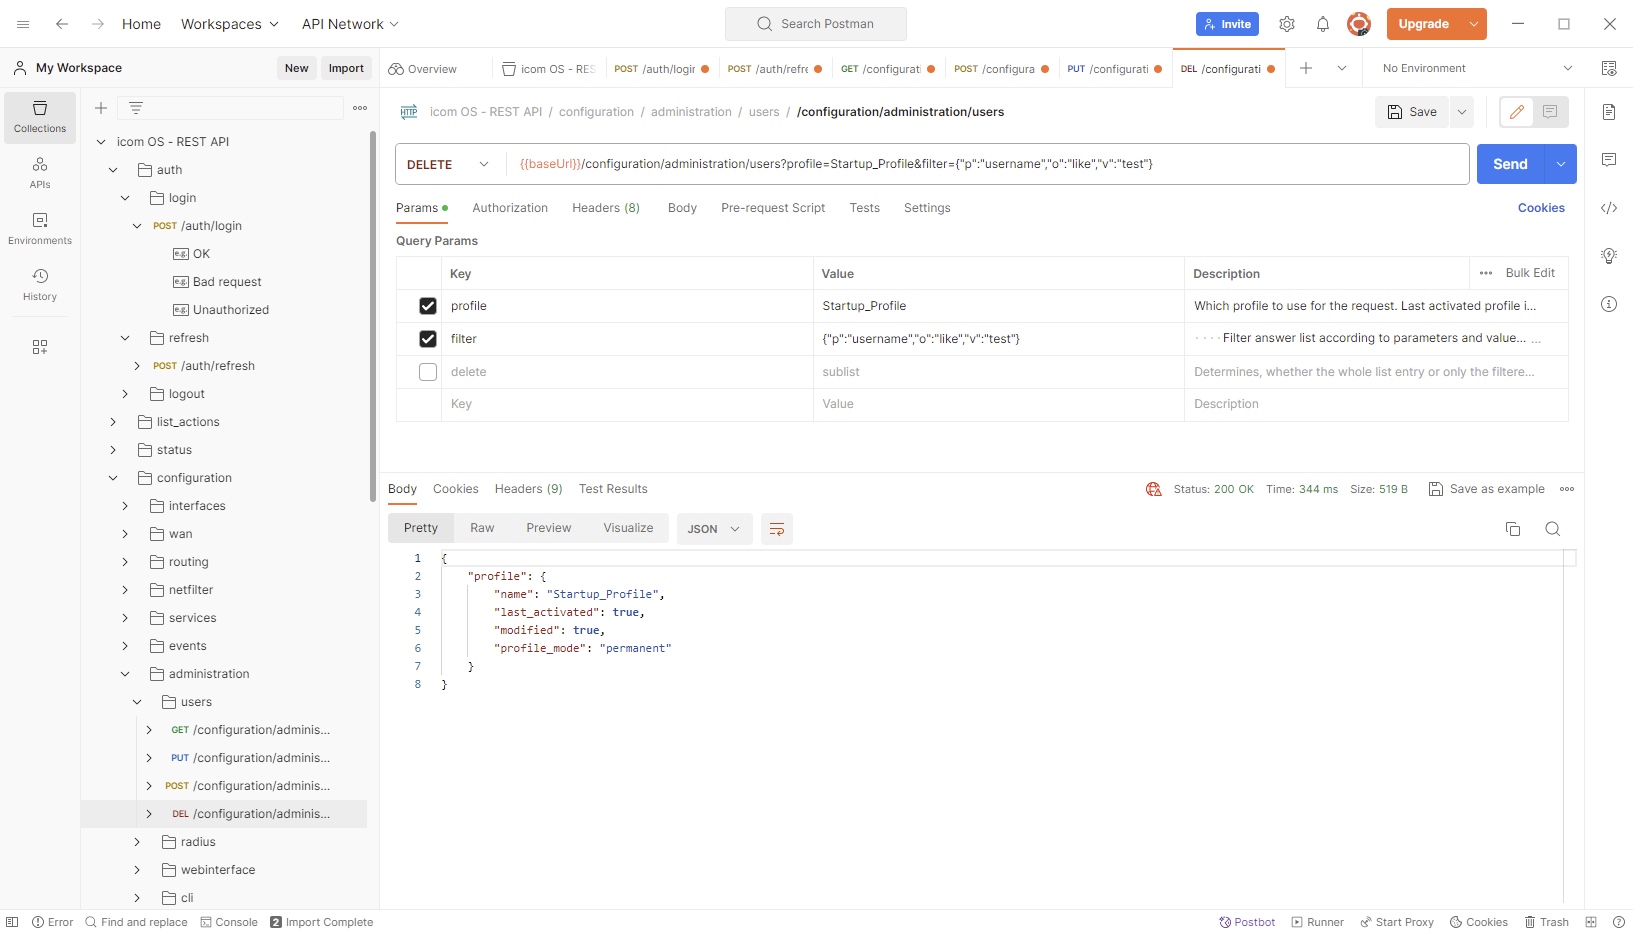
Compare the configuration in the web interface of the router in the Administration menu on the User page with the user deleted again now. [3]
2.2.2.5. Manual execution of actions
The router permits a variety of actions to be executed, such as synchronising with a time server, restarting, sending a message or setting an output. Actions are triggered when an event occurs, but can also be triggered manually. In this example, the Info LED on the router is to be activated manually.
The required HTTP command for executing actions manually is POST. Unfortunately, it is not easily possible to determine the syntax of the JSON body for manual actions in Postman. However, the required syntax can be determined using the CLI. Rfer to the pages Rest interface → Debugging and triggering manual actions as well as Determining the command syntax for CLI and REST interface in the Online Help of the router for this.
-
Navigate in the collection icom OS - REST API to operation and click on the * POST* command.
-
Change to the Body tab and modify the payload in JSON format as follows or copy it.
{
    "method" : "manual_action",
    "params" : {
        "type" : "info_led",
        "options" : {
            "info_led" : "on"
        }
    }
}
-
Click on the Send button to send the POST command to the router.
This command activates the Info LED at the router. It is deactivated in the same way with the value off for the parameter info_led.
The response appears in the lower part of the Postman app window in JSON format with the status code 201 Created.
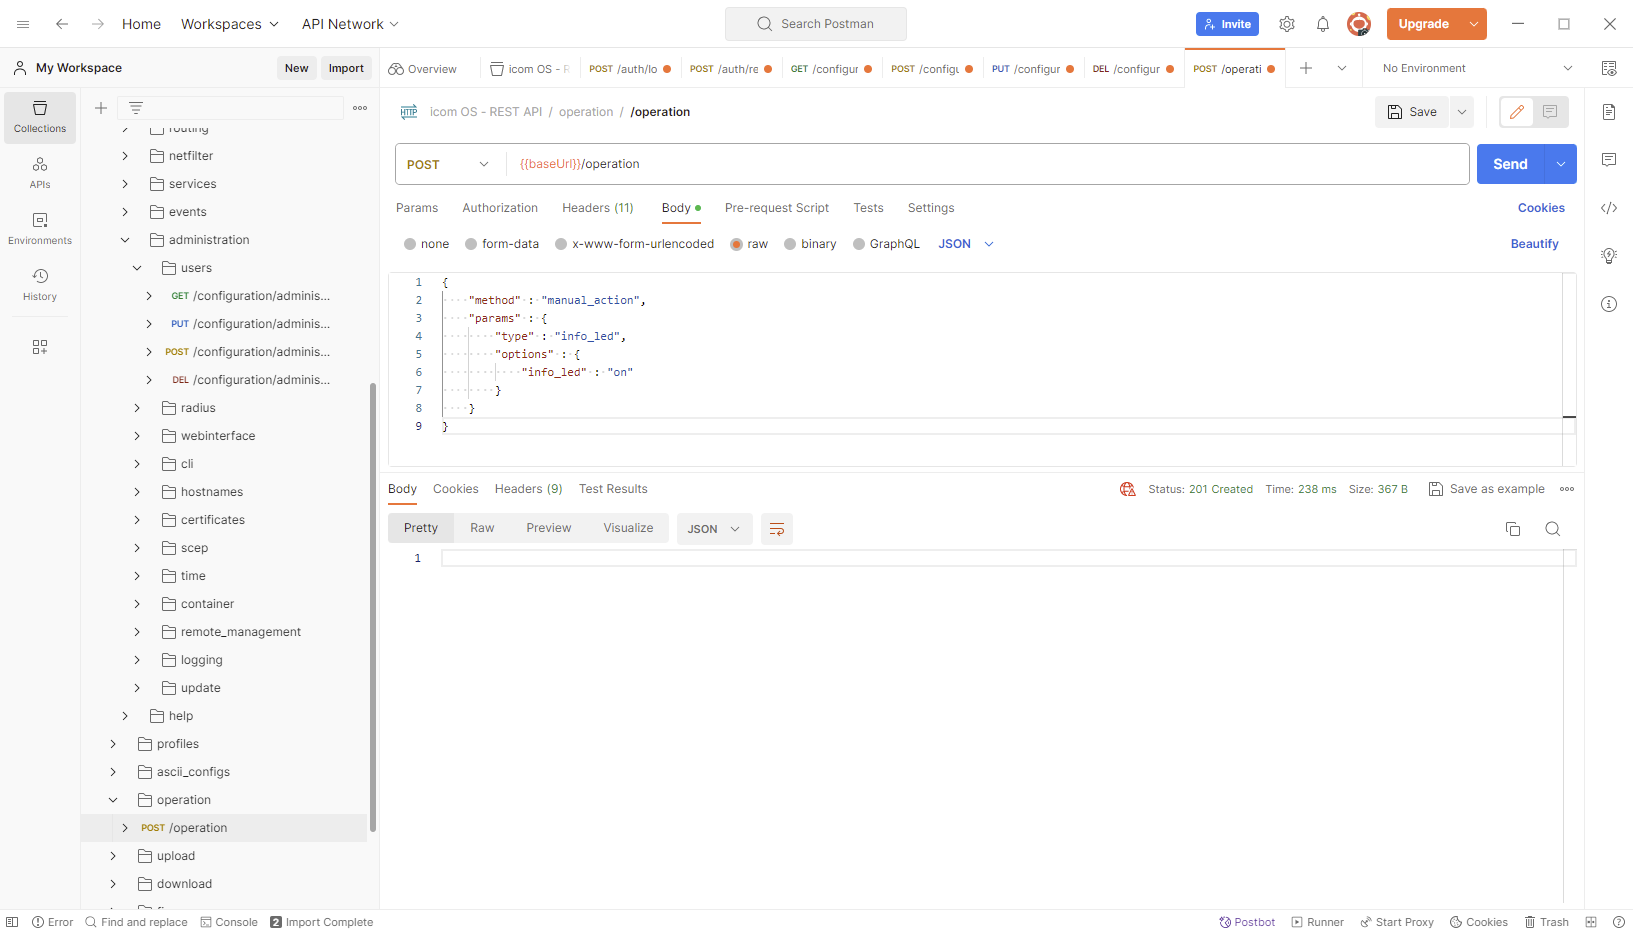
Also watch the LED on the router.
2.2.3. Swagger Editor
The Swagger Editor is a useful online tool for communicating with the router via the REST interface to get an overview of all existing commands with their associated options and determine the syntax of commands for the transmission via the REST interface. It does not require an installation. The following describes how to import the REST API documentation of the router in the Swagger Editor, request the access tokens for the REST interface as well as verify the environment variables for the communication with the router. Furthermore, the example of the user configuration describes how to read out, add, change and delete configurations with the help of the commands GET, POST, PUT and DELETE. You will also learn how to execute manual actions. An example will show you how to determine the syntax for a command and transmit the command to the router in a command line using cURL.
-
Open the Swagger Editor in a browser.
-
Click in the Swagger Editor on File → Import file and open above downloaded REST API documentation.

-
Navigate in the right field of the Swagger Editor to the Authorization section and click there under _auth/login on the *POST command to open the detailed description of the command.
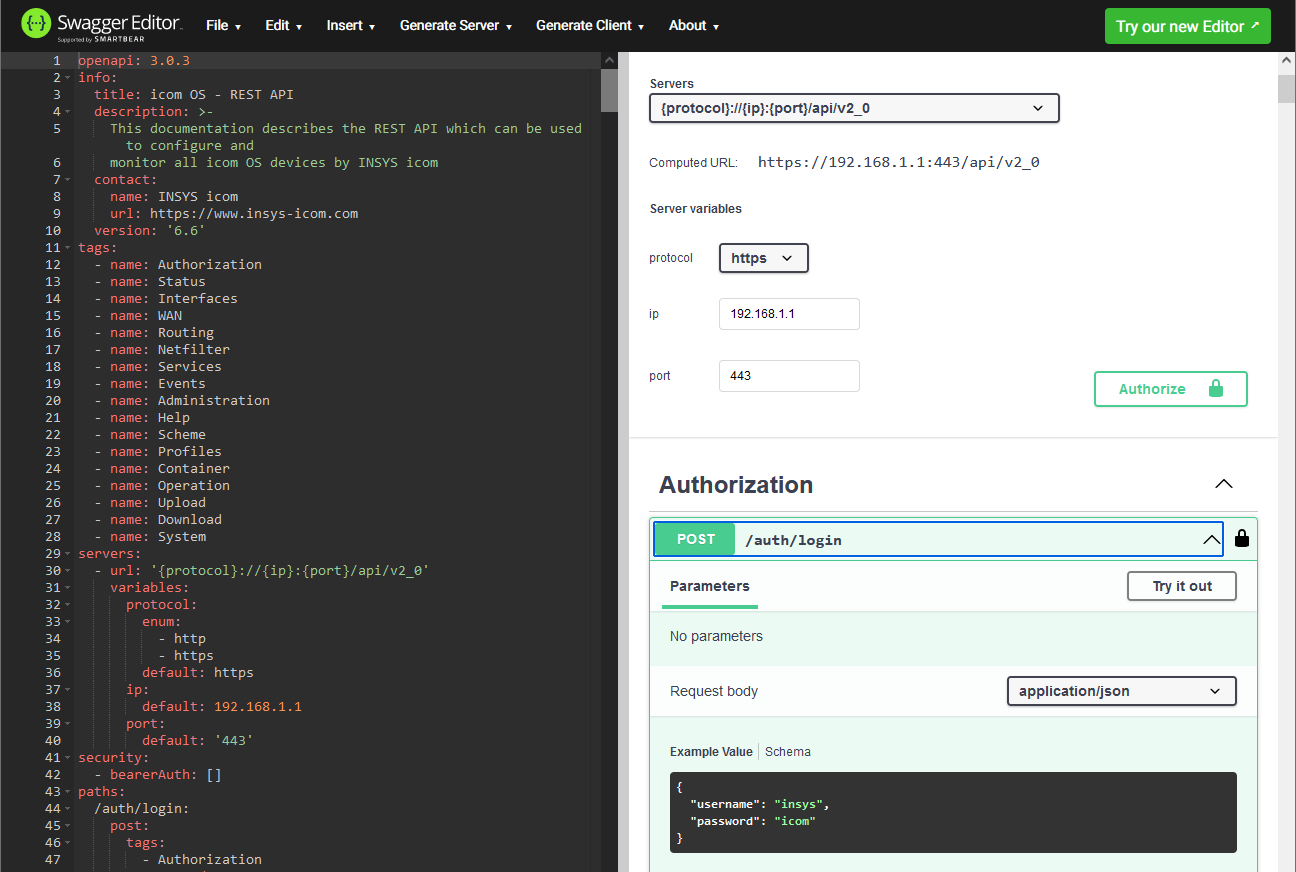
-
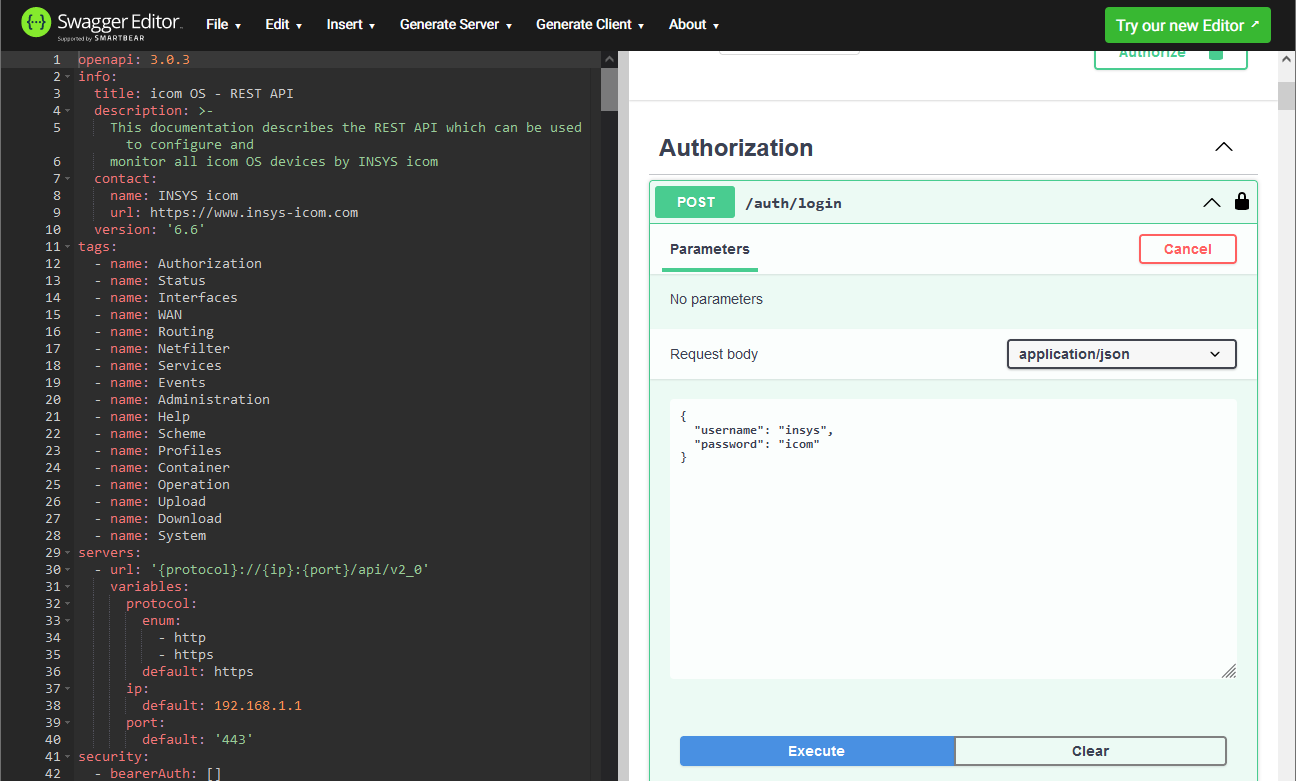
Click on Try it out to be able to generate the command.
-
If required, modify username and password and click on Execute to execute the command.
The response is indicated in the Swagger Editor in the Responses section under Server Response in the Response body field.
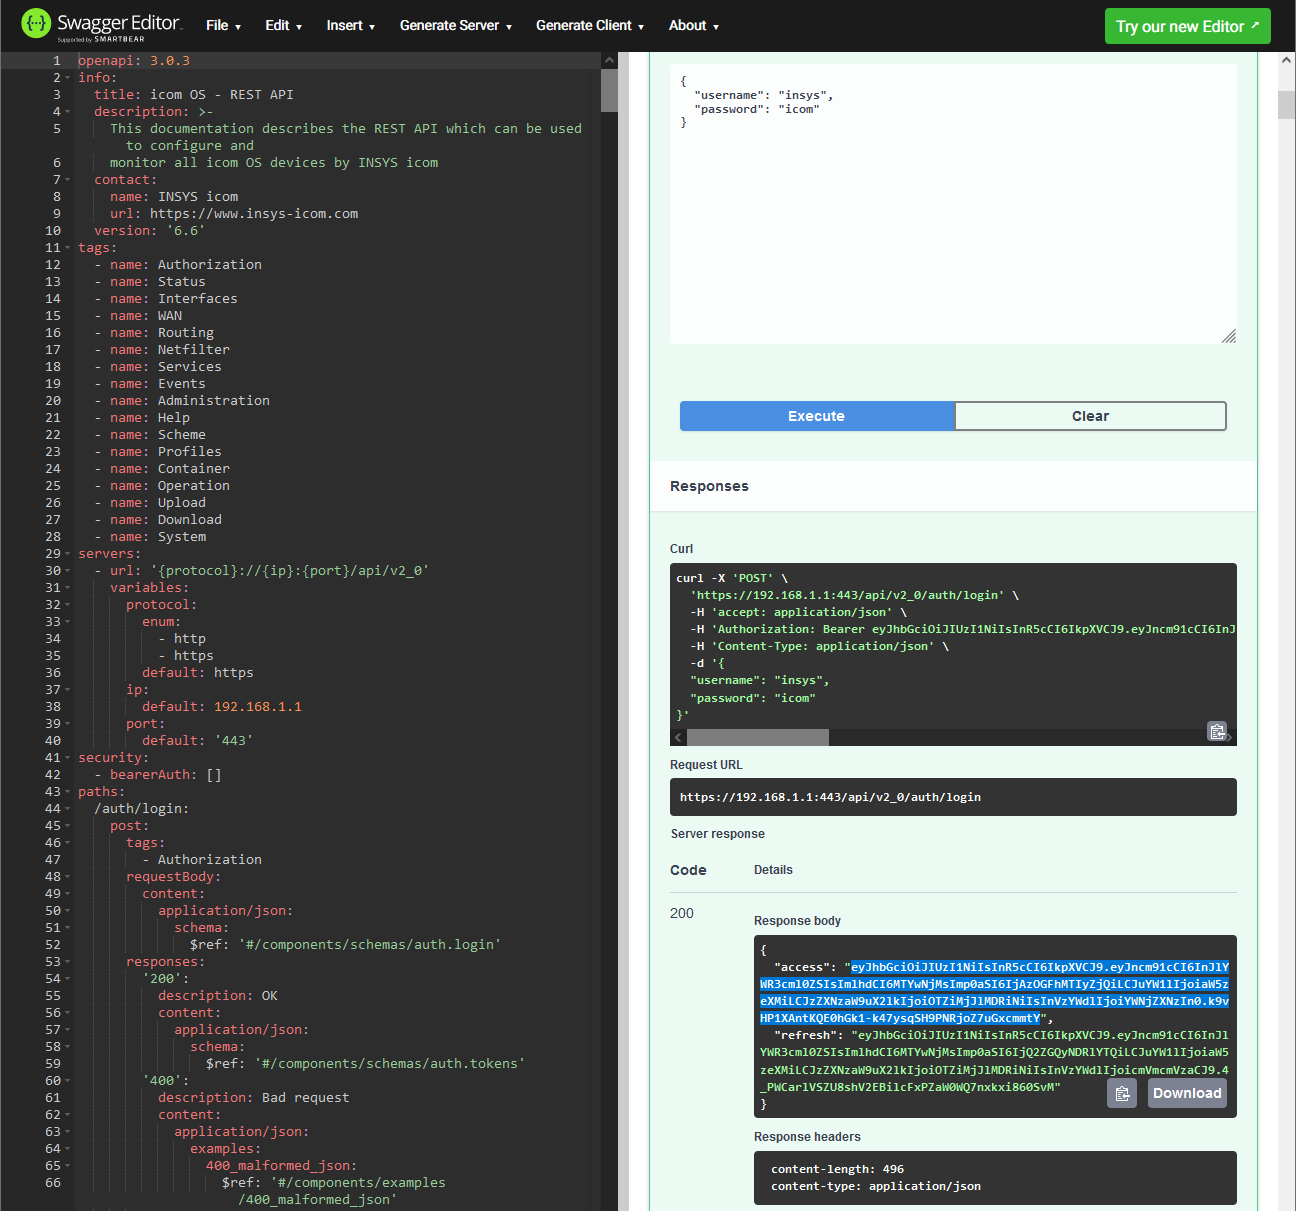
-
Copy the access token displayed in the Response body field.
-
Click on Authorize
 and paste the copied access token:

-
Click on Authorize and then on Close.
You have stored the access token in the Swagger Editor with this. It will then be inserted into the Authorisation header of each subsequent request or into the generated cURL command. For security reasons, however, the validity of the access token expires after five minutes and above procedure must be repeated.
The left field contains the REST API documentation in JSON format and it is shown in the right field clearly legible and broken up into the individual commands. The order of the commands corresponds to the order of the menus in the web interface of the router. It contains all commands that are available in the different configurations and equipment variants of the router. Not all contained commands are supported by your router.
2.2.3.1. Querying the user configuration
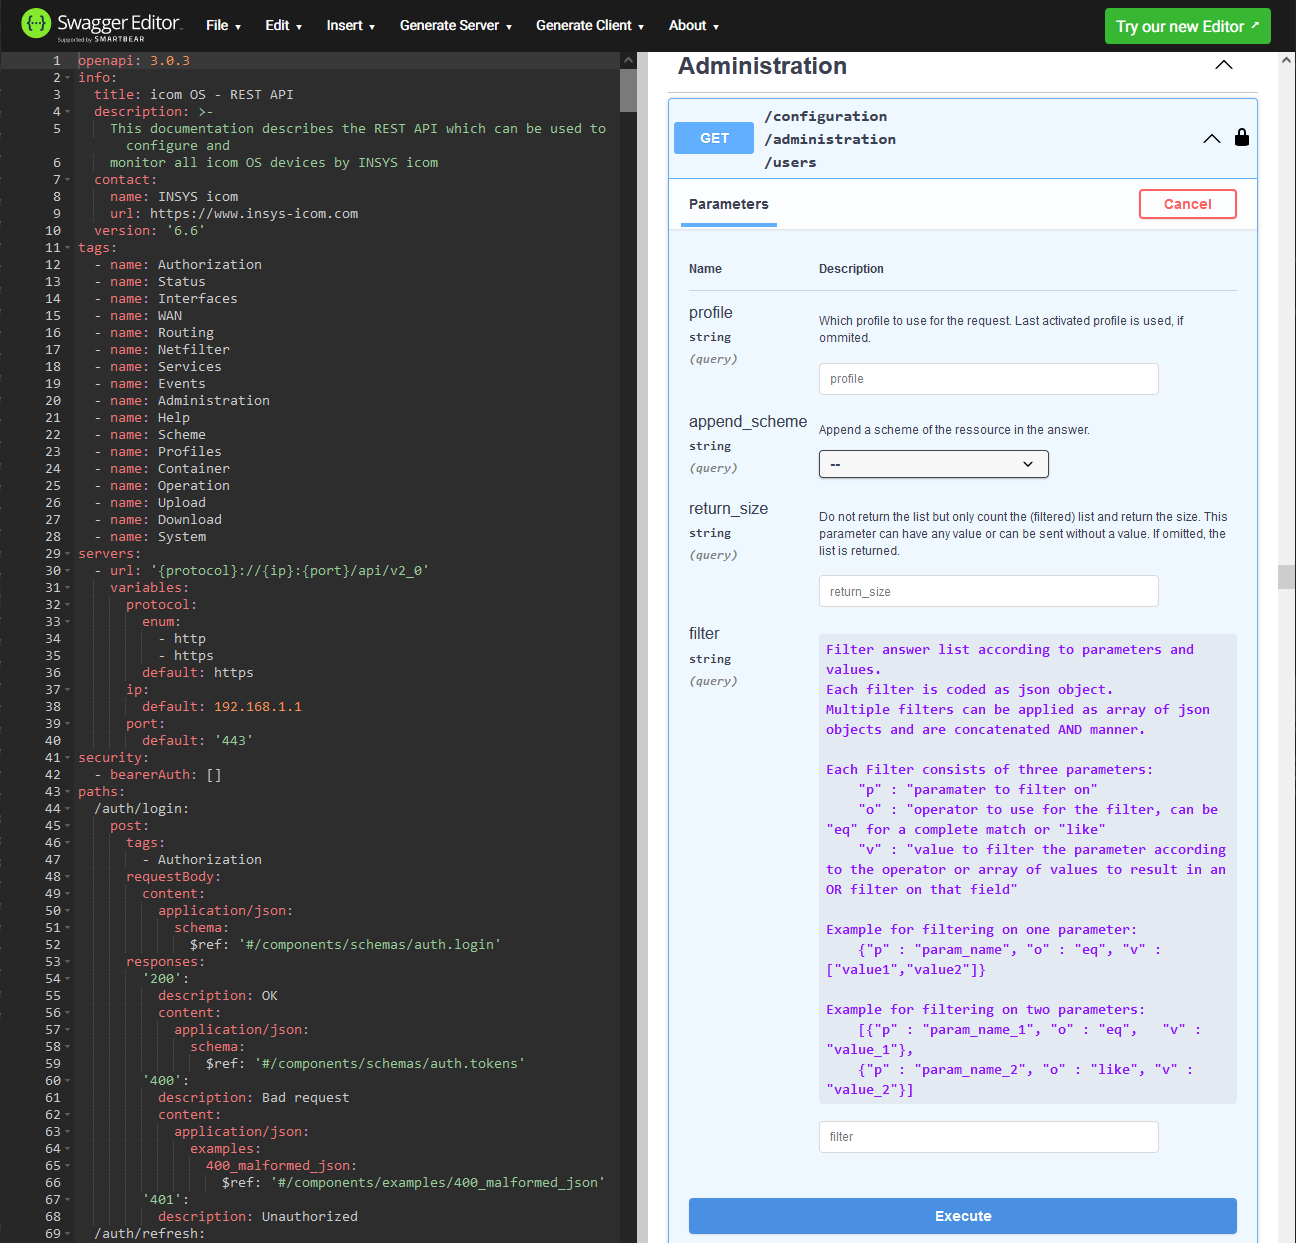
The HTTP command required for reading out resources (parameters or entries) is GET. The syntax of the command is described in the documentation of the REST API.
-
Navigate in the right field of the Swagger Editor to the Administration section and click there under configuration/administration/users on the GET command to open the detailed description of the command.
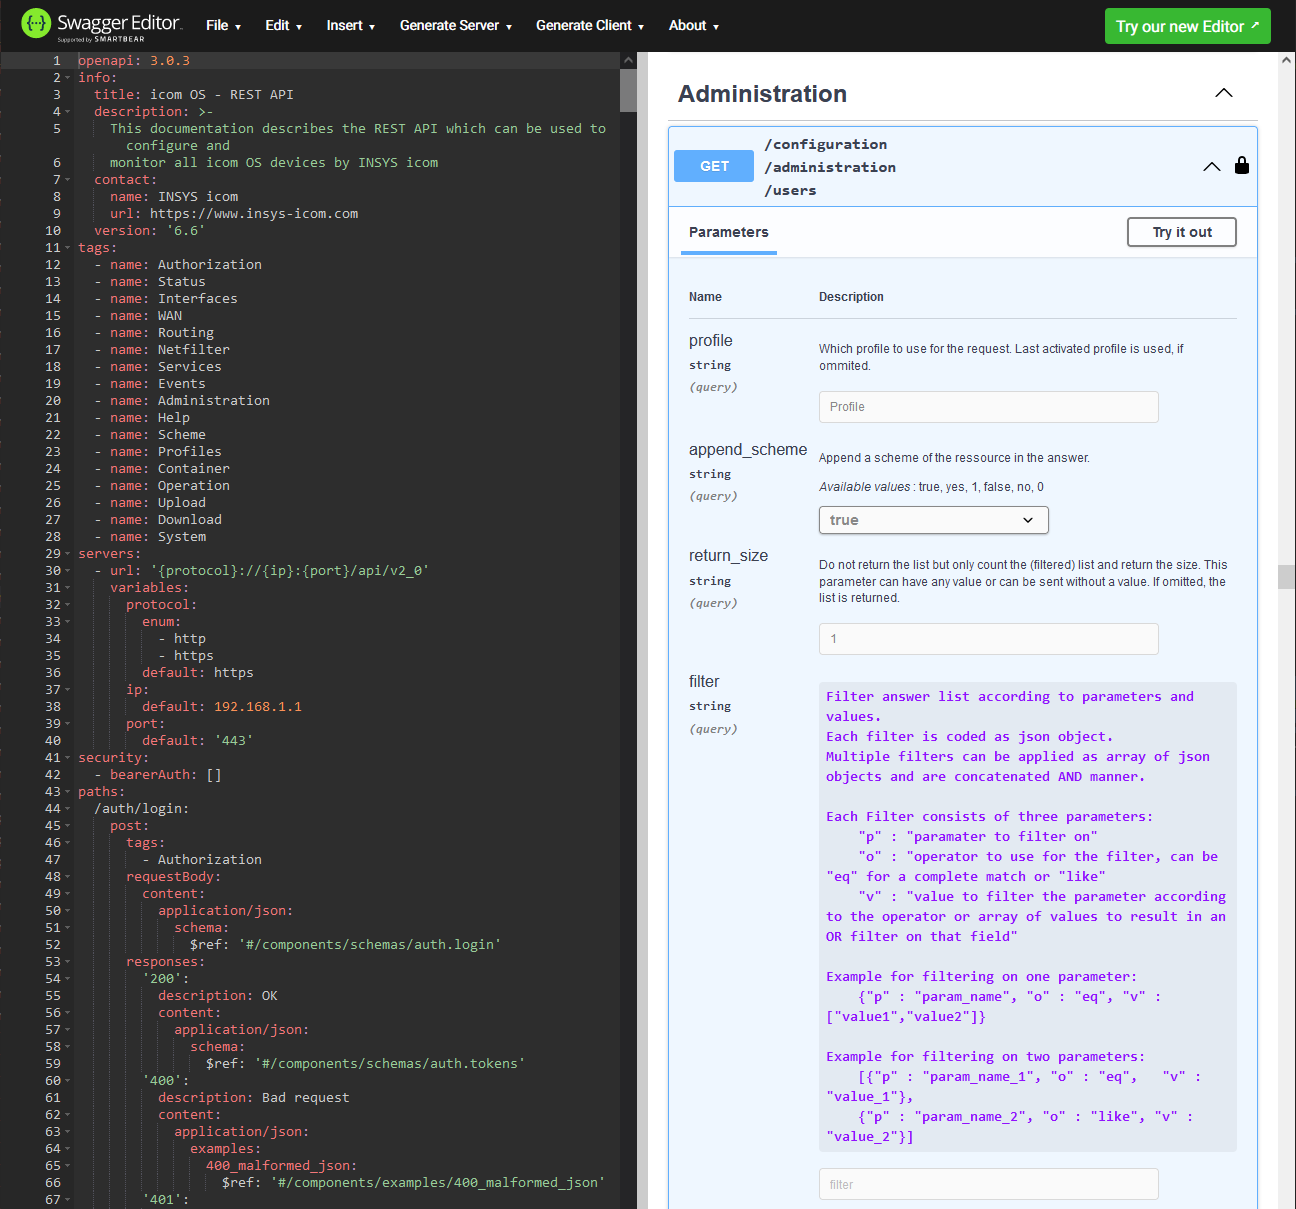
-
Click on Try it out to be able to generate the command.
-
Delete the default values of the possible query parameters profile and return_size, set append_Scheme to -- and click on Execute to execute the command.
The response appears in the Swagger Editor on the right in the Responses section under Server response with the status code 200 OK and in the Response body field in JSON format.
It contains the user configuration of the router.
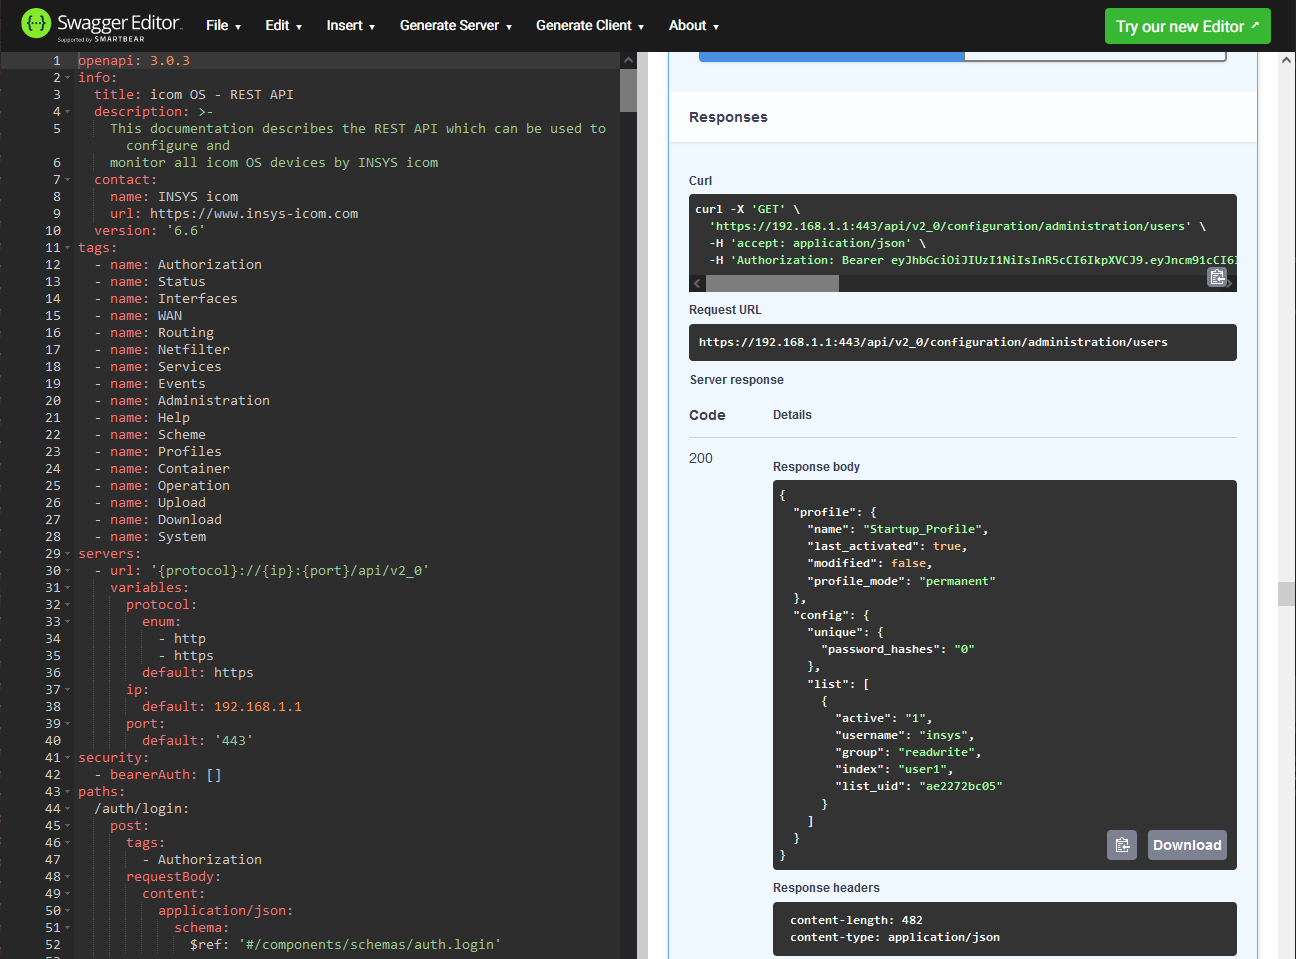
The following shows how to transmit the command created in the Swagger Editor to the router with the help of a terminal programme.
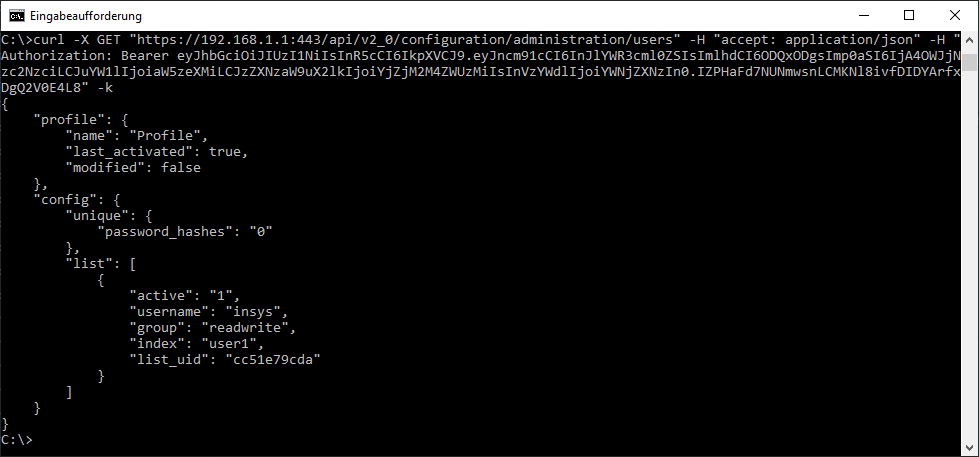
The response is displayed in the Terminal window in JSON format. It contains the user configuration of the router.
Compare the configuration in the web interface of the router in the Administration menu on the User page with this.
2.2.3.2. Adding a user
The HTTP command required for adding resources (parameters or entries) is POST. The syntax of the command is described in the documentation of the REST API.
-
Navigate in the right field of the Swagger Editor to the Administration section and click there under /configuration/administration/users on the POST command to open the detailed description of the command.
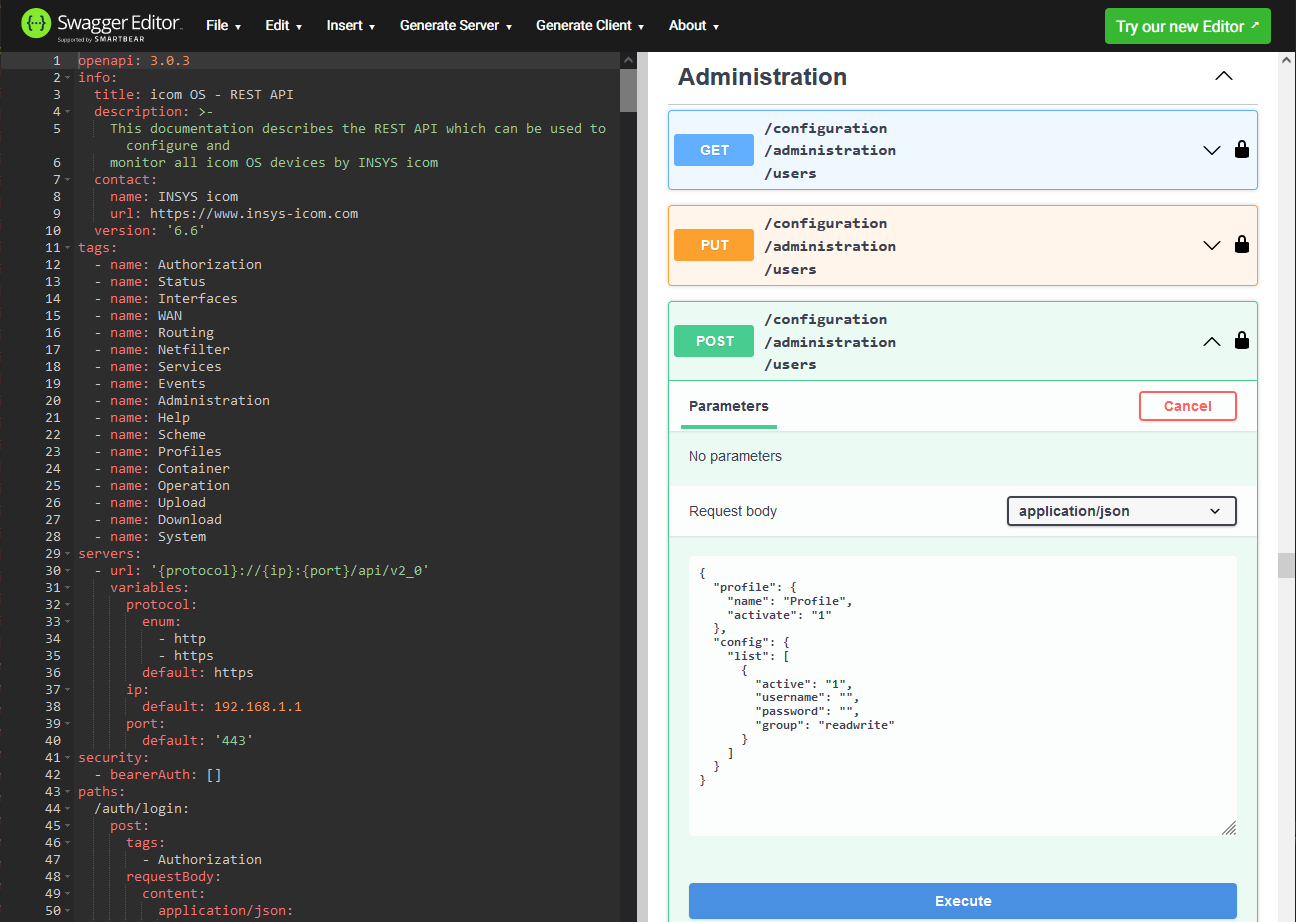
-
Click on Try it out to be able to generate the command.
-
Modify the payload in JSON format in the Request body section as follows or paste it there and click on Execute to execute the command.
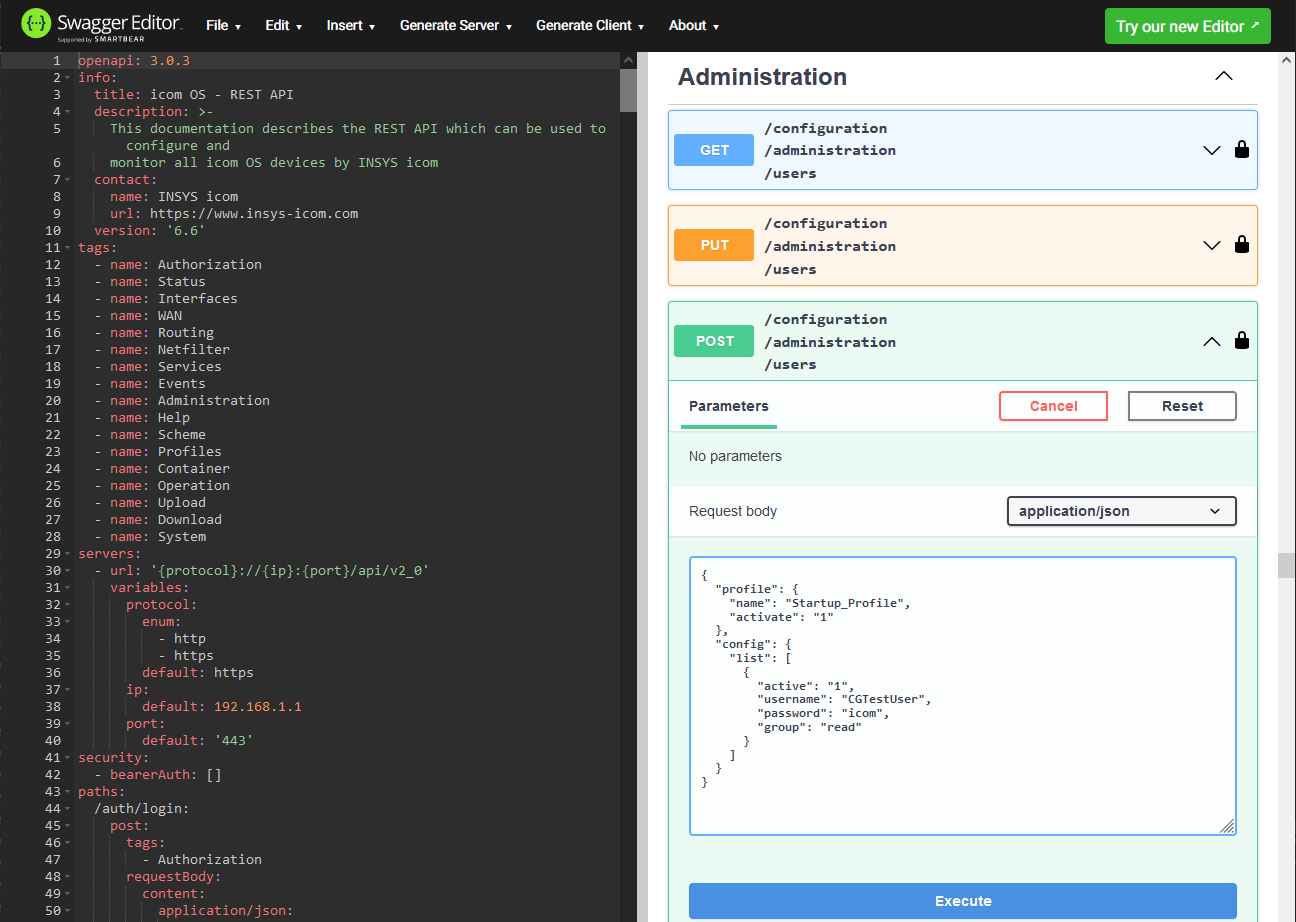
{
  "profile": {
    "name": "Startup_Profile",
    "activate": "1"
  },
  "config": {
    "list": [
      {
        "active": "1",
        "username": "CGTestUser",
        "password": "icom",
        "group": "read"
      }
    ]
  }
}
This adds a new active user with the user name CGTestUser, the password icom and the user group Read to the profile Startup_Profile, which will not be activated subsequently.
The response appears in the Swagger Editor on the right in the Responses section under Server response with the status code 201 Created and in the Response body field in JSON format.
It contains the transmitted configuration.
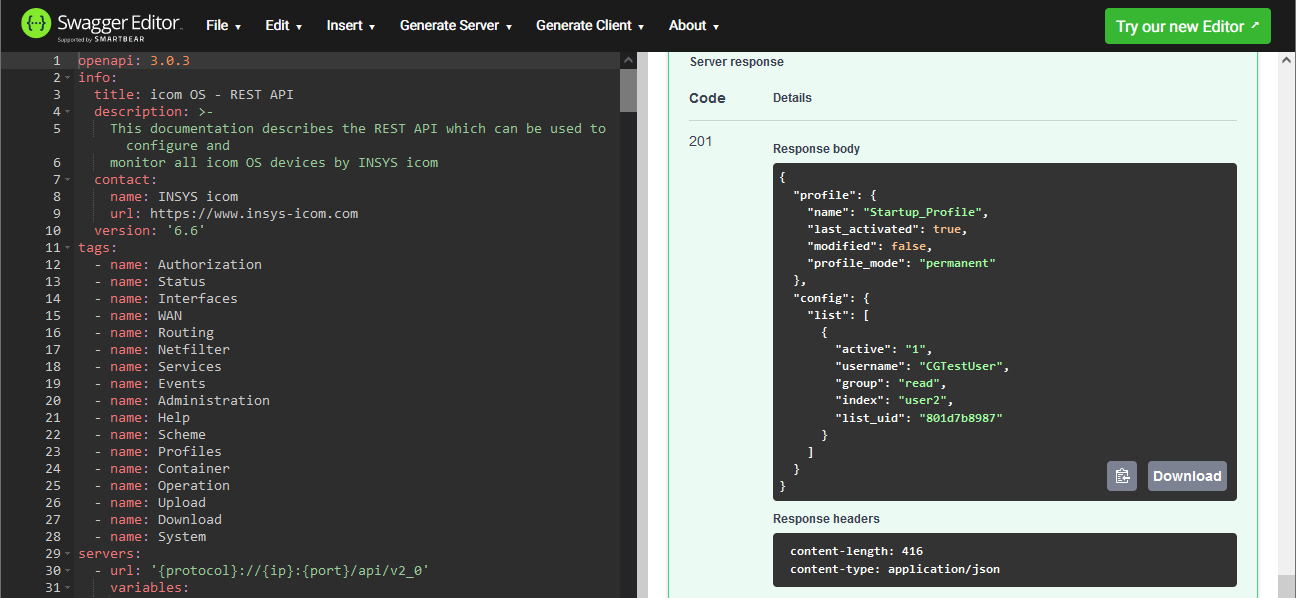
|
|
The response also includes the parameter list_uid for this user, which assigns a unique ID to the user. Copy or note down this ID. This ID is necessary to modify this user in the next step. |
Compare the configuration in the web interface of the router in the Administration menu on the User page with the changed user group.
2.2.3.3. Modifying the configuration of a user
The HTTP command required for adding resources (parameters or entries) is PUT. The syntax of the command is described in the documentation of the REST API.
-
Navigate in the right field of the Swagger Editor to the Administration section and click there under /configuration/administration/users on the PUT command to open the detailed description of the command.
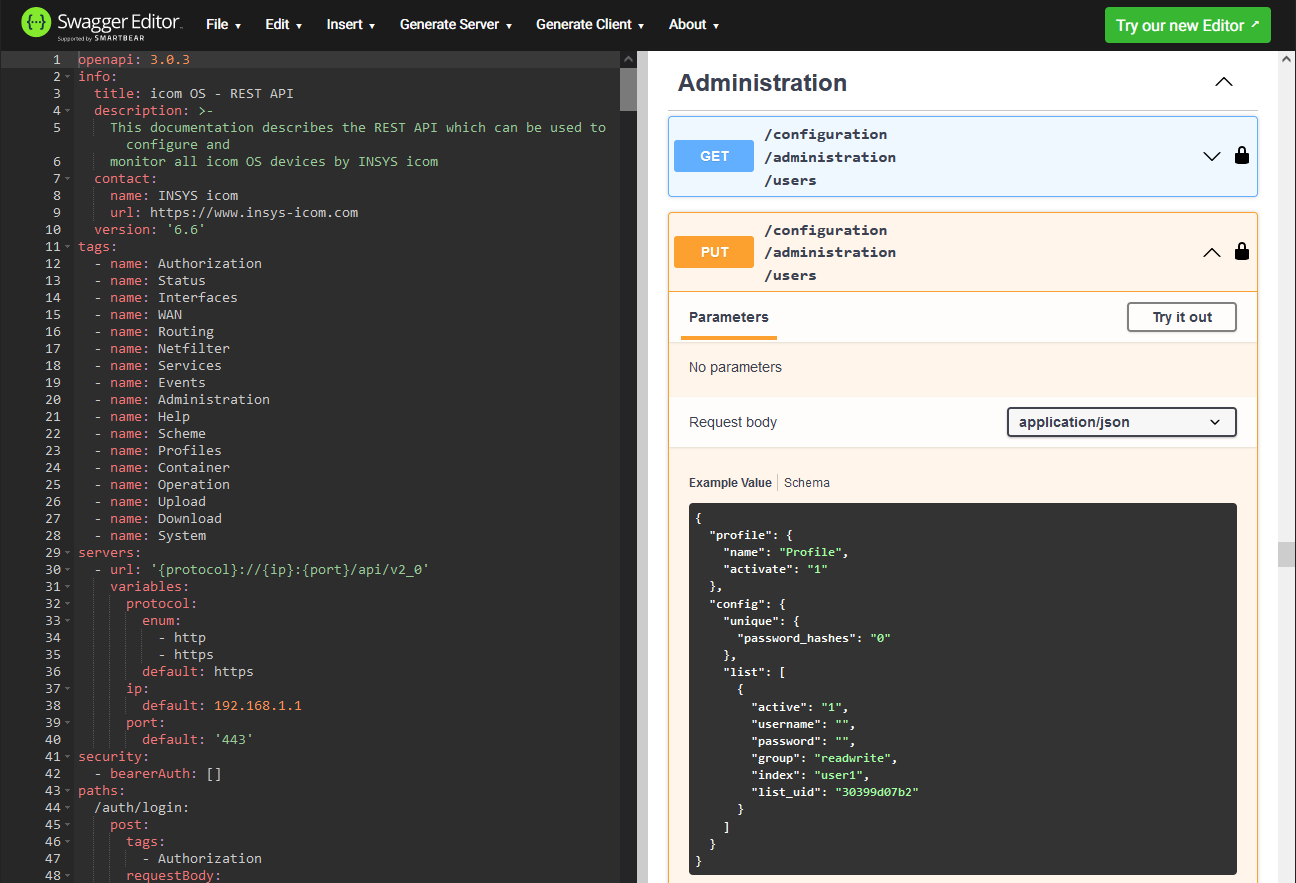
-
Click on Try it out to be able to generate the command.
-
Modify the payload in JSON format in the Request body section as follows or paste it there and click on Execute to execute the command; do not forget to modify the individual parameter list_uid for the user added above.
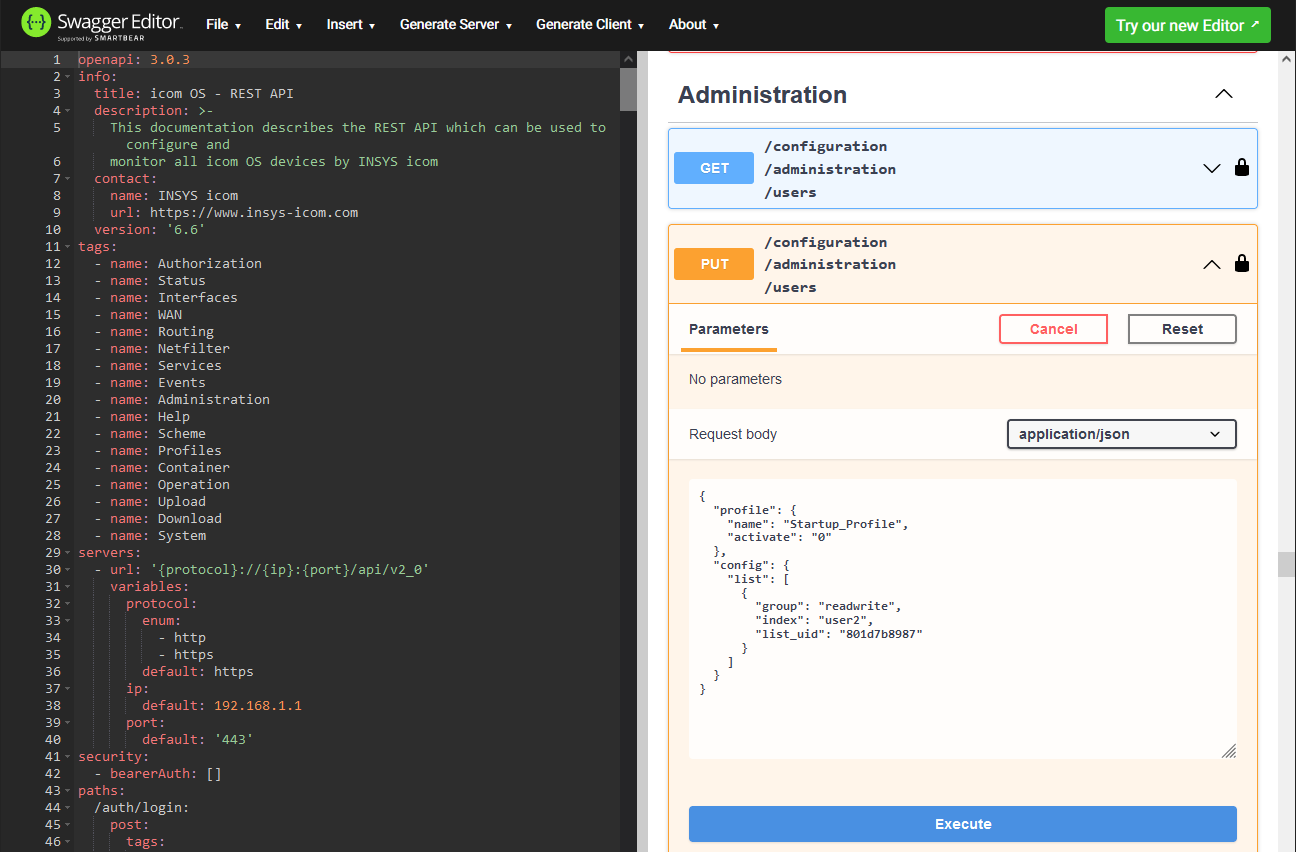
{
  "profile": {
    "name": "Startup_Profile",
    "activate": "0"
  },
  "config": {
    "list": [
      {
        "index": "user2",
        "list_uid": "<enter the list_uid of this user returned in the previous step here>"
      }
    ]
  }
}
With this command, the user group of the user with the respective list ID list_uid in the profile Startup_Profile will be set to Read/Write. This will change the user group of above added user.
The response appears in the Swagger Editor on the right in the Responses section under Server response with the status code 200 OK and in the Response body field in JSON format.
It contains the transmitted configuration.
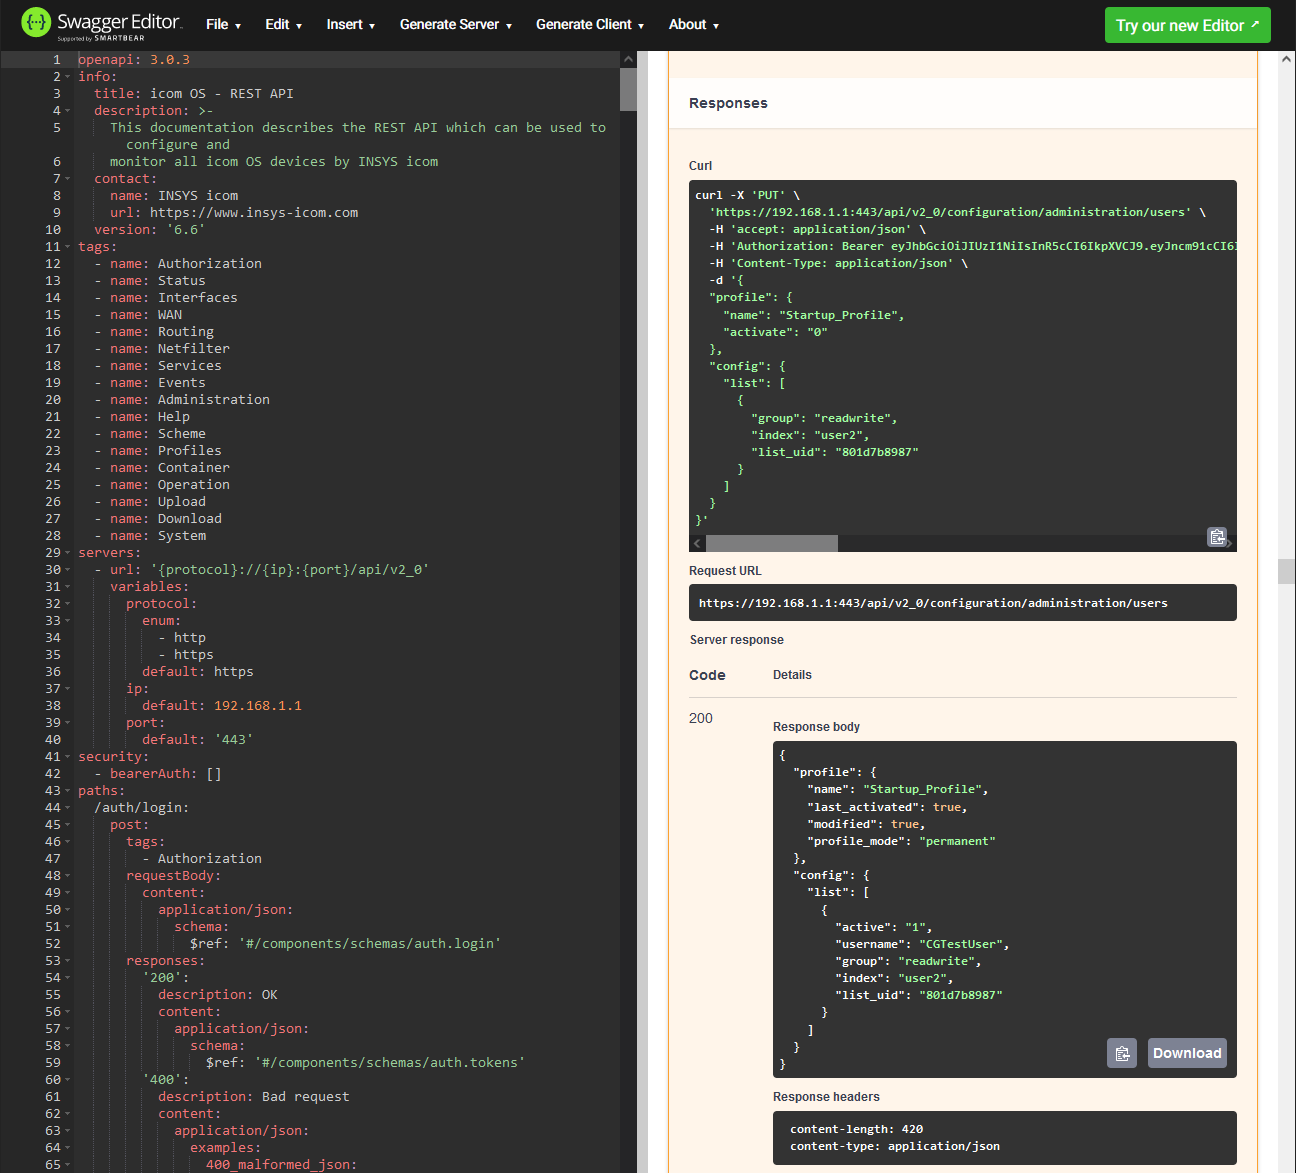
Compare the configuration in the web interface of the router in the Administration menu on the User page with the changed user group.
2.2.3.4. Deleting a User
The HTTP command required for adding resources (parameters or entries) is DELETE. The syntax of the command is described in the documentation of the REST API.
-
Navigate in the right field of the Swagger Editor to the Administration section and click there under /configuration/administration/users on the DELETE command to open the detailed description of the command.
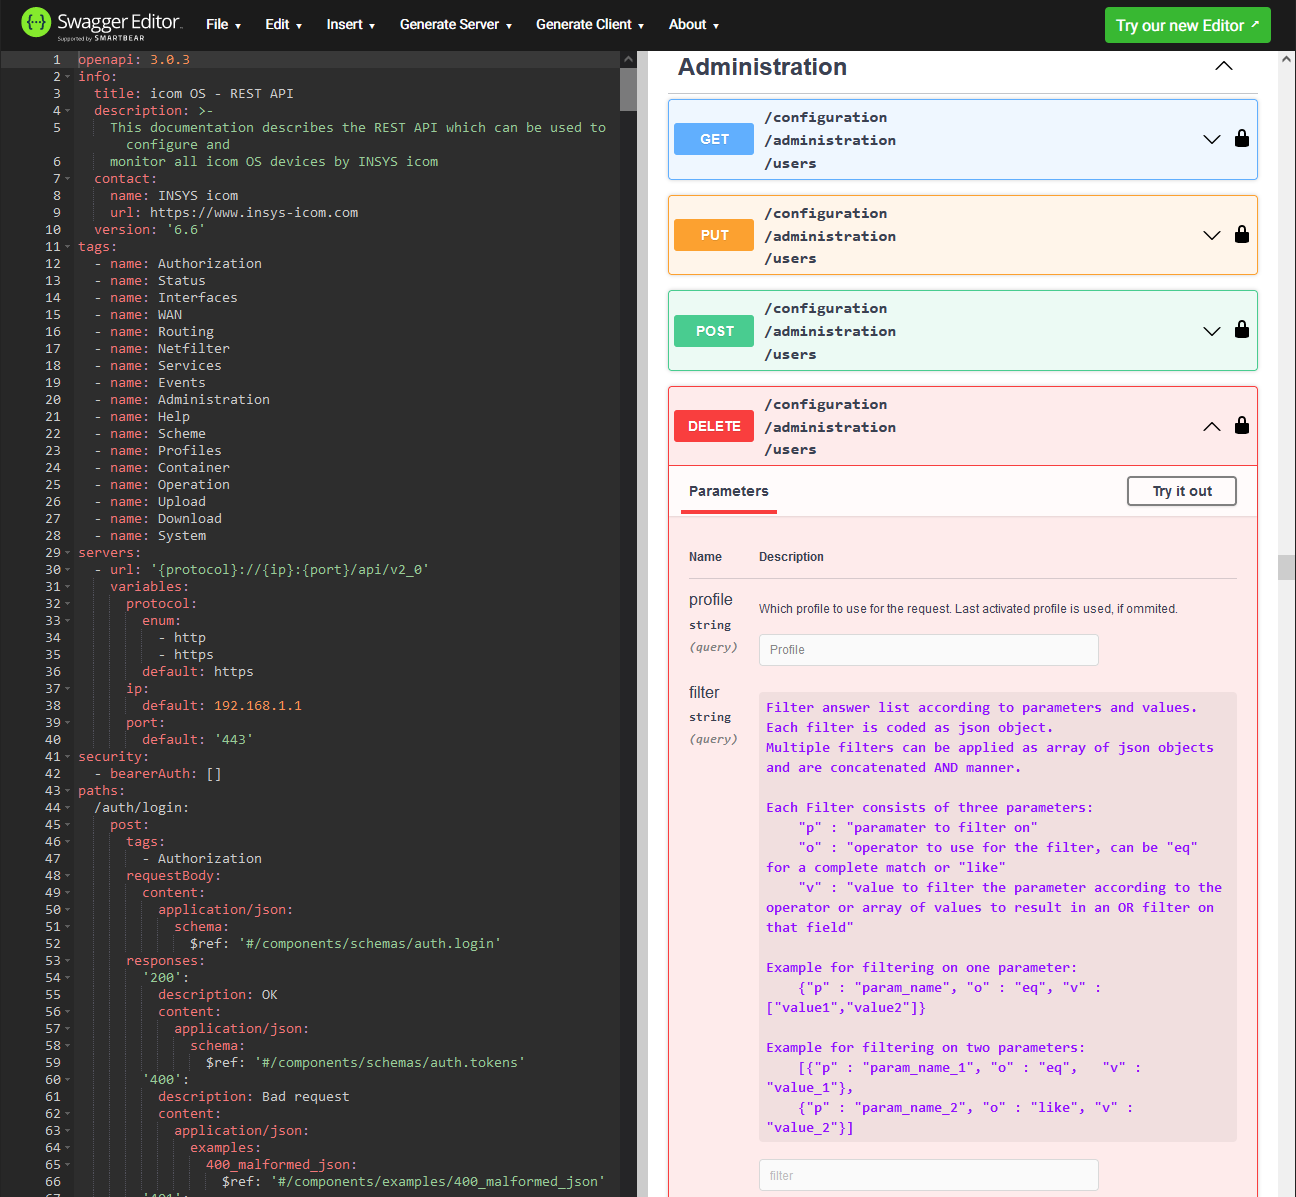
-
Click on Try it out to be able to generate the command.
-
Enter the value Startup_Profile for the query parameter profile in the Parameters section. This deletes all users that meet the filter criteria from the profile Startup_Profile.
-
Enter the the value {"p":"username","o":"like","v":"test"} for the query parameter filter. This deletes all users from the specified (or last activated, if no profile is specified) profile, whose user name ("p":"username") contains ("o":"like") the string test ("v":"test").
|
|
Each filter consists of three parameters: "p" : "parameter to be filtered" "o" : "operator to be used for the filter, either "eq" (equal) for an exact match or "like" (similar) if the specified string is to be contained only" "v" : "value that is to be searched in the parameter according to the operator" |
-
Set the query parameter delete to --.
-
Click on Execute to execute the command.
The response appears in the Swagger Editor on the right in the Responses section under Server response with the status code 200 OK and in the Response body field in JSON format. It contains the transmitted configuration.
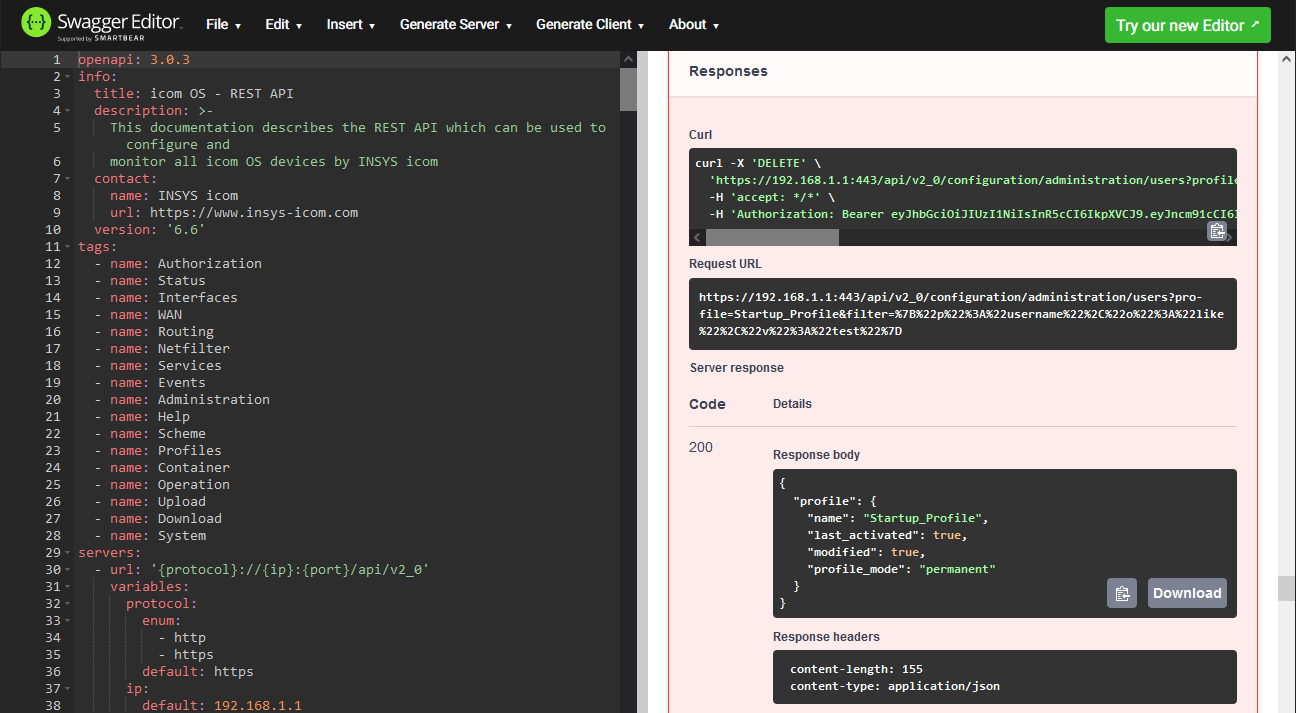
Compare the configuration in the web interface of the router in the Administration menu on the User page with the user deleted again now.
2.2.3.5. Manual execution of actions
The router permits a variety of actions to be executed, such as synchronising with a time server, restarting, sending a message or setting an output. Actions are triggered when an event occurs, but can also be triggered manually. In this example, the Info LED on the router is to be activated manually.
The required HTTP command for executing actions manually is POST. The syntax of the command is described in the documentation of the REST API.
-
Navigate in the right field of the Swagger Editor to the Operation section and click there under /operation on the *POST command to open the detailed description of the command.
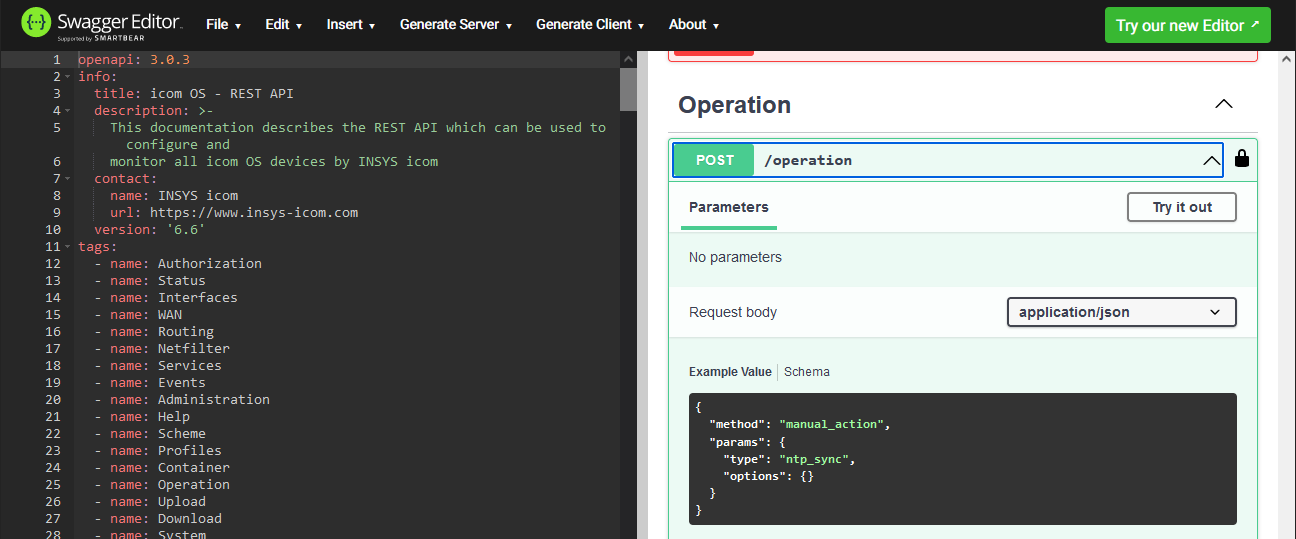
-
Click on Try it out to be able to generate the command.
-
Modify the payload in JSON format in the Request body section as follows or paste it there and click on Execute to execute the command.
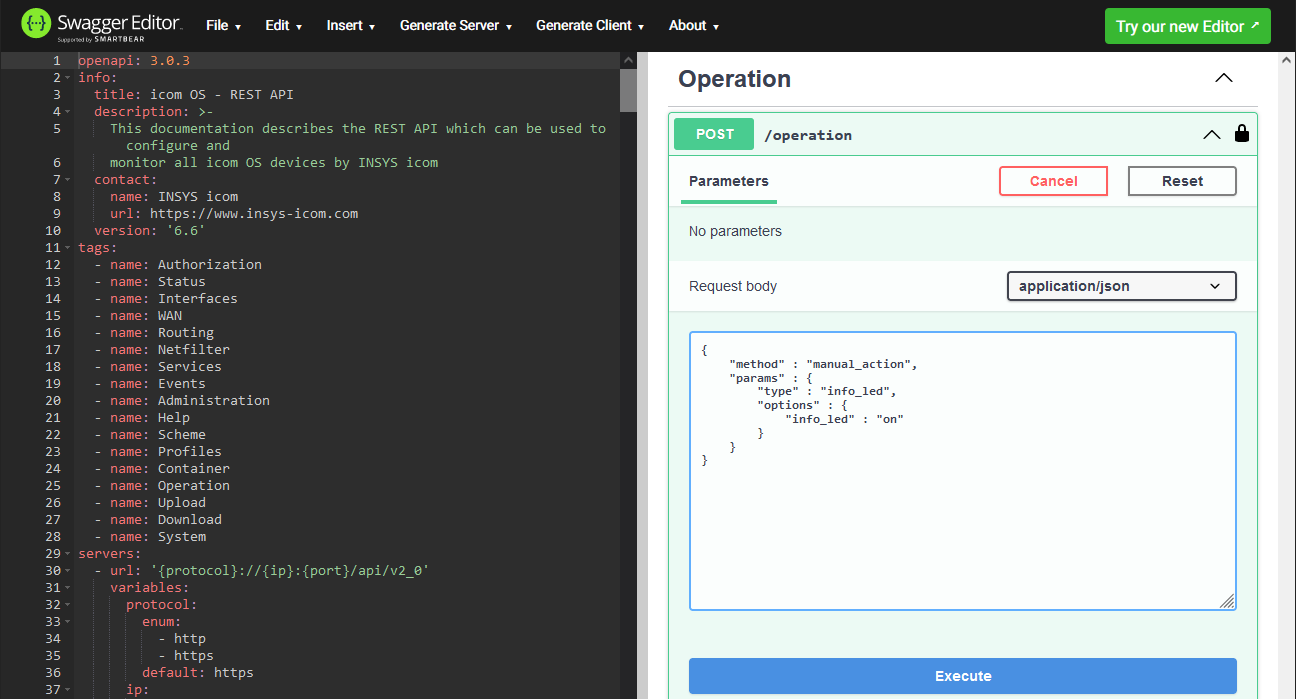
{
    "method" : "manual_action",
    "params" : {
        "type" : "info_led",
        "options" : {
            "info_led" : "on"
        }
    }
}
This command activates the Info LED at the router. It is deactivated in the same way with the value off for the parameter info_led.
The response appears in the Swagger Editor on the right in the Responses section under Server response with the status code 201 Created.
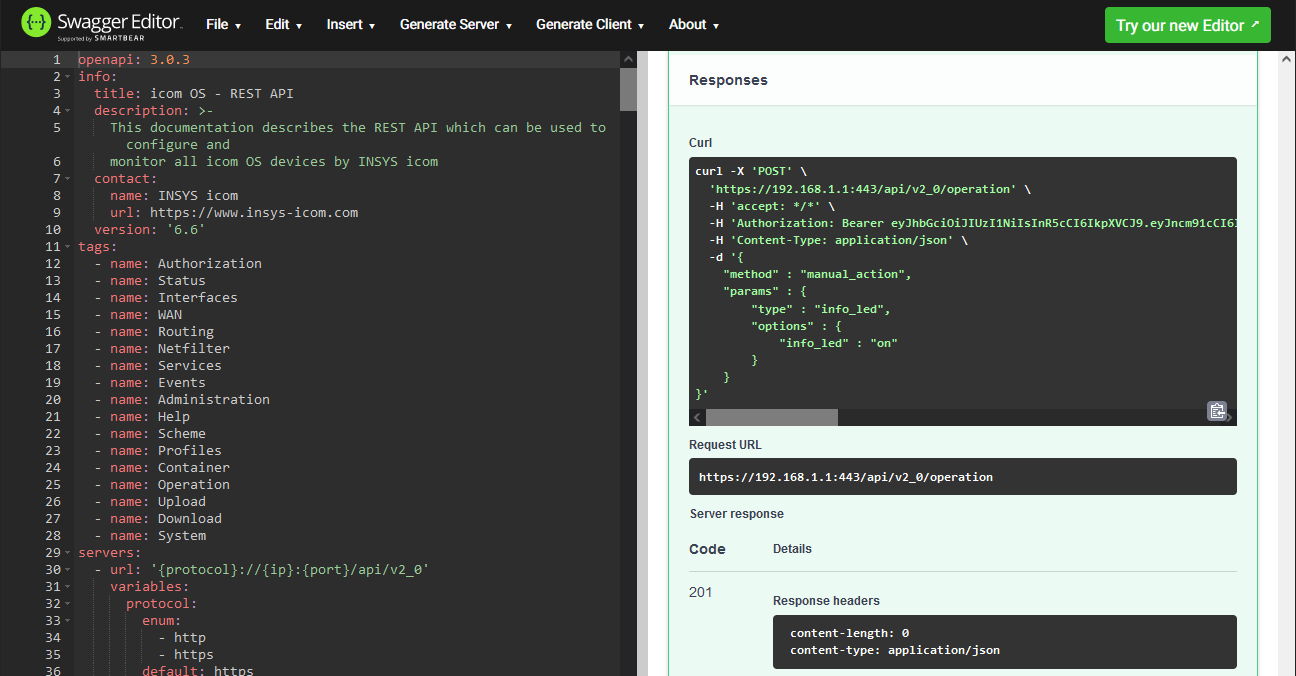
Also watch the LED on the router.
|
|
The individual parameters for the various actions can be found in the REST API in the Schemas section in the Swagger Editor.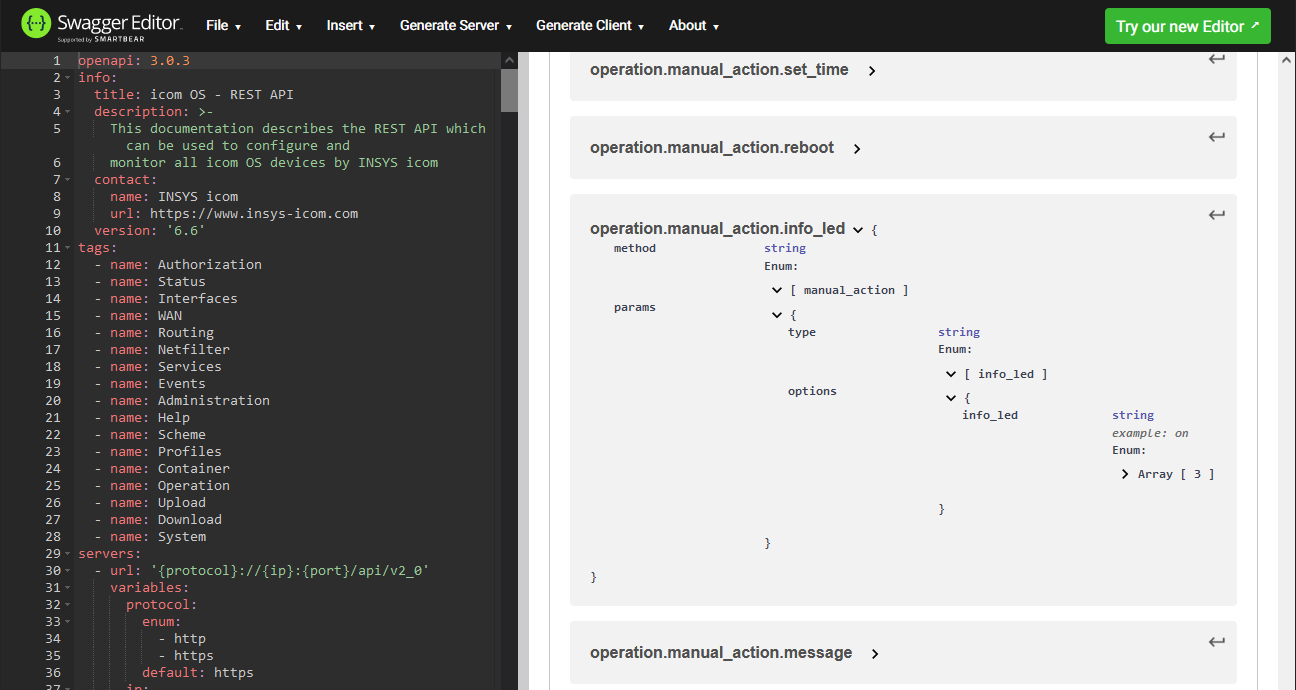
|
3. Further helpful information regarding the REST interface
3.1. The different endpoints of the REST interface
The endpoints help to categorise and organise the different resources of the REST interface. Different endpoints are available for the access to the resources of the API.
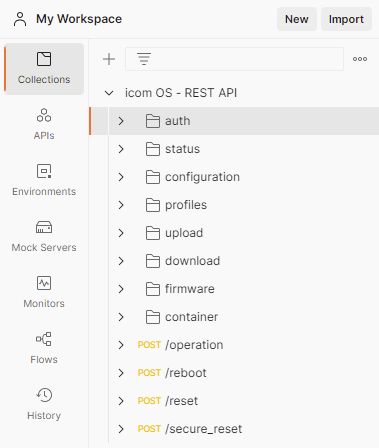
3.1.1. Endpoint auth
The auth endpoint is used to access the resources for authorisation on the REST interface. This is done using POST requests. These are for example:
-
/auth/login for requesting the authentication tokens
-
/auth/refresh for requesting the refresh tokens for renewing the authentication
-
/auth/logout for requesting the revocation of the authentication (logout)
3.1.2. Endpoint status
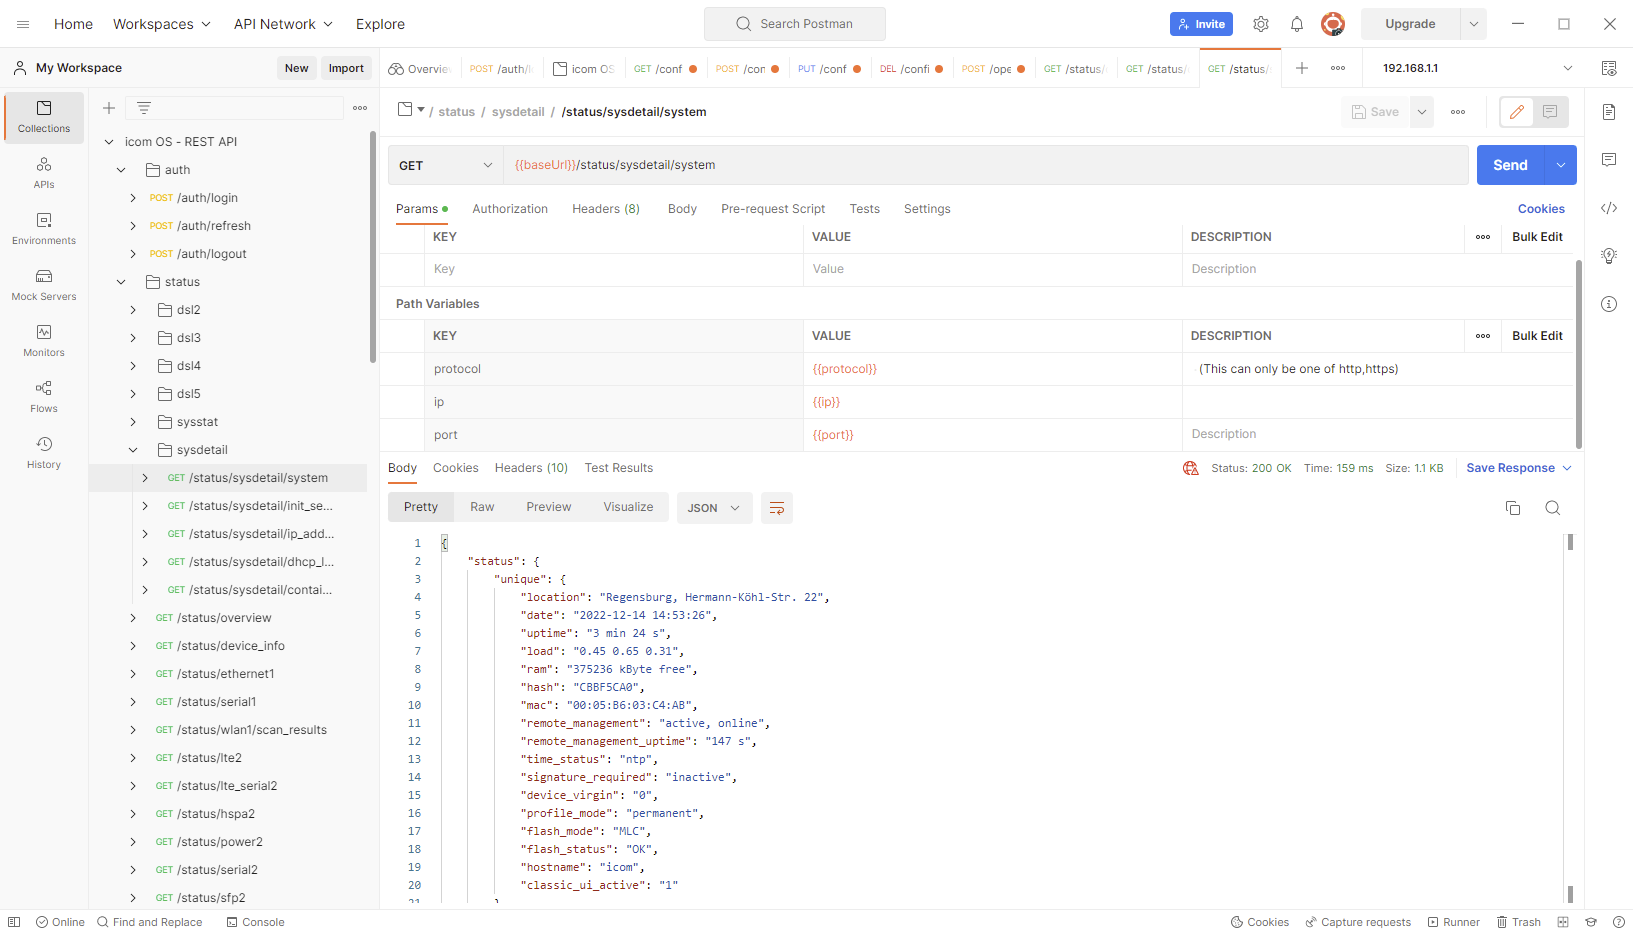
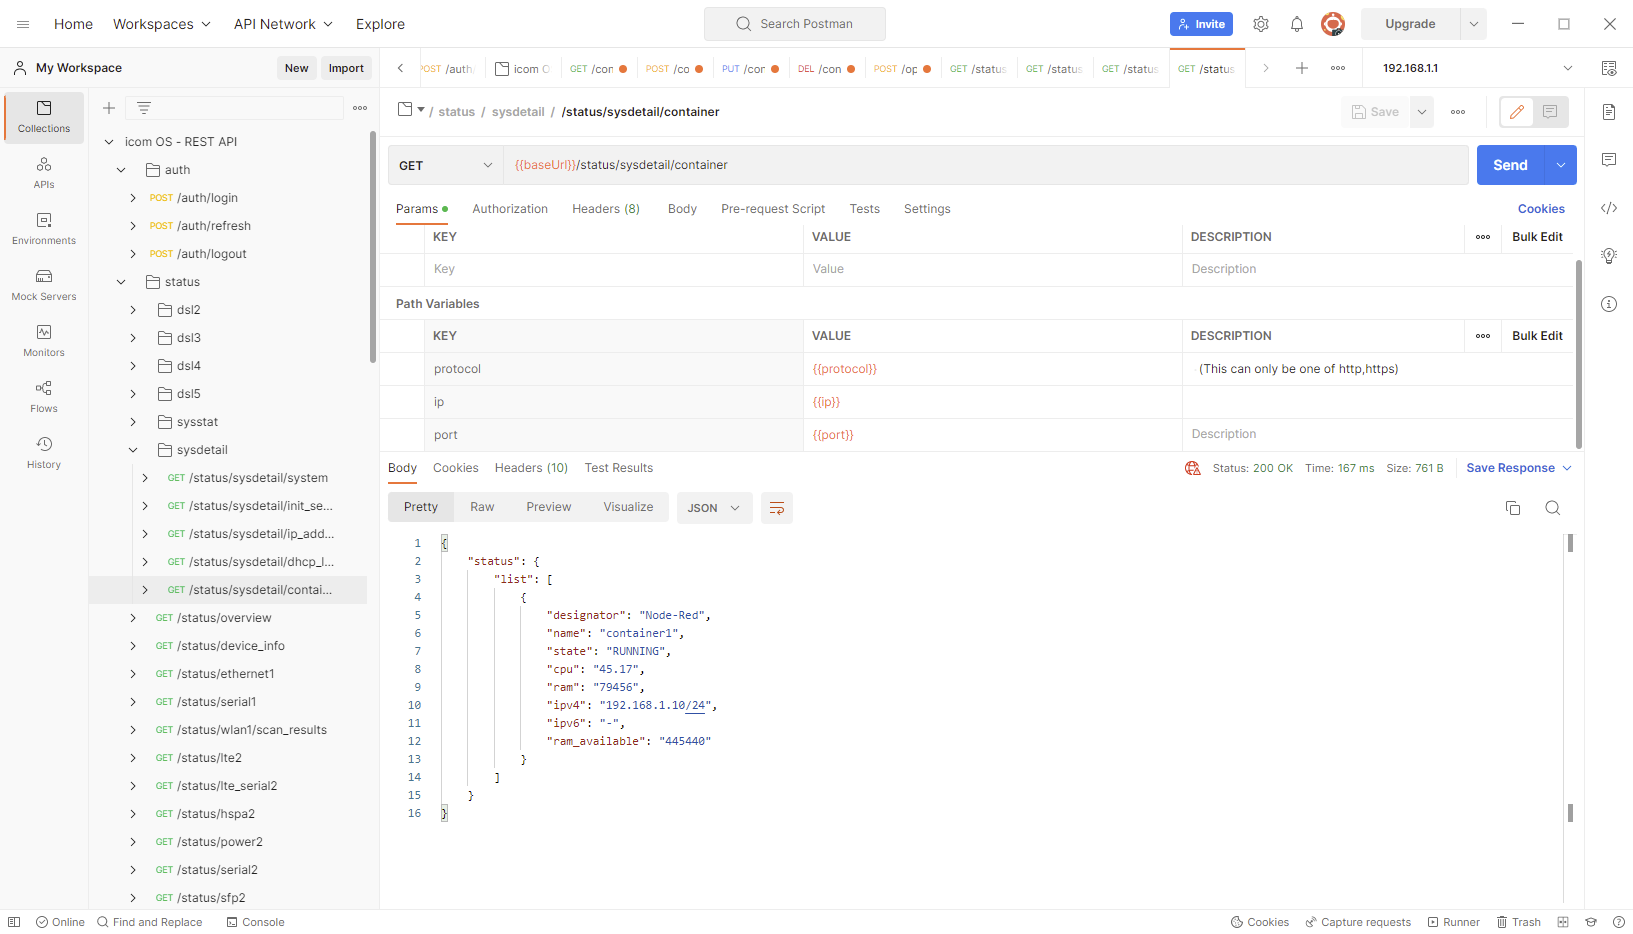
The status endpoint is used to access the resources for querying the status values of the router. This is done using GET requests. These are for example:
-
/status/device_info for requesting an overview of the the device information of the router
-
/status/sysdetail/system for requesting an overview of the system details of the router
-
/status/sysdetail/container for requesting an overview of the containers running on the router
3.1.3. Endpoint configuration
The configuration endpoint is used to access the resources for changing the parameters for the configuration of the router. This is done using the requests:
-
GET - querying parameters
-
PUT - setting parameters
-
POST - changing parameters
-
DEL - deleting parameters
These are for example:
-
/configuration/wan/wans for configuring the WAN chains
-
/configuration/netfilter/ip_filter for configuring the firewall
-
/configuration/administration/cli for configuring the access to the CLI
3.1.4. Endpoint profiles
The profiles endpoint is used to access the resources for handling the profiles of the router. This is done using the requests:
-
GET - querying profiles
-
PUT - activating and renaming profiles as well as setting the profile mode or storing the running profile in permanent profile mode
-
POST - changing profiles
-
DEL - deleting profiles
These are for example:
-
/profiles for requesting a profile overview or adding or deleting profiles
-
/profiles/activate for requesting an activation of a profile
-
/profiles/profile_mode for requesting the change of the profile mode
3.1.5. Endpoint upload
The upload endpoint is used to access resources for uploading, analysing and applying files to/on the router. This is done using POST requests. These are for example:
-
/upload/analyze for uploading file and requesting the analysis of the uploaded file
-
/upload/reanalyze for requesting the analysis of an uploaded file
-
/upload/perform for requesting the application of an uploaded file
3.1.6. Endpoint download
The download endpoint is used to access resources for downloading files on the router. This is done using GET requests. These are for example:
-
/download/log for downloading log files on the router
-
/download/certificates/public_keys for downloading public keys on the router
3.1.7. Endpoint firmware
The firmware endpoint is used to access the resource for handling Firmware files. This is done using the requests:
-
GET - querying firmware files on the router
-
PUT - uploading firmware files to the router
-
DEL - deleting firmware files on the router
This is for example:
-
/firmware for querying, uploading or deleting firmware files
3.1.8. Endpoint container
The container endpoint is used to access the resources for handling containers on the router. This is done using the requests:
-
GET - querying containers
-
PUT - activating containers
-
POST - changing containers
-
DEL - deleting containers
These are for example:
-
/container/container for querying, activating, changing and deleting containers
-
/container/licenses for querying and deleting licences for containers
3.1.9. Endpoint operation
The operation endpoint is used to access the resource for executing manual actions on the router. This is done using POST requests. This is for example:
-
/operation for executing manual actions
3.1.10. Endpoint reboot
The reboot endpoint is used to access the resource for executing a restart of the router. This is done using POST requests. This is for example:
-
/reboot for restarting the router
3.1.11. Endpoint reset
The reset endpoint is used to access the resource for executing a reset of the router. This is done using POST requests. This is for example:
-
/reset for resetting selected data of the router to default settings
3.1.12. Endpoint secure_reset
The secure_reset endpoint is used to access the resource for executing a secure deletion of all data on the router. This is done using POST requests. This is for example:
-
/secure_reset for a secure deletion of all data on the router
3.2. The different operations of the REST interface (manual actions)
Manual actions can be executed via the REST interface using an operation.
Depending on the router, a variety of manual actions are available, such as setting an output, executing a restart or sending a message.
An overview of the available manual actions is available, if you open the documentation of the REST API (as described in the downloading the REST API documentation section) in a browser.
The components → schemas section contains under operation all manual actions that can be executed via the REST interface (but not all of these actions are available on each router).
 You can also determine here the parameters required for each action and their possible values, which must be submitted in the request body of the corresponding POST command in JSON format in order to execute the manual action.
 The POST command to the /api/v2_0/operation endpoint and following request body toggles output 3.1 of the router for example.
{
    "method" : "manual_action",
    "params" : {
        "type" : "output",
        "options" : {
            "output" : "3.1",
            "change" : "toggle"
        }
    }
}
Only the status code 201 Created will be returned as response. There is no return in the form of a payload.
3.3. Exemplary use cases
3.3.1. Installing a single certificate from a certificate file
Certificate files often contain several files, e.g. a certificate, a private key and a CA certificate. Proceed as follows to upload only the certificate to the router, for example.
-
Upload the file using a POST command to the /api/v2_0/upload/analyze endpoint. The file is stored in a temporary directory and then analysed. The content of the file is returned in the response body:
{
    "filename": "openvpnclient1.p12",
    "identifier": "419781432b",
    "content": [
        {
            "entry": 0,
            "name": "Certificate",
            "type": "Cert - Certificate",
            "valid": true
        },
        {
            "entry": 1,
            "name": "CA Certificate",
            "type": "Cert - CA Certificate",
            "valid": true
        },
        {
            "entry": 2,
            "name": "Private Key",
            "type": "Cert - Private Key",
            "valid": true
        }
    ]
}
Here, you see that the file contains three entries, a certificate (0), a CA certificate (1) and a private key (2). The operation is uniquely identified by the identifier. The CA certificate 1 of the operation 419781432b is now to be stored in the profile Profile_1.
-
Use a POST command to the /api/v2_0/upload/perform endpoint with the request body:
{
    "identifier": "419781432b",
    "entries": [
        {
            "entry": 1,
            "action": "store"
        }
    ],
    "profile": "Profile_1"
}
The response body contains the name, under which the CA certificate has been stored in this profile:
{
    "filename": "openvpnclient1.p12",
    "identifier": "ba6b89c535",
    "content": [
        {
            "entry": 1,
            "name": "ca_cert1",
            "type": "Cert - CA Certificate",
            "result": "done"
        }
    ]
}
4. Troubleshooting
-
If the device responds to a command with 401 Unauthorized, the validity period of the token has expired or an incorrect token has been entered.
-
In case of problems with the cURL syntax, it might be helpful to use the option
-k(verbose) to facilitate troubleshooting. -
If an error related to an untrusted certificate chain is indicated when executing a cURL command copied from the Swagger editor, it is possible that the cURL option
-kwas forgotten to be appended to the command, which prevents verification of the certificate. -
Depending on the operating system, it may not be possible to process the cURL command generated in the Swagger editor directly in the terminal. Then it needs to be modified as follows:
-
Copy command to text editor
-
Remove apostrophes around the cURL command (e.g. GET)
-
Replace apostrophes around the parameters with quotes
-
Remove line breaks
-
Remove unnecessary blanks
-
Remove unnecessary backslashes (\)
-
-
If Swagger responds to the execution of a command with Failed to fetch, the browser is probably preventing communication with the router because it classifies it as insecure. To resolve this, enter the URL of the router (192.168.1.1) in the address bar of the browser and then click on Advanced and Continue to 192.168.1.1 (insecure) (browser-dependent) on the page informing about the insecure connection in order to store an exception for the router in the browser.
Back to the Configuration Guides for icom OS routers
Back to overview