INSYS routers with icom OS provide an integrated Linux environment that is able to virtualise own, independent systems using Linux containers (LXC).
The description in this Configuration Guide follows a configuration in the new user interface (web interface) available from icom OS 5.5. Update your router to the latest version of icom OS for the required functionality of the new user interface. The description of this configuration in the classic web interface is available in this Configuration Guide.
Situation
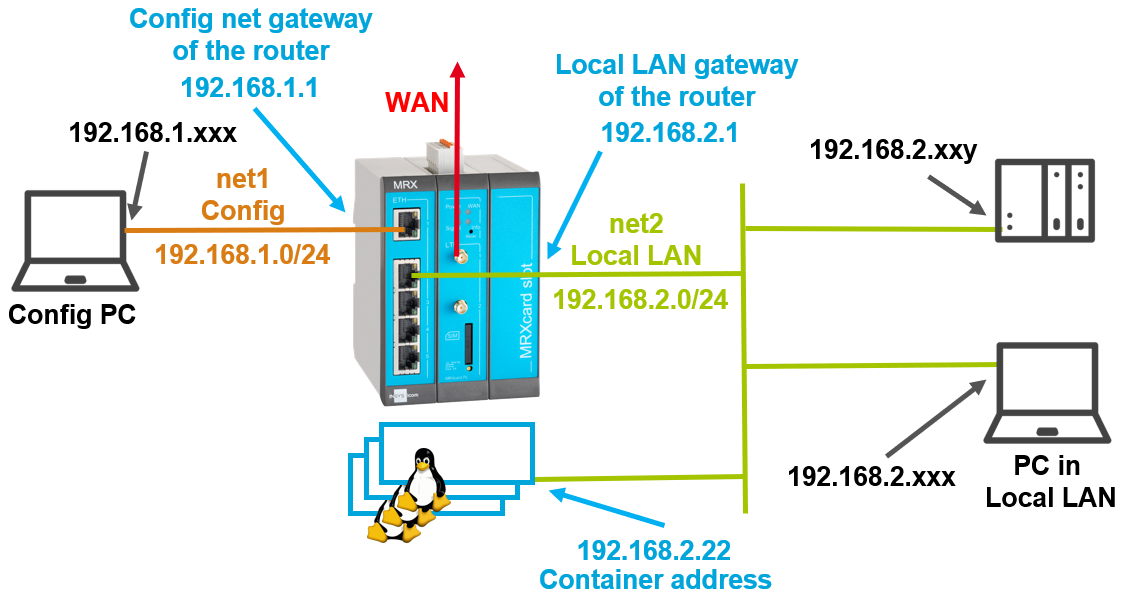
A container with a Debian Linux distribution is to be installed on an INSYS router. The container shall run in the local network (Local LAN) like an independent Linux PC.
You may proceed in a similar manner for the installation of other exemplary containers from INSYS icom. For information about your options for creating own containers, refer to our Edge Computing page. You can download sample containers and find more information about them on our Container page.
Solution
An INSYS router forms the central element of a network. The router will be configured via a PC in a separate configuration network (Config). The router has been configured using the startup wizard such that it is able to act as a WAN (Internet) gateway for a local network (Local LAN). Several system components are located in this local network including a PC. Now, a Linux container (LCX) will be created in the router that runs a Debian Linux distribution. This container shall act like an independent computer in the local network, be accessible and have access to the WAN.
Router configuration
It is recommended to commission the router as suggested in the Quick Installation Guide. Different settings of the router may result in necessary adjustments of the settings described in the following.
It is prerequisite that you have access to the user interface of the router and the container file is stored on your computer.
-
Open the Container page and download the Debian container to your computer.
-
Open the user interface of the router in a browser: https://insys.icom [1]
-
Click in the
 Container → Container menu on
  and upload above downloaded container to the router.

-
Click on SUBMIT .
-
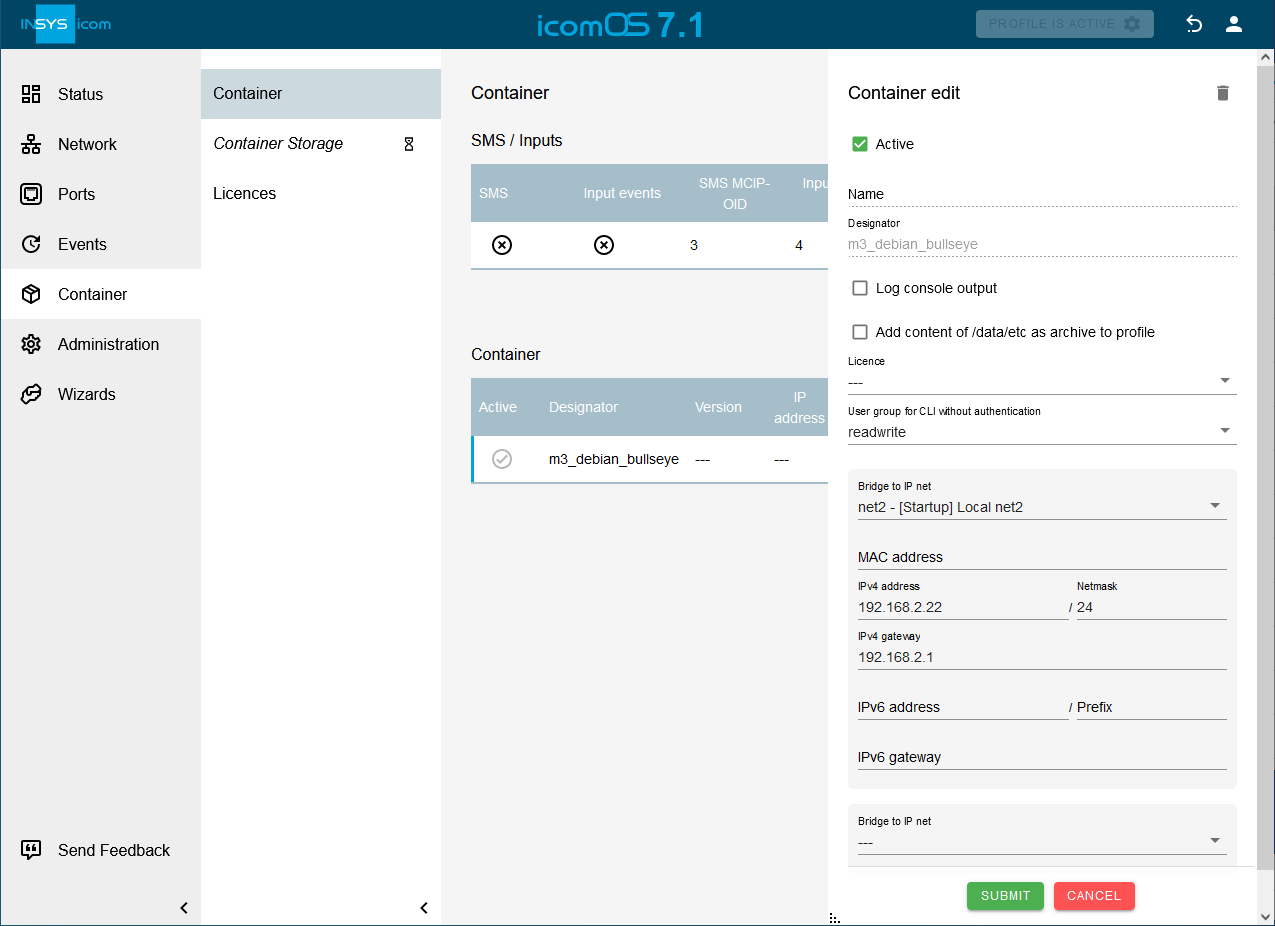
Click in the
Container → Container menu in the Container section in the row of the Debian container on  and configure the container:
 -
Click on SUBMIT .
-
Click on ACTIVATE PROFILE
 .
.
You have crated the Debian container with this.
Container configuration
For the configuration of the application in the container, it is necessary to change to a computer that is in the same local network as the container (not in the configuration network any more). The container is active and accessible directly after configuration and activation of the profile.
A terminal program like PuTTY for example is necessary for access to the container.
-
Establish an SSH connection to the container using a terminal program.
-
IP address: 192.168.2.22
-
Port: 22
-
Login: root
-
Password: root
-
login as: root
root@192.168.2.22's password:
Linux container1 4.4.41 #2 Thu Jan 12 11:18:38 CET 2017 armv7l
#######################################################
#                                                     #
#        Welcome to the Debian container!             #
#        --------------------------------             #
#                                                     #
#    Please change the root password now:             #
#        # passwd                                     #
#                                                     #
#    Read the introduction for the next steps:        #
#        # cat readme.txt                             #
#                                                     #
#######################################################

root@container1:~#
-
Change the root password to protect access to the container:
root@container1:~# passwd -
Read the file readme.txt in the container:
root@container1:~# cat readme.txt -
[Optional] If required, configure the DNS server in the file resolv.conf in the /etc directory:
root@container1:~# nano /etc/resolv.conf[4]
Change the IP address in the "nameserver" command to the IP address of your DNS server for this. This is usually also the IP address of the router in the local network.
Testing the application in the container
After the connection to the container has been established successfully, the connection of the application in the container to the Internet can be checked.
-
Check the WAN connection to the Internet by updating the Linux environment:
root@container1:~# apt-get update
A standard Debian Linux distribution is now running in the container. Refer to the developer’s website or many other websites and projects around this distribution for further support and information.
Back to the Configuration Guides for containers
Back to the Configuration Guides for icom OS routers
Back to overview