All communication of an application requires a filter rule to avoid that it will be blocked by the firewall.
A filter rule must be added for this that permits only this data traffic as precise as possible. The communication parameters must be known for this.
There are three different types of filter rules that are determined by the packet direction.
-
FORWARD: Data packets that are forwarded by the router. This is the case for example, if a locally connected device sends data to the Internet.
-
INPUT: Data packets that are directed to the router itself. This is the case for example, if the web interface of the router is accessed or the DHCP or VPN server of the router is contacted.
-
OUTPUT: Data packets that are generated by the router. This is the case for example, if the router makes NTP or DNS requests or initiates a tunnel.
Add FORWARD filter rule
-
Click in the
 Network → Firewall / NAT menu in the IP-Filter section on
  and add a new filter rule:
 -
Select the Packet direction FORWARD.
-
Select the IP version that is used for the transmission of the data packets.
-
Select the used Protocol. If All is selected, all protocols are permitted - this shall be avoided due to reasons of IT security.
-
Select under Input interface only the interface(s) over which the data packets are permitted to be forwarded to the router.
-
Select under Output interface only the interface(s) over which the data packets are permitted to leave the router.
-
Enter under Source IP address the address, from which data packets are not to be blocked by the firewall. The netmask in CIDR format specifies the address range of the address. If no address is specified, data traffic from all sources is permitted - this shall be avoided due to reasons of IT security.
-
Enter under Source port the port or port range, from which data packets are not to be blocked by the firewall. The specification of a port is only possible for certain protocols. If no port is specified here, data traffic from all ports of the source address is address permitted - this shall be avoided due to reasons of IT security. However, many applications assign the source port dynamically which does not allow to restrict to a certain port or only to a port range.
-
Enter under Destination IP address the address to which data packets must be directed that they will not be blocked by the firewall. The netmask in CIDR format specifies the address range of the address. If no address is specified, data traffic to all addresses is permitted - this shall be avoided due to reasons of IT security.
-
Enter under Destination port the port or port range to which data packets must be directed that they will not be blocked by the firewall. The specification of a port is only possible for certain protocols. If no port is specified here, data traffic to all ports of the destination address is permitted - this shall be avoided due to reasons of IT security.
-
Click on SUBMIT .
-
Click on ACTIVATE PROFILE
 .
.
Add INPUT filter rule
-
Click in the
Network → Firewall / NAT menu in the IP-Filter section on and add a new filter rule: -
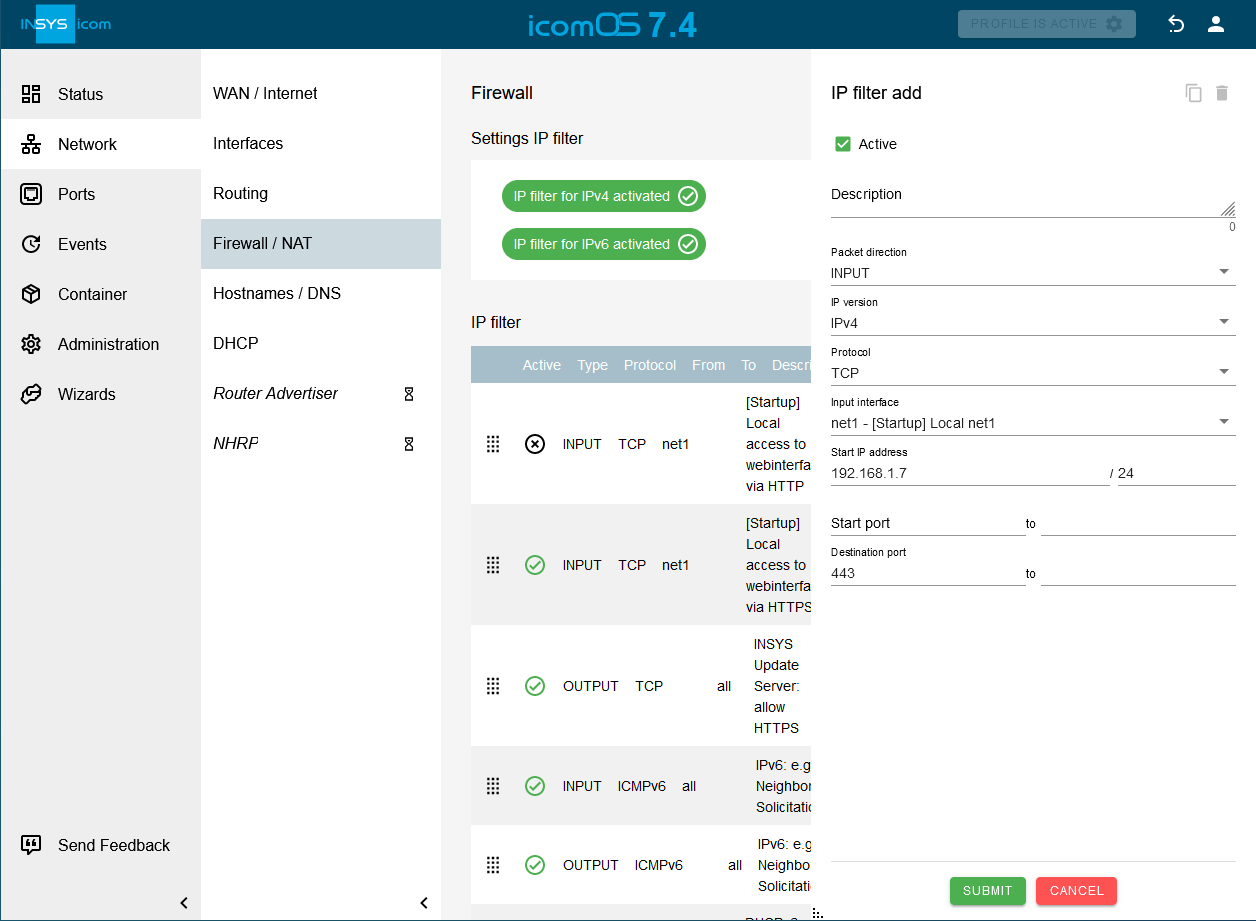
Select the Packet direction INPUT.
-
Select the IP version that is used for the transmission of the data packets.
-
Select the used Protocol. If All is selected, all protocols are permitted - this shall be avoided due to reasons of IT security.
-
Select under Input interface only the interface(s) over which the data packets are permitted to be forwarded to the router.
-
Enter under Source IP address the address, from which data packets are not to be blocked by the firewall. The netmask in CIDR format specifies the address range of the address. If no address is specified, data traffic from all sources is permitted - this shall be avoided due to reasons of IT security.
-
Enter under Source port the port or port range, from which data packets are not to be blocked by the firewall. The specification of a port is only possible for certain protocols. If no port is specified here, data traffic from all ports of the source address is address permitted - this shall be avoided due to reasons of IT security. However, many applications assign the source port dynamically which does not allow to restrict to a certain port or only to a port range.
-
Enter under Destination port the port or port range to which data packets must be directed that they will not be blocked by the firewall. The specification of a port is only possible for certain protocols. If no port is specified here, data traffic to all ports of the destination address is permitted - this shall be avoided due to reasons of IT security.
-
Click on SUBMIT .
-
Click on ACTIVATE PROFILE
.
Add OUTPUT filter rule
-
Click in the
Network → Firewall / NAT menu in the IP-Filter section on and add a new filter rule: -
Select the Packet direction OUTPUT.
-
Select the IP version that is used for the transmission of the data packets.
-
Select the used Protocol. If All is selected, all protocols are permitted - this shall be avoided due to reasons of IT security.
-
Select under Output interface only the interface(s) over which the data packets are permitted to leave the router.
-
Enter under Source port the port or port range, from which data packets are not to be blocked by the firewall. The specification of a port is only possible for certain protocols. If no port is specified here, data traffic from all ports of the source address is address permitted - this shall be avoided due to reasons of IT security. However, many applications assign the source port dynamically which does not allow to restrict to a certain port or only to a port range.
-
Enter under Destination IP address the address to which data packets must be directed that they will not be blocked by the firewall. The netmask in CIDR format specifies the address range of the address. If no address is specified, data traffic to all addresses is permitted - this shall be avoided due to reasons of IT security.
-
Enter under Destination port the port or port range to which data packets must be directed that they will not be blocked by the firewall. The specification of a port is only possible for certain protocols. If no port is specified here, data traffic to all ports of the destination address is permitted - this shall be avoided due to reasons of IT security.
-
Click on SUBMIT .
-
Click on ACTIVATE PROFILE
.
An INPUT filter rule for HTTPS access to the web interface via IPv4 and TCP protocol via the interface net1 at the router from source address 192.168.1.7 to destination port 443 has been added in the following example.